What is the Better Course Building Plugin for 2021?

[ad_1] Selling online courses is one of the best ways to monetize your WordPress site. In this guide to LearnDash vs LifterLMS, I’ll compare two of the top course building plugins to determine the best one based on three criteria: By the end of this article, you should know whether LearnDash or LifterLMS is the better plugin for you. Table of Contents What to look for in a course building plugin Course building plugins, also known as Learning Management Systems (LMSs), must be flexible to accommodate a variety of course types and business models. Pay special attention to the following features: Visual course builder. You shouldn’t need to know how to code to build your courses. Most LMSs accomplish this using a combination of WordPress technology and drag-and-drop visual editors. Quiz builder. Most LMSs offer some kind of quiz editor, but the quality of these builders varies greatly from one plugin to the next. If quizzes are an important part of your courses, pay special attention to the options for question types and grading. Content dripping. This is the option to stagger the release of lessons. For example, you might want to set lessons to release every Monday, giving students a full week to work through them. Certification. Some LMSs allow you to offer completion certificates to students. They may also let you offer badges for students who complete certain sections of a course. Community. Most course building plugins allow for some interaction with lessons in the form of comments. Others may offer advanced community options like forums. Membership programs. Some course building plugins let you create membership programs for your courses. This is a great way to build a recurring income from your content. LearnDash review Features The following features are available with the Basic package from LearnDash: One site license Unlimited course creation Unlimited students Course content protection Content dripping Advanced quiz builder Certificates & badges Email notifications Free integrations Demo site template You can find out more by checking out the LearnDash pricing page. How to use LearnDash Setting up LearnDash You can get started with LearnDash by purchasing one of their plans. You’ll be asked for some basic information, then directed to a page where you can download your plugin. The plugin will download as a ZIP folder. You can install this in the “Plugins > Add New” area of your WordPress dashboard. Once the plugin is activated, you’ll be asked to enter your API key. This can be found on your purchase confirmation page or in the receipt sent to your email address. Once you’ve registered your plugin, you’ll be directed to the LearnDash bootcamp. This is a great resource and one of the first significant factors to consider in the debate of LearnDash vs LifterLMS. Creating lessons with LearnDash The next step of the process is to create a course. In LearnDash, this is best done by building your lessons and quizzes first, then compile them into a course with the course builder. To get started, head to the “Lessons” area of LearnDash and click the “Add New” button at the top of the page. This will open the LearnDash lesson editor, which looks a lot like the regular WordPress block editor. You can use this editor to format the lesson the same way you would format an ordinary page or article. This allows you to use a mix of media in your lessons, including video, text, and images. When you’re satisfied with the lesson’s content, click the “Settings” link at the top of the editor. You’ll be taken to an area where you can customize permissions, add support materials, enable assignment uploads, and more. You can save these settings at any time by clicking the “Publish” button in the top right corner. Creating a quiz with LearnDash The next part of LearnDash to explore is the quiz builder. You can access this by going to the “Quizzes” area of LearnDash and clicking the “Add New” button at the top of the page. This will take you to a page where you can enter the title and description of your quiz. Like the lesson editor, this part of the quiz builder uses WordPress technology to allow for the use of multimedia and customized formatting. Click on “Builder” to open the area where you can create, edit, and change the order of questions. Press the “+ New Question” link to open a question box. This is where you can add your question and answer. You can also choose how many points each question is worth. The quiz builder is one of the most notable things to consider in the debate of LearnDash vs LifterLMS. With LearnDash you can enter a variety of question types, including multiple choice, single choice, and essay answer. Once you’ve created all of your questions, click the “Settings” link at the top of the page. This will take you to an area where you can modify who can access the course, set prerequisite content, create a time limit, and more. Creating a course with LearnDash Once your content is created, it’s time to compile everything into a course. To do this, go to the “Courses” area of LearnDash and click the “Add New” button near the top of the screen. This will open a page where you can title your course and create a description for it. Like the quiz and lesson descriptions, this page uses WordPress technology to allow for multimedia content and the use of HTML/CSS. Next, click the “Builder” link at the top of the page. This will take you to the curriculum area of your course, where you can add, edit, and remove lessons and quizzes. The builder uses drag-and-drop functionality so you can reorder content at any time. When you’ve built the course, you can move on to the “Settings” area. This is where you can set course prerequisites, modify permissions, enable certification, and more. Getting paid with LearnDash LearnDash offers payment through PayPal. You

Continue reading

A Progress Bar Block Plugin Done Right by the Tiles Team – WordPress Tavern

[ad_1] 
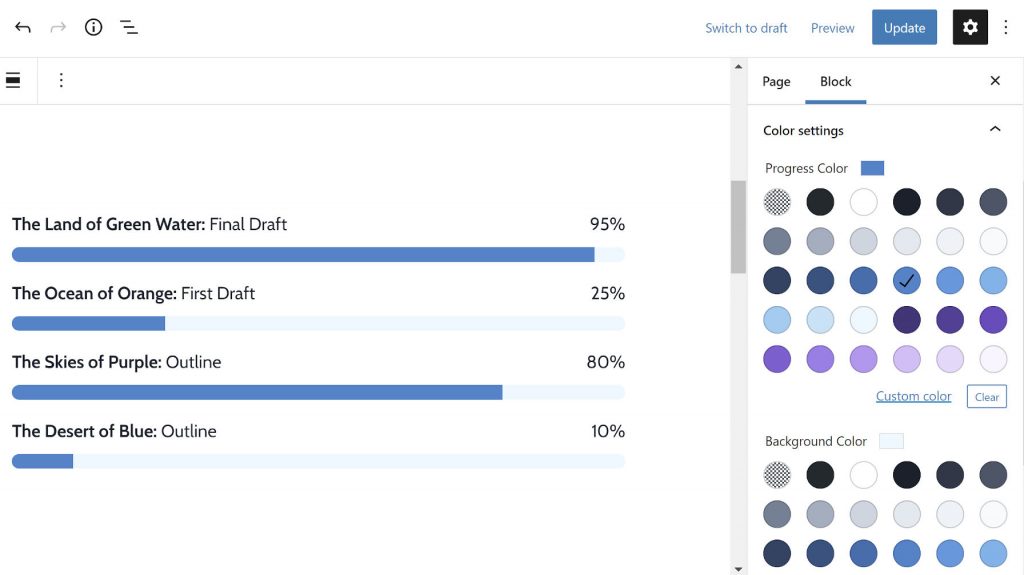
I have been on the hunt for a decent progress bar solution for a while now. Most of them are bundled in large block libraries, requiring me to install another 20 or 30 blocks in which I have no need. Others seem to miss the mark entirely with odd configurations and block options. Some of the remaining plugins still use shortcodes and widgets, but it is 2021. I am looking for a block. A couple of days ago, the Tiles Progress Block landed in the directory. It seems to be a smaller piece of a larger project named Tiles. I have been keeping an eye on the team’s work since its initial design and patterns framework plugin launched last week. That project is still in beta, and only time will tell if it becomes a competitive project in the block space. However, the team’s new progress bar block was just what I was looking for. Other than one bug, which I reported to the developer, I found no serious issues. The plugin does what it says on the tin. It registers a Progress Bar block: Small and Large progress bars with default colors. Out of the box, it includes Small and Large styles, allowing the user to adjust the size of the bar. Its strength is that — I cannot stress this enough — the block’s content is editable within the editor canvas area. This includes the label and percentage. This is a refreshing change from the many others that require users to jump back into the block options sidebar to change simple text. Because the block uses Rich Text fields for its label and percentage, end-users can use inline formatting tools like bold, italic, and more. The block also uses the standard typography and color palette controls from core WordPress. This provides access to the theme’s font sizes and colors. Adding custom labels, percentages, and colors. Plus, users can choose wide and full-width layouts, an often overlooked feature in block plugins. Overall, I am digging this block plugin. If I had one feature request, it would be to add a border-radius option. By default, the progress bar is rounded, but some users might prefer squared corners. Extending the Block In theme previews, I almost always see progress bars showcased alongside how much PHP, HTML, and JavaScript the demo’s faux developer has learned. It is rarely a real-world representation of progress bars. How do you quantify how much of a coding language you have mastered? I have been doing this for nearly two decades and cannot answer that. Progress bars should be of measurable things. For example, steps someone has taken in an online learning course, percentage of total donations received, and any number of things that can be counted are far more realistic. My favorite use of progress bars also happens to be on my favorite novelist’s website. I like to keep an eye on Brandon Sanderson’s work, looking forward to getting my next literary fix (yes, I am a fanboy). Brandon Sanderson’s writing progress. Currently, Tiles Progress Block does not handle that exact layout. However, because it is built on the block system and does not do anything out of the ordinary, theme authors can change that with custom styles. And that is just what I did. My Sanderson-esque book progress bars (rough, unpolished code available as a Gist): Progress bars with custom block style. The thing I love about the block system is that themers can extend blocks in this way. There is no needless checking for active plugins, loading additional per-plugin stylesheets, or figuring out each plugin’s unique system. If a block is coded to the current standards, theme authors merely need to hook in with their own styles. Users can then select those styles via the editor and even make them the default. I want to see more of this from the block plugin ecosystem. Like this: Like Loading… [ad_2] Source link

Continue reading

LifterLMS Review: The Best WordPress LMS Plugin? (2021)

[ad_1] If you’re searching for the best WordPress LMS plugin, you’ve probably come across the name LifterLMS. LifterLMS is one of the more popular options if you want to create an online course with WordPress, thanks in part to releasing the core plugin for free at WordPress.org, where it has a 4.7-star rating and is active on over 10,000 WordPress websites. But is it the right plugin for your course? In our detailed LifterLMS review, we’ll help you decide whether you should use LifterLMS or go with one of the many other WordPress LMS plugins out there. Here’s how we’ll divide our 2021 LifterLMS review: Let’s get started! 🧰 LifterLMS Features To start, we’ll quickly go over the many features that LifterLMS offers. Course features: Drag-and-drop course builder. Multimedia lessons – support for video, audio, text, and image-based lessons. Assignments. Quizzes – with lots of different question types. Gradebooks to show progress, quiz scores, and more. Course prerequisites. Course tracks – e.g. offer a certification when people complete multiple courses in any order. Support for multiple instructors. Course discussion areas. Membership features: Content restriction. Content dripping. Offer sitewide memberships instead of selling single-course access. Special members-only pricing on courses. Payment features: Sell courses for one-time or recurring payments (or make them free). Dedicated payment integrations with Stripe, PayPal, or Authorize.net. There’s also a WooCommerce integration that lets you use any of WooCommerce’s gateways. Payment plans (let people spread payments over time). Coupons. Bulk sales to sell access to groups. Affiliate network integrations. Course bundles. Private coaching upsells, along with bundling private coaching and course content. Social learning features: Course achievements to gamify your courses. Course certificates upon completion. Social learning to create course communities. Connect with learners using customizable emails or text messages. Integrations: Email marketing support for WP Fusion, ConvertKit, or Mailchimp. Direct integrations for popular WordPress form plugins – Gravity Forms, WPForms, Ninja Forms, and Formidable Forms. Zapier integration to connect to the thousands of apps on Zapier. Now, let’s get into the hands-on section of our review… 👷 LifterLMS Course Builder Creating an online course can be time-consuming because you need to set up a lot of different pieces of content and organize everything into a logical structure. To help make this as painless as possible, LifterLMS comes with a drag-and-drop course builder that lets you easily set up the overall structure for your course and then dig into more detailed sections when needed. Creating a Course When you first set up a course, you’ll see the native WordPress block editor, which is where you can set up the course overview content and basic settings. This is not the actual course builder. At the top, you just have the regular block editor, along with some special LifterLMS blocks. And below that, you have the Course Options meta box, which lets you set up basic details like: Estimated completion time. Prerequisites. A featured video. Scheduling. Maximum capacity. Etc. This is also where you can set up payment options, but I’ll cover those in a separate section. Once you’re ready to set up course content, you can click the Launch Course Builder button in the bottom-right corner. Using the Drag-and-Drop Course Builder To organize your courses, you get two levels of content: Lessons – the actual content of your course. Sections – these organize lessons into different categories/units. In the course builder, you can use the buttons and drag-and-drop to create the high-level structure of your course using lessons and sections. Here, you can see the basic structure of a course: You also have the option to compress the lessons under a section, which makes it easier to focus on a specific part of your course. You can see that each lesson has a set of icons beneath it (as well as a different set of icons when you hover over it). These icons let you quickly view/edit a lesson’s content. Some icons will quickly show whether a lesson has certain content attached to it, like video or audio. Other icons let you add a new quiz or assignment or open the lesson’s content editor in a new tab. You can edit basic lesson settings by clicking the icon to open a slide-out. However, you’ll need to open the full lesson editor to add text content: Adding Lesson Content The lesson content editor gives you access to the native block editor to add text/image content, as well as a Lesson Settings box that lets you attach a video or audio file and control other lesson settings. For example, if you’re creating a video course, you can add the video to the Video Embed URL box and then add some companion text using the content editor: The Lesson Settings box also lets you control prerequisites, a content dripping schedule, and some other settings. In the sidebar, you can also see where a lesson fits in the course and quickly jump back to the full course builder. Creating Quizzes To add a quiz, you can work from inside the drag-and-drop course builder by clicking the icon for the lesson to which you want to attach a quiz. Clicking the icon opens a slide-out where you can set up your quiz (or add an assignment): There, you can set up basic details like the passing grade, time limits, attempt limits, and more.  Then, you can start adding questions using a variety of different question types. You get the Basic Questions with the free version but you need the Advanced Quizzing add-on to access the Advanced Questions: And that’s a quick look at what it’s like to create quiz content with LifterLMS. 💳 LifterLMS Payment Options If you’re like many people, you’re probably creating online courses with the goal of monetizing your courses and earning money. Here’s how LifterLMS helps you do that… Charging for Course Access To charge for access to your course, LifterLMS lets you create Access Plans when you edit a course’s settings. When you create an access plan,

Continue reading

Original Dark Mode Developer Relaunches Plugin After the Apparent ‘Cash Grab’ of the New Owners – WordPress Tavern

[ad_1] WordPress dashboard screen with Dark Mode 2. Daniel James, the original Dark Mode WordPress plugin creator, is stepping back into WordPress development after a two-year pursuit of other projects. His new plugin: Dark Mode 2. It is a response to the recent change to the original Dark Mode plugin for WordPress. Last month, I reported that the WPPool repurposed the plugin to include the commercial Iceberg editor, a feature entirely unrelated to providing a dark viewing mode for the WordPress admin. It is now called WP Markdown Editor. After the change, several plugin users left one-star ratings. However, its user base was small compared to that of ProfilePress (formerly WP User Avatar), which continues getting drenched in low ratings. Still, the change did not sit well with James. “After finding out that Dark Mode had been passed on to multiple people, I was disappointed to see so many people say they’d take it on without actually bothering to do anything with it,” said James. “It became even more disappointing when I learned the latest developers to have hold of it had ripped out the original functionality in favor of something completely different as a means of selling a product.” The Dark Mode plugin was once a feature proposal for WordPress. James began the process in 2018, but it never moved much beyond the initial stage. In 2019, he put the plugin up for adoption. It changed hands a couple of more times before WPPool became the owner. In hindsight, James said he should have just abandoned the plugin. At the time, he was stepping away from WordPress entirely to pursue other projects, including building applications with the Laravel PHP framework. However, he never stopped using WordPress completely and has kept an eye on the community. “I think there is more things that WordPress.org maintainers could do, specifically the Plugin Review Team,” he said. “I think more checks need to be done when plugins change ownership and/or are updated. As someone who used to put a lot of time into WordPress, I know how demanding it can be, so having volunteers tasked with more work is always a tricky thing to handle.” However, he said he did not have the solution to the problem. “When you take Dark Mode and, more recently, WP User Avatar having their code changed for what appears to be a cash grab, all it does is hurt developers, agencies, and site admins.” The repurposing of his former work was the catalyst that he needed to rebuild a solution from scratch. Now, Dark Mode 2 is on the scene. A New Plugin and a Fresh Take Manage posts screen with Dark Mode enabled. James says Dark Mode 2 is still early in its development lifecycle. However, he does not think it is far off from where the original plugin would be if he would have continued it. Maybe just shy an extra setting or two. “I’ve finally got it to a point where it’s ready to be used and replace the classic Dark Mode plugin,” he said. “The great thing about starting again is that it’s easier to style the WordPress dashboard. There is so much going on in the various wp-admin stylesheets that starting over was the only way. It means it supports the latest version of WordPress and cuts out any outdated styling that was previously there.” The plugin currently only has one setting, which individual users can set via their profile page. It is an option between “Light” and “Dark” viewing modes. Configuring Dark Mode from the user profile screen. There are several features James is eager to work on going forward. One of the most requested from the “classic” Dark Mode days is styling the WordPress editor. At the moment, the plugin steers clear of it. “I’ve always been hesitant to do that because of theme editor styles,” he said. “However, lots of themes tend to style the editors in a very basic fashion, so I’ll be looking at adding in ‘support’ styles for those that want a fully dark dashboard.” One of the other features he is working on is scheduling when Dark Mode is active or inactive. This would primarily work based on a user’s system preferences if they have their OS set up for light or dark mode at different times of the day. “For something that appears to be quite a basic plugin, there’s so much you can do with it,” said James. This time around, the plugin developer is making Dark Mode 2 a commercial-only plugin. He is pricing it at £25 (~$35.28 at today’s exchange rate). This includes lifetime updates with no installation limits. James said he wanted to keep the price low and not have people worry about another renewal fee every year while also still being supported for his effort. “I’m not going to make millions from this plugin, and that’s okay,” he said. “That’s not my goal. My goal is to make a plugin that helps people and makes it easier for them to manage their website. Plus, it’s about time WordPress got a proper Dark Mode!” Like this: Like Loading… [ad_2] Source link

Continue reading

Updating a Publishing Plugin to the Block Editor • WPShout

[ad_1] Helen Hou-Sandí is certainly one of the most important people making (core) WordPress better, and she’s been doing it for years. So I take a pretty keen interest in what she’s working on. So when this post about updating a “legacy” WordPress post-meta post so that it was compatible, I knew I had to read it. And a few months later, I finally did. 🤪 I really appreciated both the article’s style and comprehensiveness. So please give it a read if “modernizing an old plugin for Gutenberg” is somewhere on your to-do list. The article tackles a number of things I’d meant to understand better for years in an approachable way: writing compatible JavaScript and using wp-scripts are the two that leap to mind. Visit helen.blog → [ad_2] Source link

Continue reading

Delicious Brains Acquires Advanced Custom Fields Plugin – WordPress Tavern

[ad_1] Delicious Brains, the company behind WP Migrate DB Pro and SpinupWP, has acquired the Advanced Custom Fields (ACF) plugin from its creator, Elliot Condon. After 10 years, the plugin has more than 1 million active installs and a thriving business based on the Pro version. It has become an indispensable part of the workflow for thousands of WordPress developers around the globe. The plugin allows developers to easily customize WordPress edit screens and custom field data. In 2019, the Pro version introduced ACF Blocks, a PHP-based framework for developing custom blocks. This came as a great relief to many developers who did not know how they were going to keep pace with learning the JavaScript required to use WordPress’ Block API. General reaction to the news was positive, as ACF fits in neatly with Delicious Brains’ suite of well-maintained developer products. The company’s founders also possess a genuine appreciation of ACF and its importance to the WordPress developer community. “I don’t think WordPress would be where it is today without ACF,” Brad Touesnard said on a recent episode of the Delicious Brain Waves podcast. Condon cited the scale of the project and “technology complexity and user expectation” as factors in his decision to sell ACF. As a one-person team, he was unable to keep up with the growth of ACF over the years. “Stepping away from ACF has not been an easy decision to make,” Condon said. “The reasoning behind it comes from a place of humility. As the number of installs have grown from thousands to millions, the needs of the product have outgrown my ability to develop solutions. The last thing I want to do to this amazing community is unintentionally hold back the project, so something needed to change.” Delicious Brains’ announcement stated that the company will be reviewing Condon’s roadmap for the product in hopes of fulfilling his vision moving forward. “Two of our greatest strengths that we’ll bring to ACF are design (UI/UX) and developer education,” Touesnard said. “We’ll be focusing our initial efforts in those areas. I have a few UI/UX improvements in mind that would make a huge difference to users. We also see a significant opportunity to produce developer-focused content focused on effectively using ACF in your WordPress projects.” Touesnard also confirmed that Delicious Brains will not be making any drastic changes to ACF or ACF Pro, nor do they plan to adjust the pricing of the product anytime soon. “If we ever decide to update pricing in the future, we won’t force existing customers onto the new pricing,” he said. After the initial announcement, there was some confusion surrounding lifetime licenses that originated from a hasty response to a customer inquiry. Delicious Brains has since updated the post to clarify the company’s commitment to ACF Pro’s lifetime customers. “We are committed to honoring lifetime licenses forever,” Touesnard said. “Lifetime license holders will get all ACF Pro software updates forever.” More information on how the acquisition happened, as well as what customers can expect in the future, is available on the most recent episode of the Delicious Brain Waves podcast. Like this: Like Loading… [ad_2] Source link

Continue reading

Create Per-Post Social Media Images With the Social Image Generator WordPress Plugin – WordPress Tavern

[ad_1] It was a bit of a low-key announcement when Daniel Post introduced Social Image Generator to the world in February via tweet. But, when you get repped by Chris Coyier of CSS-Tricks and the co-founder of WordPress uses your plugin (come on, Matt, set a default image), it means your product is on the right track. I am not easily impressed by every new plugin to fly across my metaphorical desk. I probably install at least a couple dozen every week. Sometimes, I do so because something looks handy on the surface, and I want to see if I can find some use for it. Other times, I think it might be worth sharing with Tavern readers. More often than not, I consider most of them cringeworthy. I have high standards. As I chatted with Post about this new plugin, I was excited enough to call Social Image Generator one of those OMG-where-have-you-been? types of plugins. You will not hear that from me often. Post quit his day job to venture out earlier this year, creating his one-man WordPress agency named Posty Studio. Social Image Generator is its first product. “I kept seeing tutorials on my Twitter feed on how to automatically generate images for your social media posts, but unfortunately, they all used a similar approach (Node.js) that just wasn’t suitable for WordPress,” said Post of the inspiration for the plugin. “This got me thinking: would it be possible to make this for WordPress? I started playing around with image generation in PHP, and when I got my proof of concept working, I realized that this might actually be something I should pursue.” In our chat over Slack, we actually saw the plugin in action. As he shared Coyier’s article from CSS-Tricks, the chatting platform displayed the social image in real-time. Auto-generated image appearing via Slack. Maybe it was fate. Maybe Post knew it would happen and thought it would be a good idea to show off his work as we talked about his project. Either way, it was enough to impress the writer who is unafraid to call your plugin a dumpster fire if he smells smoke. Post seems to be hitting all the right notes with this commercial plugin. It has a slew of features built into version 1.x, which we will get to shortly. It is dead simple to use. It is something nearly any website owner needs, assuming they want to share their content via social networks. And, with a $39/year starting price, it is not an overly expensive product for those on the fence about buying. How the Plugin Works After installing and activating Social Image Generator, users are taken to the plugin’s settings screen. Other than a license key field and a button for clearing the image cache, most users will want to dive straight into the template editor. At the moment, the plugin includes 23 templates. From Twenty Seventeen to Twenty Twenty-One, each of the last four default WordPress themes also has a dedicated template. After selecting one, users can customize the colors for the logo, post title, and more — the amount of customization depends on the chosen template. Browsing the plugin’s templates. Aside from selecting colors, users can choose between various logo and text options. They can also upload a default image for posts without featured images. Editing a template from Social Image Generator. When it comes time to publish, the plugin adds a meta box to the post sidebar. Users can further customize their social image and text on a per-post basis. Social image preview box on the post-editing screen. Once published, the plugin creates an image that will appear when a post is shared on social media. On the whole, there is a ton that anyone can do with the built-in templates. There is also an API for developers to create their own. For a first outing, it is a robust offering. However, there is so much more that can be done to make the plugin more flexible. Version 2.0 and Beyond Thus far, Post said he has received tons of positive feedback along with feature requests. Primarily, users are asking for more customization options and the ability to create and use multiple templates. These are the focus areas for the next version. With a 1,718% increase in revenue in the past month, it seems he might have the initial financial backing to invest in them. “I’ve started building a completely overhauled drag-n-drop editor, which will allow you to create basically any custom image you want,” he said. “It will be heavily inspired by the block editor, and I want to keep the UI and UX as close to the block editor as possible.” The new template editor would allow users to create multiple layers, an idea similar to how Photoshop, Gimp, and other image-editing software works. The difference would be that it can pull in data from WordPress. “For example, an ‘Image’ layer will have options such as height/width and positioning, as well as some stylistic options like color filters and gradient overlays,” said Post. “A ‘Text’ layer can be any font, color, and size and can show predefined options (post title, date, etc.) or whatever you want. You can add an infinite number of layers and order them however you’d like.” He seems excited about opening up new possibilities with an overhauled editor. Users could potentially create social image templates for each post type. A custom layer might pull in post metadata, such as displaying product pricing or ratings from eCommerce plugins like WooCommerce. “The prebuilt templates will still exist, similar to Block Patterns in the block editor,” said the plugin developer. “They will, however, serve as a starting point rather than the final product. I’ll also try to implement theme styling as much as possible. “The possibilities here are so endless, and I’m incredibly excited for this next part.” Like this: Like Loading… [ad_2] Source link

Continue reading
1 3 4 5