The Ultimate Guide to Rank Higher in Google

[ad_1] Not sure how to get started when it comes to WordPress SEO? As the world’s most popular way to make a website, WordPress is well-suited to helping you create search engine optimized websites that rank at the top of Google’s search results. However, out of the box, WordPress is lacking in some SEO aspects, which is why it’s important to properly configure your site if you want to rank well. In our ultimate guide to WordPress SEO, we’re going to cover all of the most important tactics to boost your site’s search engine rankings. That includes the following: Let’s dig in! WordPress SEO Guide: Important Sitewide Settings In this first section, let’s take a look at some important sitewide WordPress SEO settings that you’ll want to optimize before working on individual pieces of content. 1. Make Sure Your Site Is Visible to Search Engines The first step in WordPress SEO is to make sure that your site is visible to search engines. If it’s not, Google won’t rank your site no matter how optimized it is. When you’re first building your site, it’s common to block search engines from indexing it because it’s not ready for primetime yet. But once you go live, it’s essential that you turn off this block. To check, go to Settings → Reading in your WordPress dashboard and make sure that the Discourage search engines from indexing this site box is not checked: Once the box is unchecked, Google and other search engines will be able to start indexing your content. 2. Choose An SEO-Friendly WordPress Permalink Structure Your WordPress permalink structure controls the basic format of your site’s URLs. For example, consider these two URLs: yoursite.com/09/2022/cool-blog-post yoursite.com/cool-blog-post The first URL includes the month and year that the blog was published, while the second URL only includes the blog post’s “post name” or “slug”, which is the unique identifier of the blog post – “cool-blog-post” in this example. In the first example, the month and year would be automatically generated based on your chosen permalink structure. For most WordPress sites, using just the post name is the best option. You really only want to include dates in your URL slugs if you only publish time-sensitive content, such as a news blog posting current news. If you post more “evergreen” content, having the date in the URL slug is limiting. For example, let’s say that the URL slug says “2020” but you fully updated the post in 2022. This might cause readers and search engines to think the post is out-of-date even though the content is current. To set your site’s permalinks, go to Settings → Permalinks in your WordPress dashboard: 3. Use Consistent Site URL (WWW vs non-WWW) In addition to your permalink structure, you’ll also want to choose whether or not to use WWW as part of your URL. That is, yoursite.com or www.yoursite.com. There’s no right or wrong choice here. The only important thing is that you pick one and stay consistent with it. For example, here at WPKube, we use www.wpkube.com, and you’ll see that on every piece of content. If you just enter wpkube.com in your browser address bar, you’ll also be redirected to www.wpkube.com instead. To choose your URL structure, go to Settings → General and make sure that the WordPress Address (URL) and Site Address (URL) use your preferred setup: WordPress will now automatically redirect users to your preferred structure, so there’s no need to set up a redirect at the server level (though you can if you want). 4. Install a WordPress SEO Plugin In order to add a lot of important SEO functionality to your site, it’s essential that you install a quality SEO plugin. There are a lot of good SEO plugins, but we recommend Yoast SEO to most beginners for the following reasons: It’s popular. It’s easy to use. It has a long track record of reliability. The free version works fine for most sites. It’s also the SEO plugin that we use here at WPKube. For those reasons, we’re going to use Yoast SEO for all of the screenshots and instructions in this tutorial. With that being said, here are a few other options you can look at: You can read our Yoast SEO vs Rank Math comparison to see how two of the most popular options compare. Once you install and activate the Yoast SEO plugin, you’ll want to go through its setup wizard to configure some important basics for your site’s SEO. Later on, we’ll also show you how to use Yoast SEO to optimize individual pieces of content on your site. 5. Install an SSL Certificate and Use HTTPS HTTPS makes your website more secure and privacy-friendly by encrypting the data that passes between your site’s server and your visitors’ browsers.  You can tell if a site is using HTTPS by looking for the green padlock in your browser’s address bar: While that alone is reason enough to use HTTPS on your site, there’s also another big benefit – Google has used HTTPS as a positive ranking factor since 2014. So not only does it make your site more secure, but it also helps it rank higher in search engines. In order to use HTTPS on your site, you’ll need to install an SSL certificate on your server, which most web hosts offer for free nowadays. If your host doesn’t, you can consider switching to one of the top WordPress hosting providers from our list. Once you’ve installed an SSL certificate, you can enable HTTPS on your site by using a plugin like Really Simple SSL. If you feel comfortable, you can also do it manually, but it requires a little more work. 6. Verify Your Site With Google Search Console and Submit Sitemap Google Search Console is a free tool from Google that lets you manage all aspects of your site’s SEO, including configuring settings and viewing real performance data. For that reason, you’ll absolutely want to set

Continue reading

How to Install and Setup WP Super Cache: Our Beginner’s Guide

[ad_1] For fast websites, caching is an important tactic. It will store files that see a lot of use in a portion of memory, which is faster to recall than loading them from the server. As such, there are lots of WordPress plugins available. A perennial option is WP Super Cache, for a few reasons. In contrast to other plugins such as W3 Total Cache, WP Super Cache is super simple. In many cases, you’ll use a minimal-click setup that will still give you a boost to your site’s speed. However, there are more settings under the hood, and it can fit your needs regardless. For this post, we’re going to go over how to install and setup the WP Super Cache plugin. Along the way, we’ll look to explain almost everything you need to know about the plugin. What the WP Super Cache Plugin Does for Your Site Your website’s server contains many different files, some of which will load more often than others. A fundamental of the internet is that files will move between servers, often across the globe. However, this distance coupled with the constant loading stream of data can slow down your site, and cripple it in the worst case scenario. This is where a plugin such as WP Super Cache comes in. It hooks into your site to provide a temporary storage option for those files your server will load on a frequent basis. This ‘cache’ will pull files out when there’s a request, which cuts down on loading time. It’s a near-essential piece of functionality you can implement in minutes. There are lots of WordPress caching plugins available. For instance, the WPKube blog uses WPRocket. However, WP Super Cache has a charm of its own, along with a nifty feature set. Looking at the WP Super Cache Plugin’s Features and Functionality WP Super Cache is almost as old as WordPress itself. It’s a longstanding option to cache files, and it’s also a ‘first-party’ plugin. This means Automattic looks after its development and maintenance, much like WordPress itself. This plugin takes your ‘dynamic’ WordPress files and turns them into ‘static’ HTML ones. The contrasting PHP files will be heavy and slow to move around. The HTML ‘copy’ of sorts is light and will give you the same level of interactivity in most cases. Here’s what else it can offer: It offers two modes: Simple and Expert. These will suit different types of users. In fact, most will likely choose the Simple option and never look back. There’s also a WP-Cache option, which handles the caching process for known users, certain URLs, and others. It’s more complex and slower than the typical caching options, but it also provides a greater level of dynamism with regards to your content. You can connect a compatible Content Delivery Network (CDN) if you use one, and WP Super Cache can leverage its functionality. There’s lots more to discover about WP Super Cache, but the best way to find out about it is to use it. Over the rest of the article, we’ll run over how to do so. How to Install and Setup WP Super Cache (In 3 Steps) WP Super Cache is so straightforward that in many cases you won’t need a tutorial. However, there is much more to the plugin than selecting the Simple mode and leaving it alone. The next few steps will look at the following: However, you’ll need to install and activate the plugin before anything else. Let’s deal with this first. 1. Installing the Plugin and Finding Its General Settings In the beginning, you’ll need to install and activate the WP Super Cache plugin. Because it’s free, you can do this directly from your WordPress dashboard. We have an in-depth guide on how to do this without fuss. Once the plugin is live on your site, head to the Settings > WP Super Cache screen: You’ll pop up on the Easy tab. The first radio button here will give you the option to turn caching on or off: However, we’d recommend you keep this to Off for now. This is because you’ll want to tweak all of the necessary and relevant settings before you pull the trigger. Speaking of which, we can look at this in the next section. 2. Customizing the Advanced WP Super Cache Settings The real main settings screen for WP Super Cache is the Advanced tab. This contains almost every option you’ll need, but requires heavy use of your scroll wheel: The top few options are simple to understand. There’s an option to turn on caching, then to choose the appropriate delivery method: The difference between delivery methods can be complex, but Simple uses PHP to serve cached files, while Expert uses your .htaccess file or Nginx rules. It also enables a few other options to leverage. If you use custom permalinks, you may not need to tinker within your server’s files. However, the Expert mode still requires some technical knowledge to implement well. While it’s faster, the negatives could outweigh the positives. Our advice is to use Simple mode, unless you are comfortable poking around within WordPress’ files. As for the other sections on the Advanced screen, let’s look at them in turn. Miscellaneous This section will help you determine how caching works for different users. The recommended approach is to disable caching (and associated functionality) for those users who log into your site. This is because the dynamic functionality is important for them. The plugin does a good job to note which options you should tick – everything that states its Recommended is a good idea. Here’s a quick list of options to go for: Disable caching for logged in users. Compress pages so they’re served more quickly to visitors. Cache rebuild. 304 Browser caching. As for the other settings, the only optional one you’d set is Don’t Cache Pages with GET Parameters. These types of pages will render on a per-user basis. As such, you’ll want

Continue reading

What Is Gravatar? Complete Guide for WordPress Users + Everyone Else

[ad_1] What is Gravatar and why should you care about it? In a nutshell, it’s a service that helps you display avatars on the Internet. If you’re a user, it helps you create a profile picture that automatically follows you around to other sites. And if you’re a WordPress webmaster, it helps you automatically display profile pictures for your users and commenters. In this post, we’re going to cover everything that you need to know about Gravatar, with a special focus on WordPress because we’re a WordPress blog. With that being said, anyone can benefit from this article – we won’t get to the WordPress stuff until the end! Here’s everything that we’re going to cover: What Gravatar is, explained in more detail How to set up your own Gravatar Some tips for working with Gravatar on WordPress, like disabling it or caching the images locally Let’s get started! What Is Gravatar? Gravatar helps you create a unique user avatar that you can easily use at a ton of different websites across the Internet. Or, if you have a website, Gravatar helps you easily display unique avatars for all of your users. Gravatar is a portmanteau of the phrase globally recognized avatar. The idea is that a person can upload an avatar in one spot (the Gravatar website) and then have that avatar automatically recognized by other websites. The basic process works like this: You create a Gravatar account using your email address. You can add multiple email addresses if needed. You upload your desired avatar picture to Gravatar. When you use your email address on a website that uses Gravatar, that website will automatically use the avatar image that you set up with Gravatar. Gravatar comes from a company called Automattic, which is the same company behind WordPress.com and is owned by one of the co-founders of the open-source WordPress software (which is different from WordPress.com).  Because of this, Gravatar is built into WordPress, though many other sites and services use it. Gravatar Examples To drive home the point, let’s look at some Gravatar examples. One of the most common examples is WordPress. All WordPress sites use the Gravatar service by default. Let’s say you leave a comment on a WordPress blog (like this one) using the same email address that you registered with at Gravatar. Well, that WordPress site will show your Gravatar image next to your comment – here’s an example from our comments section: There are a lot of other Gravatar examples beyond WordPress, though. For example, Slack uses Gravatar to generate profile pictures by default. So does Stackoverflow and tons of other websites and services. So, whether you knew it or not, you’ve probably used a site that supports Gravatar. How to Create a Gravatar Creating your own Gravatar image is easy and 100% free. Here’s how to do it… First, go to the Gravatar website and click the Create your Gravatar button: You’ll then be prompted to either: Create a new free WordPress.com account (if you don’t have one already). Log into your existing free WordPress.com account. WordPress.com is a service from the same parent company as Gravatar. Gravatar uses WordPress.com as its sign-on solution and creating a WordPress.com account is 100% free: If you just created your WordPress.com account, you might see another prompt on the Gravatar website telling you to sign in. Go ahead and click that button if you see it. Or, you might already be connected, in which case you can jump to the next step: Now, you’ll see your email address, along with a prompt to add a new Gravatar image: When you click that, you’ll be prompted to upload an image from your preferred source. Or, you can take a new picture with your webcam: Once you select your image, you’ll have an option to crop it if needed. Or, you can just leave it as the original. Once you’re happy with how it looks, click Crop Image: Then, you’ll need to set a rating. This helps website/service owners make sure they don’t accidentally have explicit pictures on their sites. If it’s just a normal “run of the mill” avatar, choose the suitable for display on all websites option and click Set Rating: And that’s it! You’re all done. If you want, you can repeat the process to add more avatars. Gravatar also lets you set up some profile information in the My Profile tab. However, you shouldn’t feel compelled to fill any of this out as most people will just see your avatar picture: How to Use Your Gravatar The nice thing about Gravatar is that you don’t need to do anything special to use it. All you need to do is use the email address associated with your Gravatar account. As long as: You use that email. The website/service supports Gravatar. Then your avatar image should show up automatically. If you want to associate multiple email addresses with your avatars, you can add new email addresses from your Gravatar dashboard: You’ll need to click the link in the activation email that Gravatar sends your new email address to make it live. Gravatar Profile Search – Search for Gravatar by Email If you want to look up your own Gravatar image (or someone else’s image), there’s a Gravatar profile search feature that lets you look up someone’s profile picture by entering their email address. To use this feature: You’ll then see the different profile picture options: WordPress Gravatar Guide: Improve Gravatar Usage On Your Site Now, let’s start moving into the WordPress-specific Gravatar tips for WordPress webmasters. While Gravatar makes it really easy to have real profile pictures on WordPress, there are two potential issues: User experience Performance In terms of user experience, the issue is that visitors can’t change their profile pictures from your WordPress site – they have to do it from the Gravatar website. This isn’t a big deal in your comments section. But if you allow user registration (say for a membership

Continue reading

Guide to the new Query Loop Block • WPShout

[ad_1] 
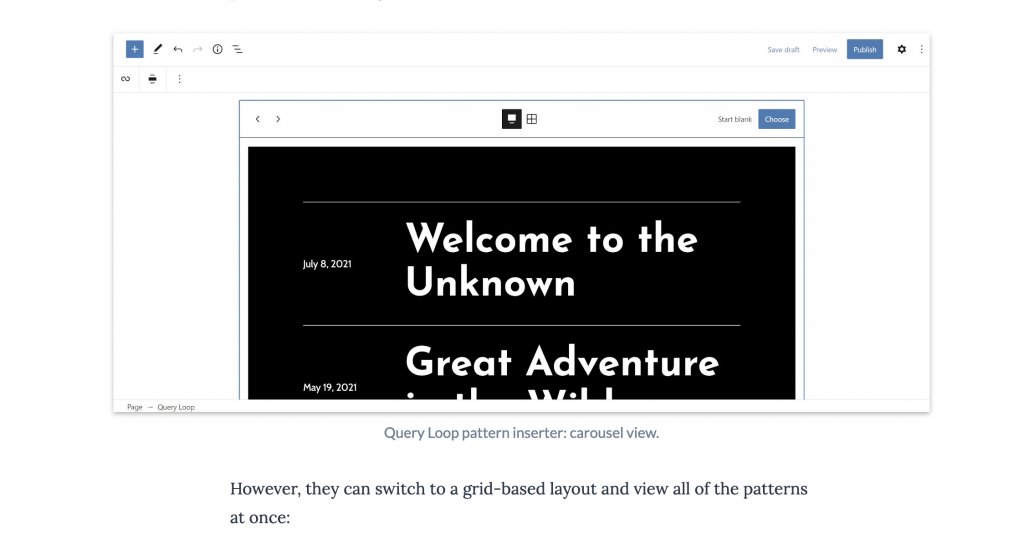
I was talking with the current students in the Up and Running Bootcamp last week about the new Query Block in WordPress 5.8. I had to admit I’d not really played with it much myself. For that reason, I was quite excited that when I sat down to look for posts to share this morning with you all, I found this great little guide to it that Justin Tadlock put together over on the WP Tavern a few weeks ago. For those who aren’t yet comfortable with the name of this block, here’s Justin’s great summary: The term “Query” is simpler than you might think. It merely means to “query” or “ask” for posts from the database according to a defined set of options. For example, one might attempt to get the last 10 blog posts. “Loop” is an even easier concept to grasp. It means to “loop” or “cycle” through each queried post and output it. Technically, a developer could do things other than displaying the posts during this process, but we are only concerned with what gets printed on the screen. The two things combined become the Query Loop block. It allows users to ask for a set of posts and display each one. Visit wptavern.com → [ad_2] Source link

Continue reading

How to Create a Food Blog With WordPress: Our Step-by-Step Guide

[ad_1] Whether you realize it or not, food is central to our lives. Some use it for fuel, while others present recipes as an art form. If you’re in the latter group, and you want to create a food blog to share your passion, WordPress is a top platform. With the number one Content Management System (CMS) at your side, you’re able to work on your site and publish it in no time. What’s more, it’s extendable using themes and plugins. In this article, we’ll show you how to create a food blog with WordPress. Before this, we’re going to give you all the context you need to get started. What a Food Blog Is On paper, the concept seems simple. A food blog does what it says on the tin. You’ll post regular content about food, although there are a few different ways you could go here: The blog could be all about cooking. Recipes are going to be a big part of your content. You could review restaurants and other establishments. This isn’t going to feature recipes so much, and it will be heavy on text and media. The blog could review kitchen gadgets. This will use affiliate links to monetize your blog in most cases. There are lots of other types of food blog too, but we’ll focus on cooking-based blogs for this post. Though, once you have the fundamentals down, you’ll be able to apply them to any type of site you wish. Why You’d Want to Start a Food Blog In short, you’ll want to start a food blog because it interests you. This seems obvious, but you should have a passion for food-related subjects first and foremost. If you’re looking to make some money from your blog, or otherwise share your knowledge with the public, there are a few good reasons for doing so: Spinning up a WordPress site is straightforward, and quick. Expanding on this, it’s simple to add monetizing functionality if needed. You can build a massive following, because food blogging is popular. By extension, you can influence the industry if you have a lot of followers. If you like the sound of these points, using WordPress to create a food blog is going to suit you. In fact, let’s dig into this further next. What Makes Up a Stellar Food Blog If you look at some of the top blogs in the space, they all have a number of elements in common. Of course, there are different niches when it comes to food blogs, but for recipe-based sites, there are a few consistent elements: Readable text and good typography choices. Gorgeous images, often taken by a professional (or even a passionate hobbyist). Dedicated recipe formats, often as part of a theme or plugin (more on this later). This is a bare-bones tick-list, but if you have these in place, it’s enough to get started. Depending on your exact requirements, you might want to add aspects such as related posts sections, and social media feeds. Though, a food blog is a simple concept, with the complexities covered in your content and media. When it comes to some of these core elements, WordPress is ideal. Why WordPress Should Be Your Platform Of Choice Before we get onto how to create a food blog, we should chat about your choice of website builder. We’ve covered lots of other platforms on the WPKube blog, such as Wix and Squarespace. Though, WordPress is by far our preferred choice. Here’s why: It’s the most popular CMS on the market. WordPress is open-source and free (as in both speech and beer). You can extend the platform in whatever way you choose given the right skills, themes, and plugins. WordPress is secure and stable. The community of developers, users, and volunteers is rich. We could wax lyrical on why WordPress is amazing for the next 10,000 words. Instead, you should check out our article looking at the ins and outs of WordPress itself. What You’ll Need in Place to Create a Food Blog At this point, we’re beginning to get into the ‘nitty-gritty’. Now you’re aware of the scope of a food blog, you can begin to gather the necessary tools and services. Consider this mise en place for your site. Most of the following will be essential, but we’ll give you a heads-up if one element is optional. Of course, if you need something specific for your vision, feel free to add it onto the list. Still, to create a food blog with WordPress, you’ll need the following: A domain name. Suitable web hosting. WordPress. A theme that’s right for your goals. Some almost essential plugins to cover security and contacting you. Further plugins to help you build your site and add functionality based on your needs. For this last one, there could be any number of aspects you’d like to add to your blog. For example, you might want to enhance comments, or add social media feeds. You’re even able to connect email marketing services to your blog. Though food-related functionality should be a prime concern. Recipe post formats and sections are going to be a big deal on your site, so you could argue that something like this is also essential, if it’s not covered by your theme. During the next few sections, we’ll outline some of the more popular and worthy choices when it comes to each of these, although our blog has lots of articles on each of these aspects. How to Create a Food Blog With WordPress (In 5 Steps) Once you have an idea of what type of food blog you want to create, it’s time to get up and running. We’ll cover the following steps next: Select a suitable hosting platform and register a domain name. Install and set up WordPress on your host. Find and install a suitable theme for your site. Choose and install plugins to help you add essential functionality. Launch your site. Though, without a host

Continue reading

How to Disable Comments in WordPress: A Complete Guide

[ad_1] WordPress started life as a blogging platform. Years later, it’s now a Content Management System (CMS) that is used with over 40 percent of the web. Along the way, some of classic blogging staples have fallen out of favor. This means there are many sites that want to disable comments in WordPress. Despite this feeling surrounding commenting, there are a lot of benefits to letting users engage with your content. Still, if you want to cut out the comments, there are a few ways to do so. As such, this post is going to show you how to disable comments in WordPress. We’ll look at the different places within WordPress you can change settings, and also discuss some extra techniques to complete rid your site of comments. WordPress’ Relationship With Commenting In 2003, WordPress was a blogging platform through and through. It had all the hallmarks you’d expect: theming, blog-specific settings, and commenting functionality. Comments are a key part of a blog, and it’s fair to say that they have become more prominent as WordPress has evolved and grown. We’ll discuss more about the benefits later, but it’s also fair to say that as WordPress has evolved, some site owners have pushed back against commenting. This is because of the gradual change from blogging platform to CMS. As WordPress became adept at creating other types of site, comments weren’t as central to some users. Because of this, the platform has functionality in place to disable commenting on your site. Again, we’ll get into this in more detail later. The Value of Comments Within WordPress Before we get into how to disable comments, it’s worth talking about why you’d want to have them for a business-focused site. It’s easy to consider them superfluous to requirements, but this isn’t the case. In fact, comments can offer more value than other forms of engagement, for a few reasons: You’re able to gauge interest in your products, services, and content direct from your users. You can see how potential customers engage with you, and pivot your offerings. Users can become part of a community, which builds brand loyalty. It can also have an impact on visibility, and your affiliate network (if you have one). While there are more benefits we could mention, this is beyond the scope of the article. Still, if you thought comments were only for a blog site, it’s worth rethinking that mindset. Comments can be a valuable marketing arm, and cultivating a readership with them is a solid strategy. Why You’d Want to Disable Comments in WordPress We’ve covered what’s good about comments, but this doesn’t mean they’re always necessary. Here are a few points on why you wouldn’t want comments on your site: Comments require moderation to stop spam and off-topic discussions. While there are plugins to help with this, it’s not always going to be a prime solution. If you’re not able to dedicate time to essential comment moderation, it makes sense not to implement them. You may like to cultivate discussions elsewhere, such as a forum or even on social media. We think there are drawbacks to this approach, but if it’s right for your business, asking for engagement direct on your blog posts will dilute the engagement on other channels. If your content marketing is not central to your promotion, asking for engagement might not be beneficial. As such, no comments are better than handfuls of unanswered entries. If you’re writing informational posts, such as news items, they may not warrant comments. Here, you have flexibility to disable comments on a site-wide basis, or only for individual posts. It’s also worth noting that there are ways to cut down on the amount of moderation and engagement you do across your site’s comments. Solutions such as closing comments after a certain period of time, and removing comment URLs are an alternative to disabling comments in WordPress altogether. Still, if it’s something you’re set on, we have the methods coming up next. How to Disable Comments in WordPress (2 Ways) For a task that’s simple on the surface, there are a lot of options for disabling comments in WordPress. Taking a broad brush, here are the two primary ways of getting the job done: Use the core options within WordPress to disable comments. Choose a suitable plugin to disable comments across your site. When we dig into these options, we’ll also detail specific settings to help you disable comments and leave no trace. To finish the article off, we’ll note how to disable media comments, and how to delete existing ones. 1. Use WordPress’ Built-In Options The first port of call to disable comments in WordPress is the platform’s own settings. To find them, head to the Settings > Discussion page within your WordPress dashboard: There are a wealth of options here that can help you. In fact, we recommend heading here when you first set up your site. The main option you’ll want to consider here is Allow people to submit comments on new posts. Unticking this will turn off commenting on a site-wide basis. If you’re working on a brand new site and you don’t want comments, your journey ends here. Though, for existing site owners, this will only turn off comments for future posts. The rest of this post will help you get rid of pre-existing comments on your site. Disable Comments for Individual Posts Although WordPress provides a full bank of options for handling comments, you can also work with them on a per-post basis. There are a few ways to do this, and the most straightforward is to access a post’s Block Editor screen. Here, click the Post menu on the right-hand side, and scroll down to the Discussion settings. The checkboxes here will let you disable comments for the post in WordPress: Note that if you don’t see this box, you’ll need to enable it from the Preferences screen accessed from the ‘traffic light’ menu in the Block Editor: This

Continue reading

What is a WordPress Slug? An In-Depth Guide to Setting and Editing a WordPress Slug

[ad_1] It’s surprising how even a small aspect of your site has an impact. The way you set your URLs can make or break your site in some areas. For example, consider the WordPress ‘slug’ you use for each post and page on your website. It may seem unimportant, but the slug of your URL opens the door to better Search Engine Optimization (SEO). It also gives users a human-readable way of getting the context of your site. As such, this post will focus on the topic of WordPress slugs. We’ll also show you how to optimize them, to exract the maximum value. What a WordPress Slug Is In short, a WordPress slug is the portion of your URL that comes after the main domain name. For example, consider our recent Kadence theme review post: It’s a piece of identification for your post or page, and it gets its name due to its size. Though, your home page won’t ever have a slug, as that’s identified by your primary domain name. In some cases, a post or page may have multiple slugs. Consider taxonomies such as category and tag archives, and author pages: The lines get blurred here and there, because some aspects of a URL may or may not be related to the slug. On the whole, you have full control over every slug for your WordPress website. What’s more, you should exercise that control, because slugs have an important role to play. Let’s discuss this next. Why a WordPress Slug Is Important It may seem a minor concern, but a WordPress slug can help you in a few major ways: You’re able to give your post or page an SEO boost (more of which later). It offers a human-readable element that helps visitors decide if they want to click through to a post or page. You can offer a concise version of a longer post title. Again, this impact readability and context. Given the above, it’s a good idea to work on your WordPress slugs at the point of creating a post or page. We’ll have more to say on this throughout the article. For now, let’s focus on the SEO benefits you’ll get from slugs. How a WordPress Slug Can Impact Your Search Engine Optimization (SEO) The main positive to working with WordPress slugs is how they can improve your SEO. Of course, the better your SEO, the greater the traffic you receive. As such, you’ll get a few benefits from optimizing your WordPress slugs: Search engine crawlers will be able to parse your content quicker. This is because a slug is clear and defined. You’ll be able to rank for the right keywords with a higher success rate. Again, the clarity of a slug means it’s as keyword-rich as possible (if you optimize it well). As we noted earlier, a well-optimized slug can help visitors ascertain what your post is about. The traffic and click-throughs that result means better metrics for your site. This will have a knock-on effect to your SEO. In a nutshell, getting your WordPress slug in an optimal condition is going to help you win the SEO battle on multiple fronts. Let’s take some time to discuss the best way to do this before showing you how to edit slugs. How to Optimize a WordPress Slug Setting a slug is not a case of letting WordPress handle the process and sitting back. While WordPress does generate a slug for you once you create a new page, it’s not going to be optimal. The good news is there are a few solid practices to consider, and they’re easy to implement: Keep the slug short. A WordPress slug should be around three to five words in length. Use your focus keyword. It seems obvious, but your slug should contain your post’s focus keyword or phrase. Only use lowercase letters. Much like filenames, keep a slug lowercase, and use hyphens to separate words rather than other punctuation. Add focus where necessary. If you’re using the focus keyword for the post or page, you’ll have natural focus in your slug. Even so, look to remove all superfluous words from your slug, so that the focus of the content is clear. Use ‘function words’ if required. Words such as “a” and “the” aren’t required in your slug, unless they help add clarity and focus. Keep the slug evergreen. In other words, don’t add time-specific elements such as the year to a slug. This helps you update a post later without changing the URL of the post. This may seem a lot, but each elements gets you close to the ultimate optimal WordPress slug. Regardless, this knowledge isn’t useful if you don’t know how to edit slugs. Let’s discuss this next. How to Edit WordPress Slugs Before we get onto specific editing steps, it’s worth seeing how WordPress helps you to generate slugs in the first place. To do this, head to the Settings > Permalinks page within your WordPress dashboard: Setting your permalink structure is one of the first tasks you should tackle when starting a site. This is because getting your URL and slug structures right from the start is better for you and your SEO. There are lots of ‘tags’ available to help you set a suitable structure, but %postname% is your slug for all intents and purposes. In previous versions of WordPress, you would have to make a change before you did anything else on your site. Though, the development team realized that the Post name permalink structure is ideal. As such, it’s now the default setting for your permalinks. When it comes to individual slugs though, there’s a different approach. As we noted, WordPress generates slugs for every post page, taxonomy, and author you create. This isn’t going to be optimal in most cases, so we have work to do. Let’s start with your posts and pages. Editing Slugs for Posts and Pages There are a few places to edit WordPress slugs

Continue reading

How to Switch from Wix to WordPress (Step by Step Guide)

[ad_1] It gets said about many aspects of running a website, but your choice of platform is one of the most important decisions you’ll make. However, mistakes happen and needs change. If you’re currently looking to switch from Wix to WordPress, you’ll want to make the process as smooth as possible. While there’s nothing wrong with Wix in some aspects, it’s a closed-source problem to WordPress’ open-source solution. If you want to make the switch, there’s a lot of ‘donkey work’ in getting posts, pages, and media from one platform to another. As such, this post will show you how to switch from Wix to WordPress step-by-step. We’ll cover all of the aspects you need, and mention some future considerations too. Comparing Wix to WordPress On the surface, there’s a lot to like about both Wix and WordPress. For example: They both offer a full-featured solution for creating a website. Building a layout using both platforms is a breeze. The extendable nature of both solutions means you’ll be able to create a site to your exact requirements. Overall – and it might be polarizing to say – Wix does represent a good platform in some use cases and for some site owners. However, there are some drawbacks that warrant attention. Why You’d Want to Switch From Wix to WordPress In a bubble, Wix represents a dependable solution for creating and managing your website. However, you may have come up against some of the following issues: You’d like to run more than one site, without increasing your current budget. The storage for your Wix account has run out. You want to scale your site for more traffic and growth. The requirements you have for an eCommerce site can’t be met with Wix. In all of these cases, a switch from Wix to WordPress makes sense. Note that we’re talking about self-hosted WordPress here, rather than the .com version. Self-hosted WordPress is a full-fledged Content Management System (CMS) that can be tailored to your exact requirements. What’s more, the core software is free, as are thousands of themes and add-ons called ‘plugins’. Of course, you’ll need to pay for some aspects of hosting your WordPress website, but on the whole, you stand to save money by switching. Also (and it’s something we consider the most important aspect), you have total control over how to run and present your website. How to Switch from Wix to WordPress (In 6 Steps) As we noted, making the switch from Wix to WordPress is tougher than other platforms. This is because Wix doesn’t let you export your content with the same flexibility as its competitors. As such, there are a few steps you’ll need to take to get everything ported over: Purchase suitable hosting. Pick a theme for your site. Import your Wix content into WordPress. Design your new layout. Add functionality to help your new site meet your needs. Redirect your old site to the new one. We’ll dedicate more time to some of these steps than others, so let’s get to it! 1. Choose a Suitable Hosting Provider Before you think about making the switch from Wix to WordPress, you’ll need somewhere to host your new site. Wix includes hosting in its monthly price, while self-hosted WordPress doesn’t. Even so, you’ll usually pay around the same price for your own host, and get more control over your performance to boot. If you’re wondering which host to choose, we’ve looked at a number of options previously. However, the field is more packed for WordPress, given how popular the CMS is. As such, you might want to consider managed hosting. This keeps the control and flexibility with you, while letting your host handle under-the-hood tweaks. If you’re still unsure which host to choose, we’d recommend A2 Hosting: They have good support, a wide selection of plans, and suitable options for a range of budgets. We’ve covered them before (+ 52% off coupon) at WPKube, and had a lot of good things to say about the entire service. Installing WordPress You’ll also need to install WordPress in some cases. However, a lot of hosts include a one-click installer such as Softaculous, or pre-install WordPress for you. If you’re fortunate to have WordPress pre-installed, a chunk of the work is already done for you. However, if not, WordPress is a snap to set up. In fact, we’ve covered this in a previous article, so check that out if you need the guidance. 2. Choose the Right Theme For Your New WordPress Site Once WordPress is up and running on your host, there are a few tasks you’ll want to check off. We’ll talk about some of these later, but for now, getting your site looking right is our focus. WordPress uses ‘themes’. Think of them as ‘skins’ for your site, that can also implement additional functionality in some cases. While there are hundreds of themes available for free, they’re not usually the best fit for a business site, for a few reasons: You’ll get better support under normal circumstances with a premium theme. The functionality will be more robust. Free themes often have a reduced set of features in order to convince you to upgrade. Updates will be more frequent, as developers can devote their whole time to fixing bugs and enhancing the theme. You should look to pay around $50–100 for a decent premium theme, although you can find options at all price points. What’s more, there is lots of choice for your industry or niche. When it comes to narrowing down your options, consider how established the developer is, how often a theme has been updated, and other user’s reviews before stumping up the cash. Once you’ve chosen a theme, you’ll need to install it on your site. WPKube has put together the ultimate guide to getting themes up and running on your site, so check that piece out if you need the assistance. 3. Import Your Wix Content Into WordPress Here is where making

Continue reading

How to Create Funnels with WordPress (Step by Step Guide)

[ad_1] One of the hardest aspects of running an online business is turning your visitors into paying customers. There are so many factors involved that you’d be forgiven for missing a step or two. Yet, if you were to create funnels with WordPress, there’s a greater chance of winning customers. When it comes to creating sales funnels, for us, WordPress beats the competition. It’s scalable, flexible, and fits your budget regardless of whether you’re a startup or an enterprise. In this post, we’ll show you how to create funnels with WordPress. We’ll outline all of the tools you need, and walk you through the entire process. A Quick Primer on ClickFunnels Before we get into the article proper, it’s worth talking about ClickFunnels for a few minutes. This is a leading solution for creating repeatable and effective sales funnels. Thousands of users generate traffic, customers, and income using the tool. On paper, it has a lot of exciting and innovative features and functionality. For example: There’s much more in the “Heck Yes!” column for choosing ClickFunnels. Even so, it doesn’t capture 100 percent of the user base. Why You’d Want to Find a ClickFunnels Alternative Given the great things ClickFunnels offers, it’s not the only solution on the market. In fact, whenever we’ve mentioned ClickFunnels at WPKube, it’s always alongside the competition. Here are a few reasons why: Pricing. There’s no getting around that ClickFunnels is expensive. The lowest tier is $97 per month, and this isn’t as full-featured as the $297 per month plan. ClickFunnels’ ecosystem. While a closed-source all-in-one hosted platform is great to get started with, you’re locked into ClickFunnels forever. In other words, there’s no way to take your business away from ClickFunnels’ system. The functionality. ClickFunnels is a ‘jack-of-all-trades’. As such, while some functionality is best-in-class, others need some work. Its look and design. Much like WordPress sites used to have certain ‘tell-tale’ elements, so a ClickFunnels site screams its name too. To touch on this last point a little more, if you take a look at any of the templates or default setups for ClickFunnels sites, they all have a dated look that has become associated with sales funnels as a whole: So, ClickFunnels has a ‘spammy’ default design, although we admit it’s a successful one. Regardless, there will be a unique combination of reason why you’d want to create funnels with WordPress – so let’s chat about this next. Why You Should Create Funnels With WordPress It shouldn’t come as a shock that we think WordPress is number one when it comes to building any type of website. We’ve covered our reasons in detail across the blog in the past, although let’s summarize the key aspects for you: The WordPress core software is free. Not only does it cost zero dollars to download and use, it’s also open-source. This means you control almost every aspect of your site, without lock in. It can stick with you for your business’ entire journey. WordPress works great as a blogging platform. It’s also a full-featured Content Management System (CMS) that works for enterprise-level sites with millions of hits per month. WordPress is extendable through thousands of themes and plugins. In fact, many are free. There’s also a rich premium market for both themes and plugins that we’ll touch on throughout the article. The WordPress community is strong, diverse, and knowledgeable. There are support channels with easy access, and a rich developer network to ensure WordPress is always evolving and improving. The above is just the tip of the iceberg. Even so, not everyone will jump to create funnels with WordPress, without surveying the competition. We’ll focus on this next. 2 Alternative Solutions to Create Funnels With WordPress Competition is a healthy thing among any products or services. Sales funnels are no exception. We’ve covered landing page plugins in the past, and in many cases they could compete with more ‘traditional’ funnel builders. Despite this, there are two tools we’d suggest are closer competitors to WordPress, and the first is one we’ve already mentioned. 1. ClickFunnels We won’t go over the same details again, as we’ve already talked about ClickFunnels both in this article and others. In any case, it’s worth summing up the appeal of ClickFunnels in general: It’s an all-in-one funnel builder platform. The community is geared towards helping you succeed. You’re given a proven system to create, utilize, and prosper from sales funnels. What’s more, it’s a breeze to get up and running with. Once the sign-up process is out of the way, you’ll carry out the following steps: Navigate to your dashboard and click the Build a Funnel button. From the dialog screen that pops up, choose a funnel type to work with. Use the Launch Checklist in the Funnel Builder to create your sales funnel. The final step here involves designing squeeze and sales pages, order forms, confirmations, and Thank You pages. It’s all laid out well, and you’ll have your funnels ready and waiting for visitors within no time. 2. Systeme Another solution we’ve featured on the blog in the past is Systeme. This positions itself as a direct ClickFunnels competitor, and has much of the same functionality: A drag-and-drop funnel builder, that also doubles as a site-building tool. Email and content marketing functionality. Built-in tools for selling subscriptions and courses. Robust contact management. In our review, we argued that Systeme reaches a different user than ClickFunnels. The latter is focused on the core concept, while Systeme wants to be the center of your entire business. As such, the getting started steps are more diverse than ClickFunnels: Click the Create button to build a new funnel. Choose an end goal for your funnel, such as capturing emails, or running a webinar. Build an order form and Thank You page using templates. Customize each page to your requirements. Use the built-in page builder to design your funnel further. We think that both solutions have a good approach to creating funnels. Our

Continue reading

WordPress Theme Development: Core Concepts (Full Guide)

[ad_1] Welcome! WordPress themes are one of the most important topics that one must understand to be good at WordPress development. Themes underlie the entire visual half of WordPress sites, but often grow to do even more. Because of the visual importance, they’re a great place to dive in if you’re interested in getting to the “code-side” of WordPress. I myself “cut my teeth” on WordPress themes back in 2007 and 2008. WordPress themes were where I started to come to grips with the power (and limits) of PHP, CSS, and HTML. So this course is great for newbies, and those just looking to confirm their understanding of the whole system. An editor’s note before we dive in: 2021 is an exciting year for the future of WordPress themes. For the first time since… kind of forever (that is: the start of WordPress itself)… what themes look like could change pretty dramatically. But today, in April 2021, that future is still a little unclear. And even when that future is clearer (and less likely to change) it’ll still be vital that WordPress developers understand “classic” WordPress themes for a long time. After all, as seasoned WordPress freelancers are well aware, WordPress sites can live for a long time with little more than security updates. So we’ve updated our classic and still vital little free course on WordPress themes as they are in early-2021. Enjoy! Understanding this Free WP Theme Development Course This is an brief introduction to the core concepts of WordPress theme development and comes from the Third Edition of our “learn WordPress development” course Up and Running. We’ve worked hard over the years to write some of the best tutorials on WordPress development, and give them away to readers here at WPShout. Up and Running is our effort to consolidate all that teaching into a single step-by-step resource for people new to the world of WordPress coding. Hopefully, it’s also a little easier to navigate than the mess of links that is this (or any) modern website. This post consolidates a few of that chapters from Up and Running together. While the course is much more exhaustive on both WordPress theme and plugin development than this is, we’re sure this will give you a very solid foundation to start from. The three important concepts of WordPress theme development we’ll cover here are: The WordPress Template Hierarchy Processing Posts with The Loop Adding Functionality with functions.php We’ll take you through each one on the linked articles at the bottom of every section. Those are a very accurate representation of what you’d find in Up and Running. Although on the real course site, it’s a little easier to keep your place. We have a completion-tracking WordPress plugin for that 🤓. Like you’ll find in Up and Running, all of the linked chapters here have a Summary Limerick and Quiz to reinforce what you’ve learned at their end. 🙃 Core Concept 1 of WordPress Theme Development: The Template Hierarchy The first thing that’ll help you get a sense of WordPress theme development is getting a sense of what all those theme files do. Some of them may be obvious to someone who has done a fair amount of web development, like style.css being the place for your CSS styling rules. But most the work you do in WordPress theme development comes down to understanding the WordPress template hierarchy. WordPress template hierarchy underlies a lot of what’s useful and complicated about WordPress. WordPress themes involve a bunch files. And understanding those files is the key to understanding WordPress development. All the files in the template hierarchy have a few things in common: They have names that end with .php They contain a version of “the Loop” inside of them (see the next section for more about that) They mostly contain HTML and some PHP code Those three bullet points are the core of what makes up the WordPress hierarchy. But there’s a lot more to understand. And that’s what our article all about it tries to help you with. Reading it will get you along the way to being a full-fledged WordPress theme developer: The Template Hierarchy in WordPress Core Concept 2 of WordPress Theme Development: The Loop in WordPress and What it Means For this one, we’ve taken the time to create a custom post. Like the other of these post’s, this is a chapter from Up and Running. The Loop is one of the things that first scared me (David writing this) about WordPress development. The core thing was that it all sounded so ominous. Whether people called it “WordPress loop” of “The Loop”, I knew that WordPress had that complicated concept involved. Later, after I’d programmed more, I realized that this was just a basic “while” loop, a common construct in almost all programs. But before that, it really intimidated me. If you feel like you’ve got it from that description alone, you might not need to read our full article about what the WordPress Loop is and what it means. Other than the syntax which is distinct to WordPress, it’s not much more complicated than that. But if you’ve never done much coding, you probably should be sure to read the whole article. WordPress theme development is really dependent on getting a handle on how “the Loop” works in WordPress. You’ll hear people talk a lot, as you get into theming, about being “inside the WordPress loop” and outside of it. The article covers all of that and more. If you’ve not read it yet, please do: Understanding The Loop: WordPress’s Way of Showing Posts Core Concept 3 of WordPress Theme Development: Adding Functionality with functions.php Plugins are a big topic in WordPress, and I’ve sometimes heard people describe this next focus as “the plugin of a WordPress theme.” I don’t necessarily agree with that description. I also think it actually add confusion to the issue. That said, inside of your WordPress theme’s functions.php is indeed where you write

Continue reading