Not sure how to get started when it comes to WordPress SEO?
As the world’s most popular way to make a website, WordPress is well-suited to helping you create search engine optimized websites that rank at the top of Google’s search results.
However, out of the box, WordPress is lacking in some SEO aspects, which is why it’s important to properly configure your site if you want to rank well.
In our ultimate guide to WordPress SEO, we’re going to cover all of the most important tactics to boost your site’s search engine rankings. That includes the following:
Let’s dig in!
WordPress SEO Guide: Important Sitewide Settings
In this first section, let’s take a look at some important sitewide WordPress SEO settings that you’ll want to optimize before working on individual pieces of content.
1. Make Sure Your Site Is Visible to Search Engines
The first step in WordPress SEO is to make sure that your site is visible to search engines. If it’s not, Google won’t rank your site no matter how optimized it is.
When you’re first building your site, it’s common to block search engines from indexing it because it’s not ready for primetime yet. But once you go live, it’s essential that you turn off this block.
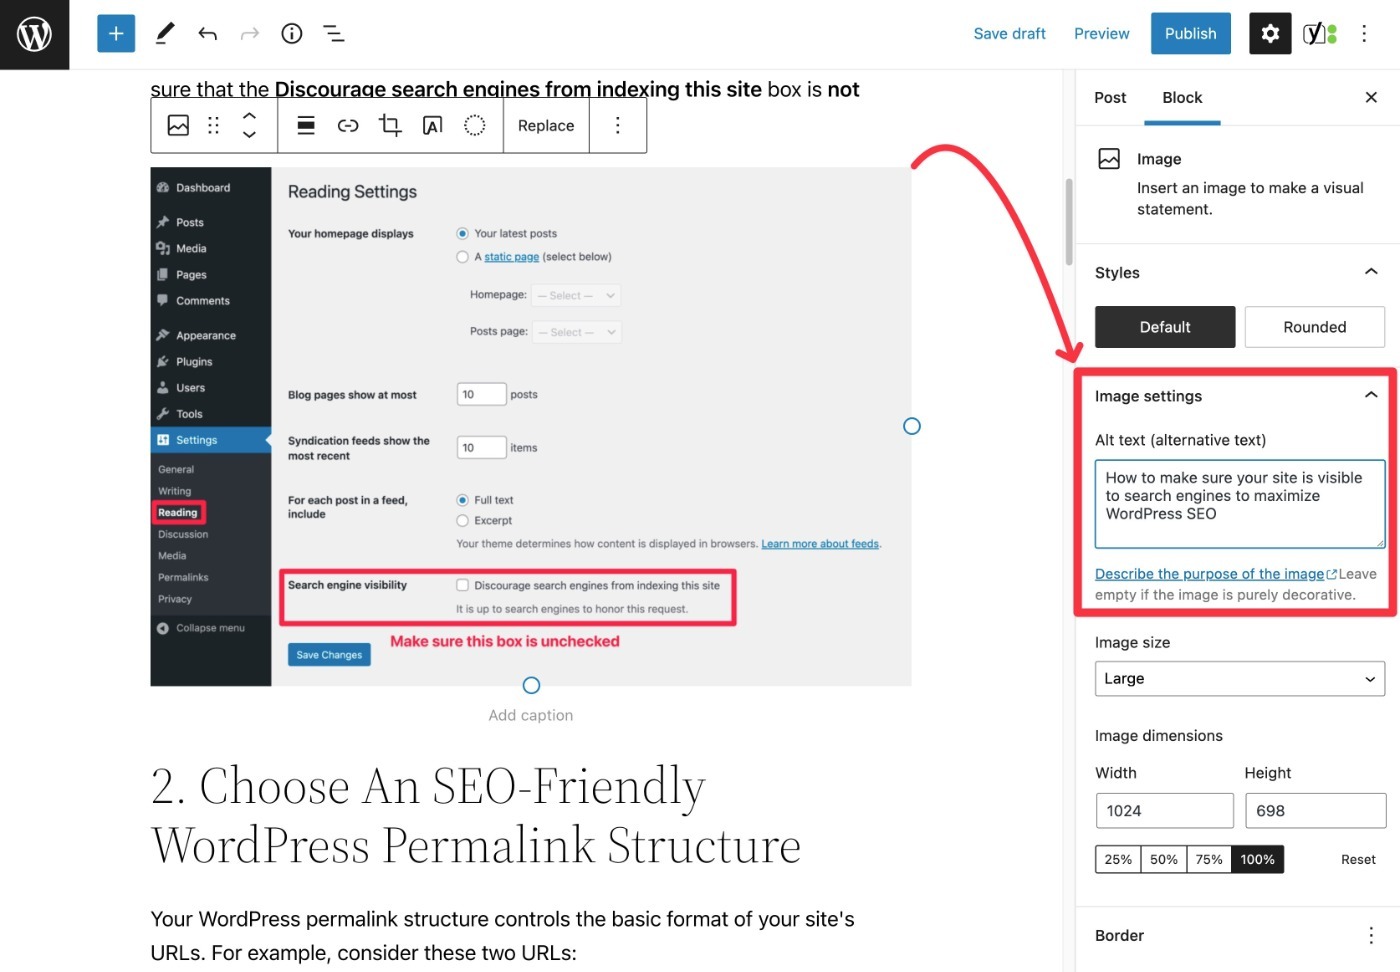
To check, go to Settings → Reading in your WordPress dashboard and make sure that the Discourage search engines from indexing this site box is not checked:
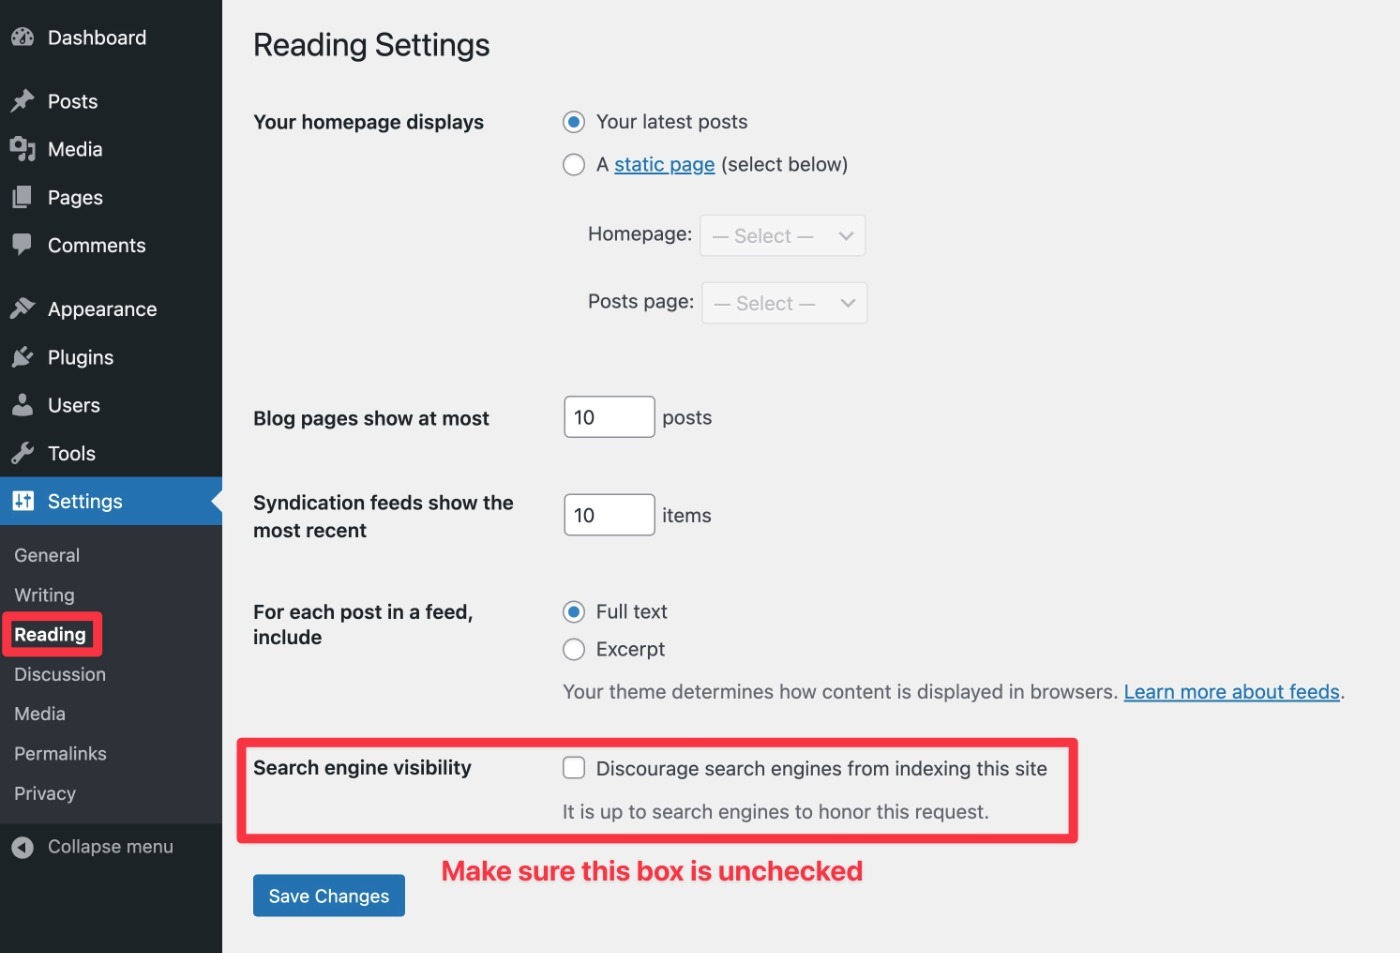
Once the box is unchecked, Google and other search engines will be able to start indexing your content.
2. Choose An SEO-Friendly WordPress Permalink Structure
Your WordPress permalink structure controls the basic format of your site’s URLs. For example, consider these two URLs:
- yoursite.com/09/2022/cool-blog-post
- yoursite.com/cool-blog-post
The first URL includes the month and year that the blog was published, while the second URL only includes the blog post’s “post name” or “slug”, which is the unique identifier of the blog post – “cool-blog-post” in this example.
In the first example, the month and year would be automatically generated based on your chosen permalink structure.
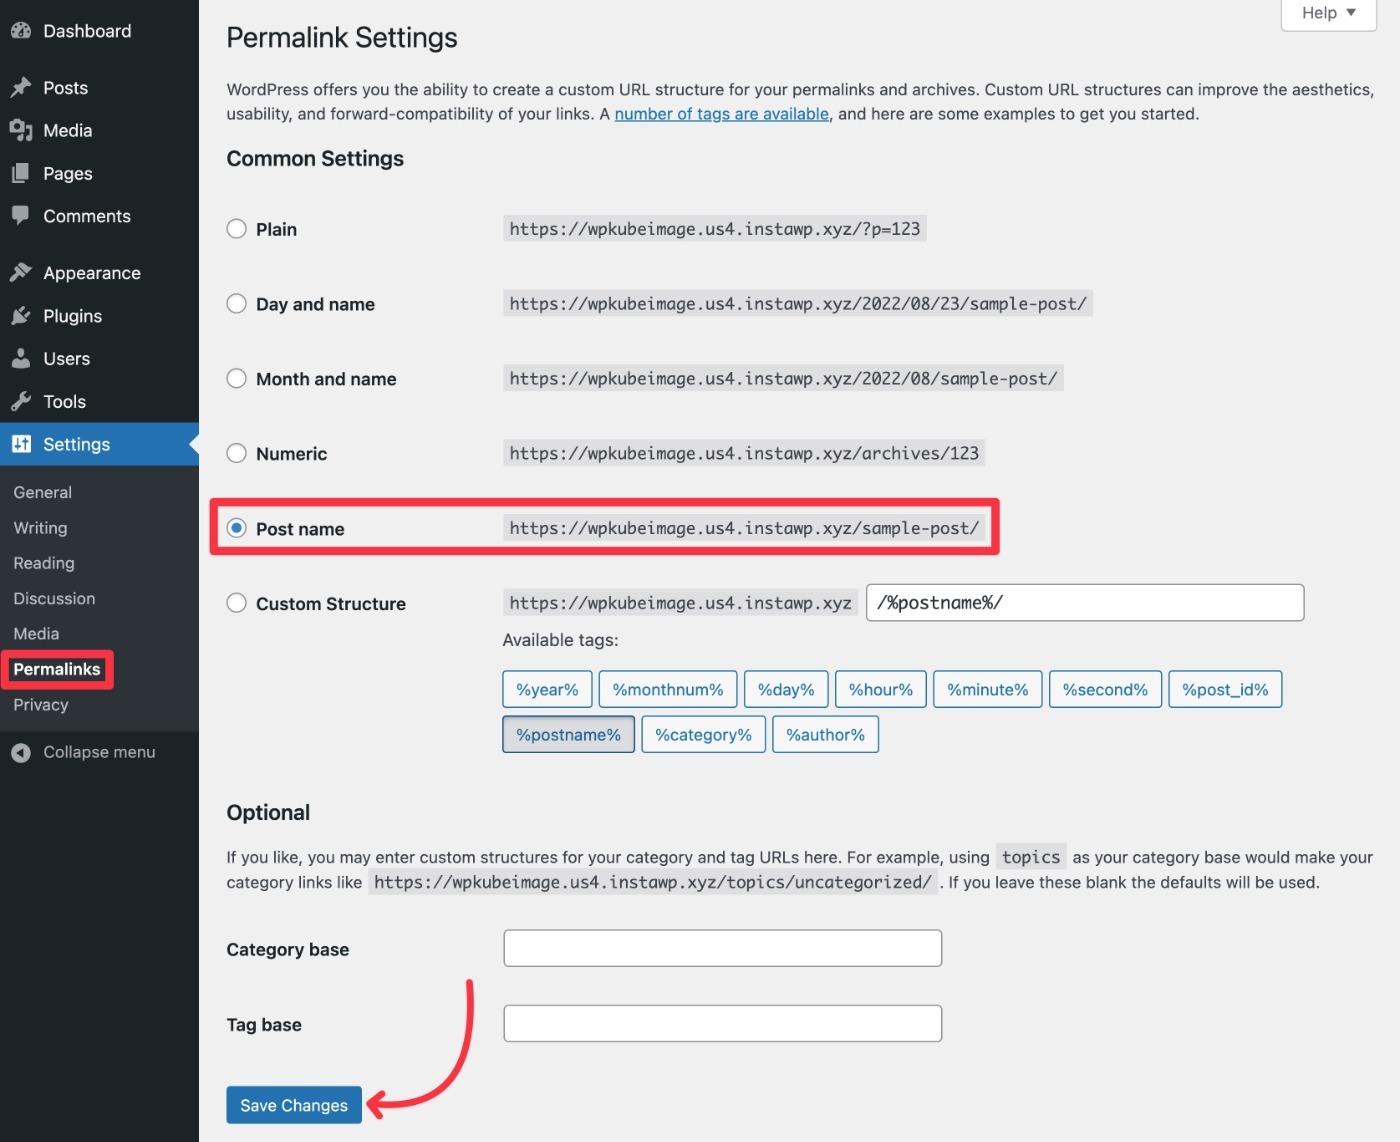
For most WordPress sites, using just the post name is the best option. You really only want to include dates in your URL slugs if you only publish time-sensitive content, such as a news blog posting current news.
If you post more “evergreen” content, having the date in the URL slug is limiting. For example, let’s say that the URL slug says “2020” but you fully updated the post in 2022. This might cause readers and search engines to think the post is out-of-date even though the content is current.
To set your site’s permalinks, go to Settings → Permalinks in your WordPress dashboard:
3. Use Consistent Site URL (WWW vs non-WWW)
In addition to your permalink structure, you’ll also want to choose whether or not to use WWW as part of your URL. That is, yoursite.com or www.yoursite.com.
There’s no right or wrong choice here. The only important thing is that you pick one and stay consistent with it.
For example, here at WPKube, we use www.wpkube.com, and you’ll see that on every piece of content. If you just enter wpkube.com in your browser address bar, you’ll also be redirected to www.wpkube.com instead.
To choose your URL structure, go to Settings → General and make sure that the WordPress Address (URL) and Site Address (URL) use your preferred setup:
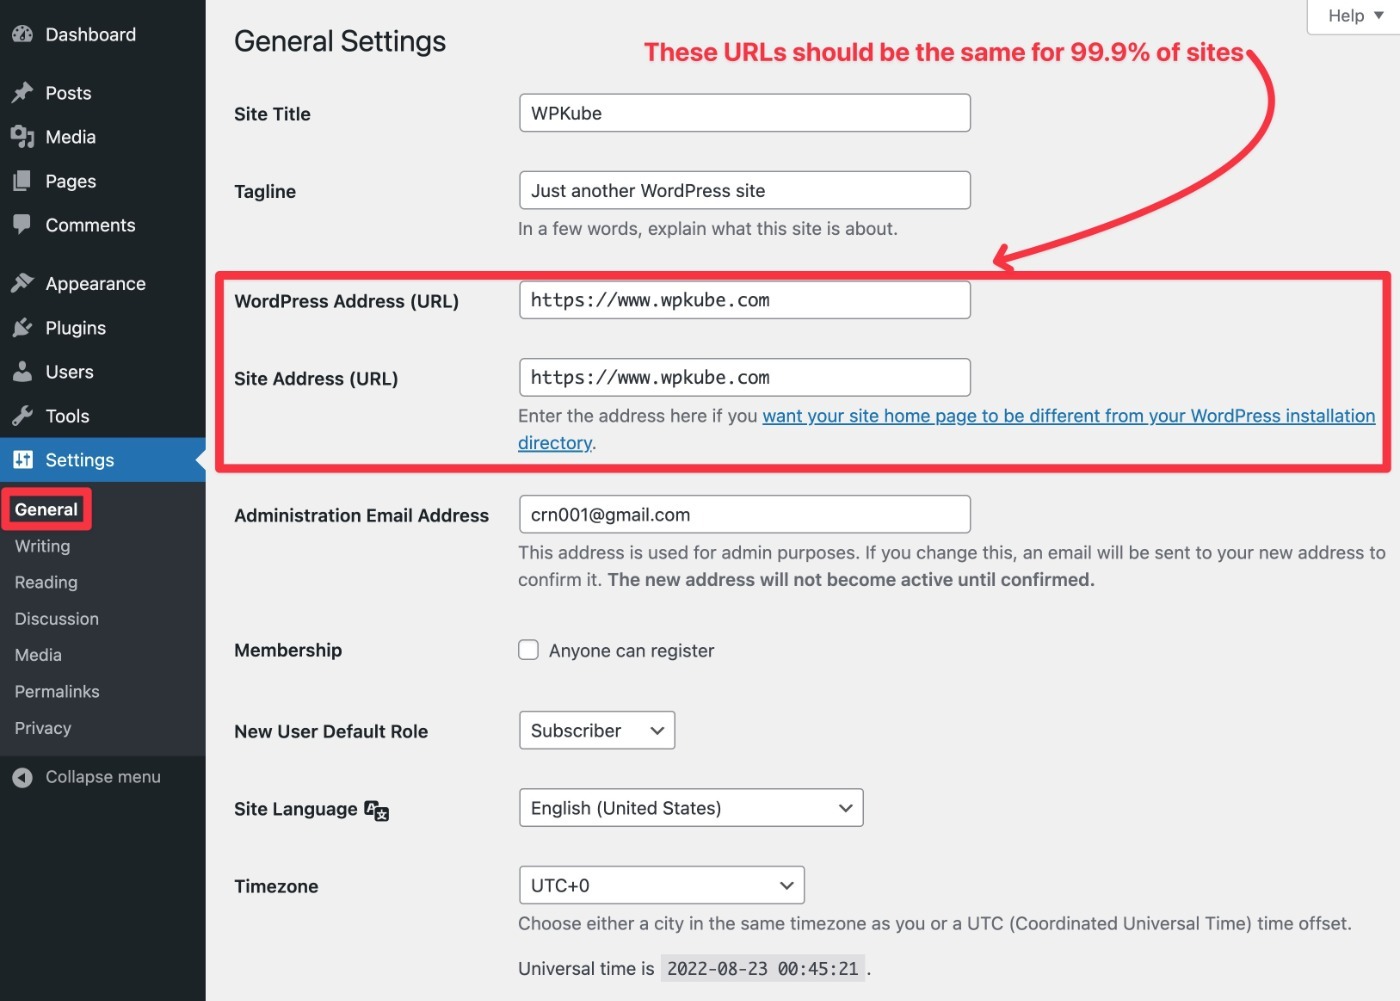
WordPress will now automatically redirect users to your preferred structure, so there’s no need to set up a redirect at the server level (though you can if you want).
4. Install a WordPress SEO Plugin
In order to add a lot of important SEO functionality to your site, it’s essential that you install a quality SEO plugin.
There are a lot of good SEO plugins, but we recommend Yoast SEO to most beginners for the following reasons:
- It’s popular.
- It’s easy to use.
- It has a long track record of reliability.
- The free version works fine for most sites.
It’s also the SEO plugin that we use here at WPKube.
For those reasons, we’re going to use Yoast SEO for all of the screenshots and instructions in this tutorial.
With that being said, here are a few other options you can look at:
You can read our Yoast SEO vs Rank Math comparison to see how two of the most popular options compare.
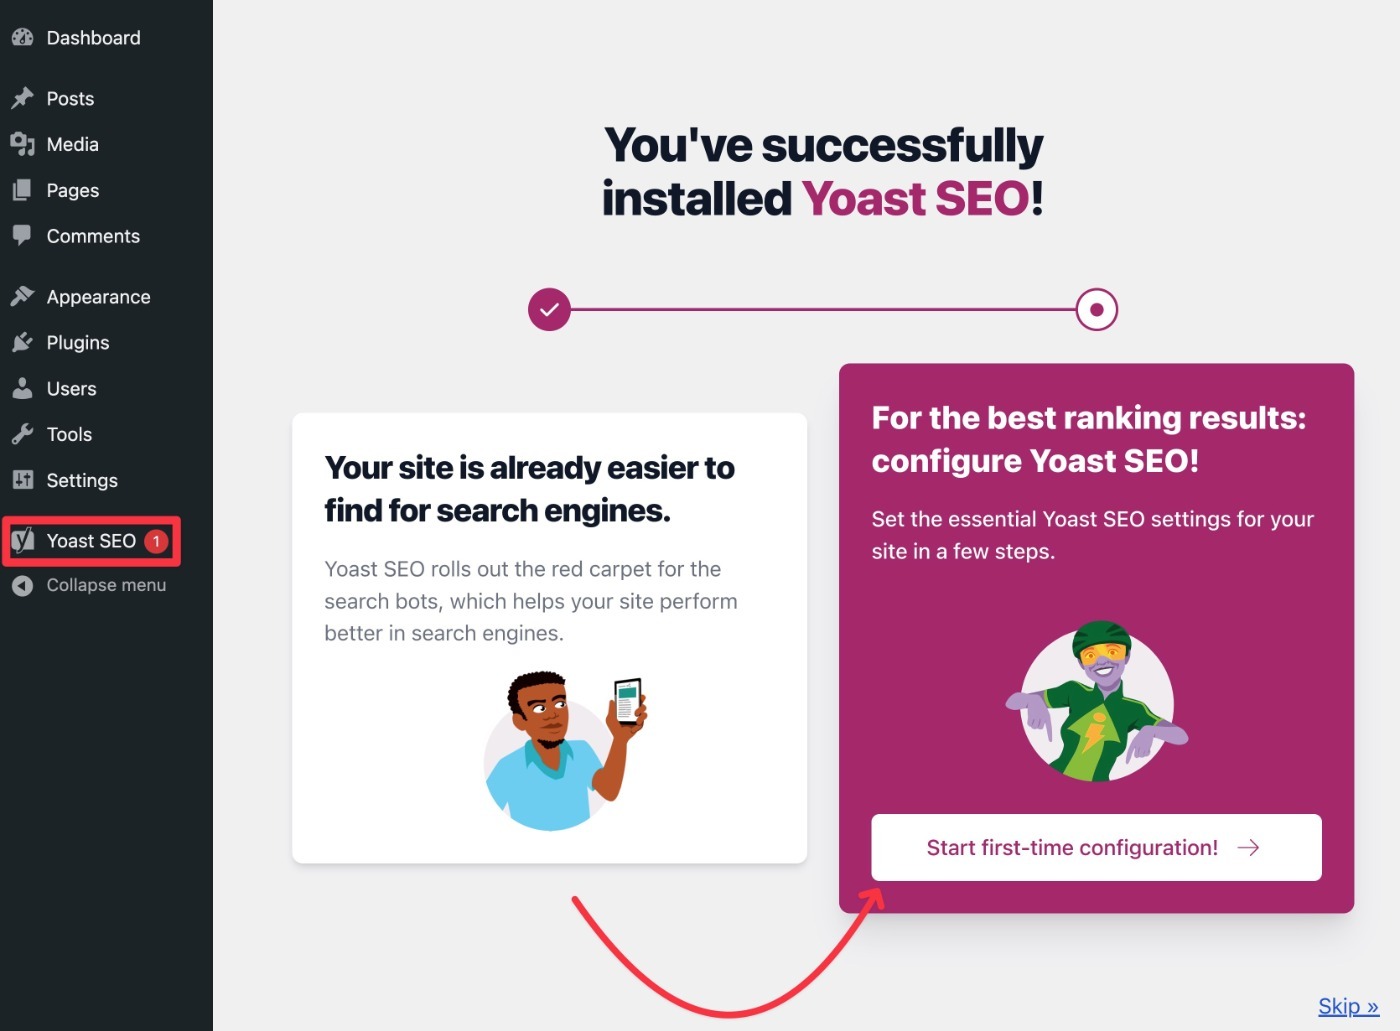
Once you install and activate the Yoast SEO plugin, you’ll want to go through its setup wizard to configure some important basics for your site’s SEO.
Later on, we’ll also show you how to use Yoast SEO to optimize individual pieces of content on your site.
5. Install an SSL Certificate and Use HTTPS
HTTPS makes your website more secure and privacy-friendly by encrypting the data that passes between your site’s server and your visitors’ browsers.
You can tell if a site is using HTTPS by looking for the green padlock in your browser’s address bar:

While that alone is reason enough to use HTTPS on your site, there’s also another big benefit – Google has used HTTPS as a positive ranking factor since 2014.
So not only does it make your site more secure, but it also helps it rank higher in search engines.
In order to use HTTPS on your site, you’ll need to install an SSL certificate on your server, which most web hosts offer for free nowadays. If your host doesn’t, you can consider switching to one of the top WordPress hosting providers from our list.
Once you’ve installed an SSL certificate, you can enable HTTPS on your site by using a plugin like Really Simple SSL. If you feel comfortable, you can also do it manually, but it requires a little more work.
6. Verify Your Site With Google Search Console and Submit Sitemap
Google Search Console is a free tool from Google that lets you manage all aspects of your site’s SEO, including configuring settings and viewing real performance data.
For that reason, you’ll absolutely want to set up and verify your WordPress site with Google Search Console. Here’s how:
- Go to the Google Search Console website.
- Add your WordPress site, making sure to choose the proper URL (WWW vs non-WWW and HTTP vs HTTPS).
- Verify your site with Google Search Console using one of the available methods. If you’ve already added Google Analytics, you can verify using that. Our Google Search Console guide covers some of the other methods. Yoast SEO also includes a tool to verify your site – go to Yoast SEO → General → Webmaster Tools to access it.
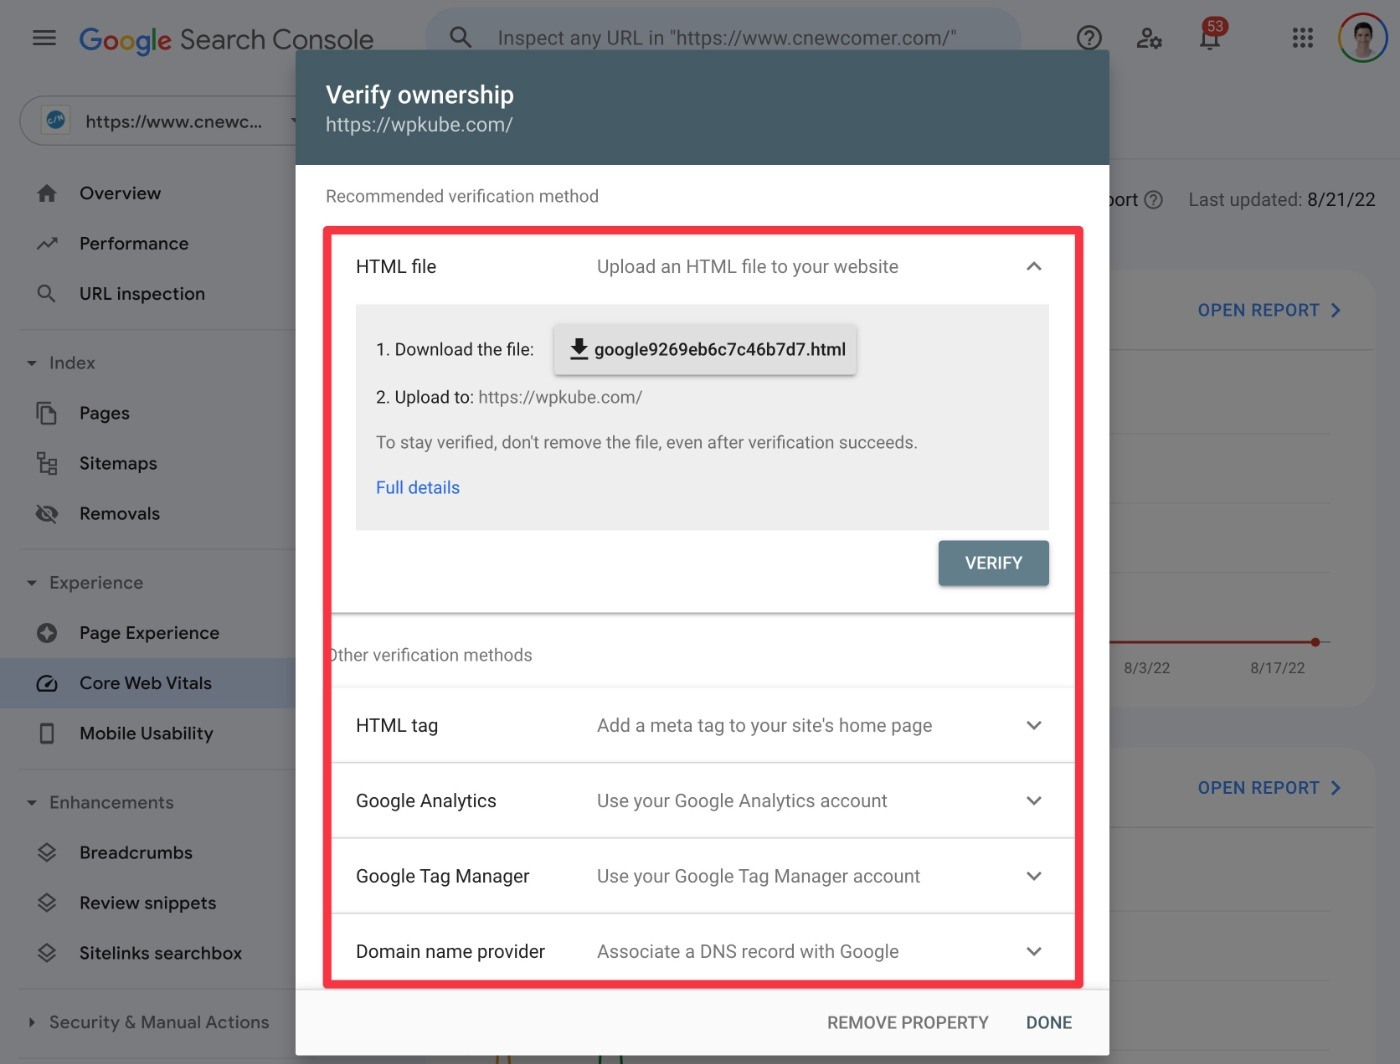
Once you’ve verified your site, you’ll get access to a bunch of tools.
While it’s worth exploring all of them, one essential action you should take is to submit your WordPress sitemap to Google. This will help Google fully discover all of your content and include it in the search results.
Here’s how:
- Go to the Sitemaps area in Google Search Console.
- Find the Add a new sitemap box (it should be at the top of the page).
- Enter the URL to your site’s sitemap. The default WordPress sitemap is located at yoursite.com/wp-sitemap.xml. However, if you’re using the Yoast SEO plugin, it will replace the default sitemap with its own sitemap, which is located at yoursite.com/sitemap_index.xml.
- Click Submit.
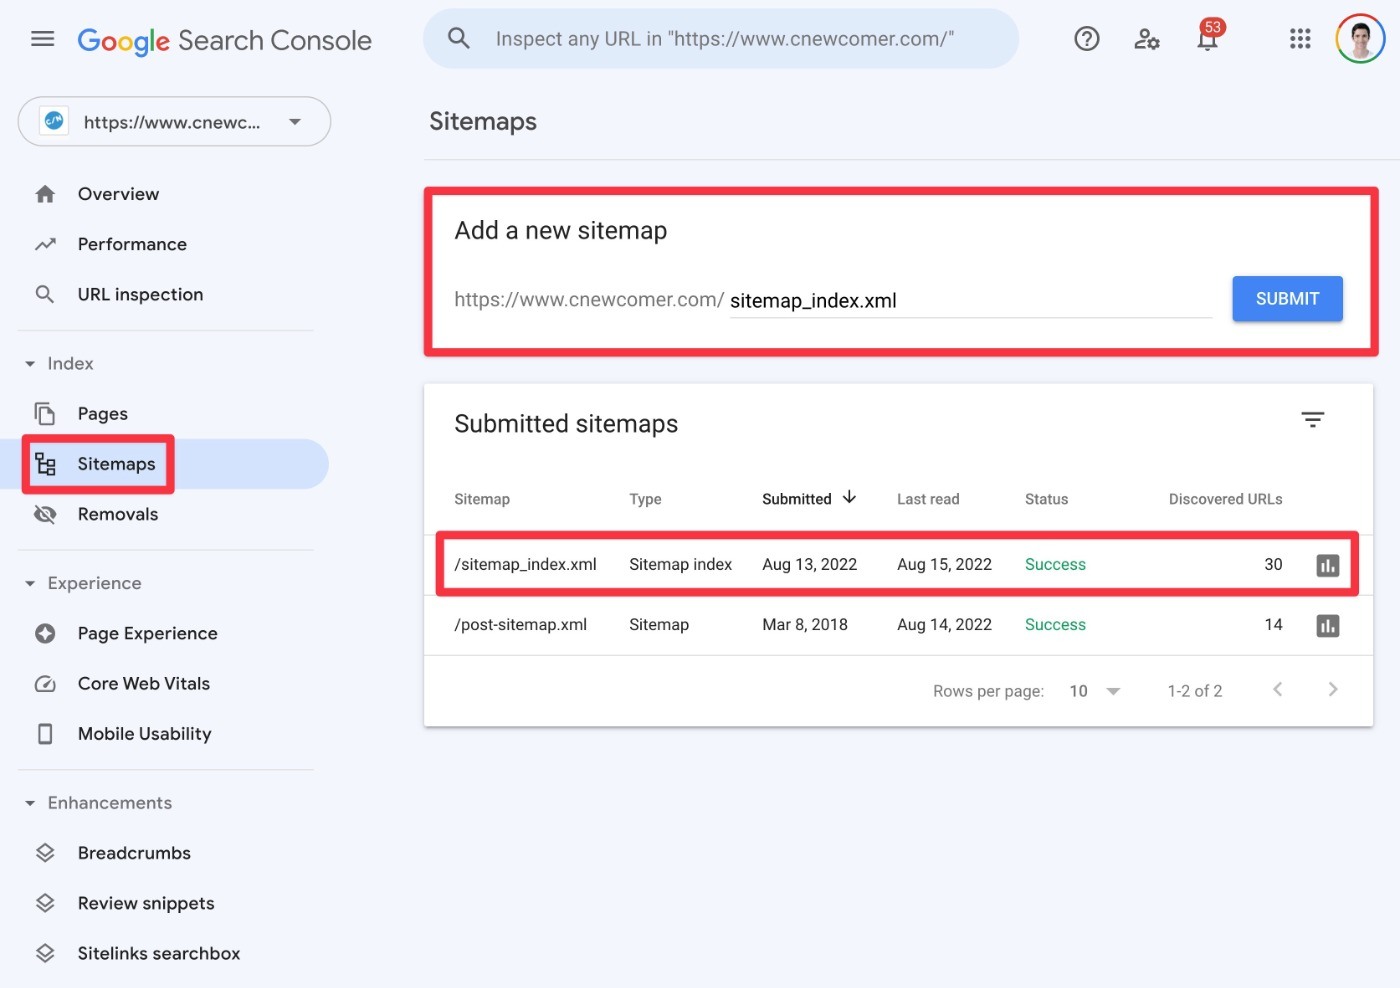
Once you submit your sitemap, you should see it appear under the Submitted sitemaps list.
7. Optimize Your Site’s Performance (Especially Core Web Vitals)
Having a fast-loading website not only creates a better experience for your visitors, but it also helps your site rank higher in search engines, especially since Google’s 2021 Page Experience update.
For SEO, you’ll want to focus primarily on your site’s Core Web Vitals metrics:
- Largest Contentful Paint (LCP)
- First Input Delay (FID)
- Cumulative Layout Shift (CLS)
If your site is already receiving traffic, you can see how it performs in Core Web Vitals by using the Core Web Vitals menu in Google Search Console:
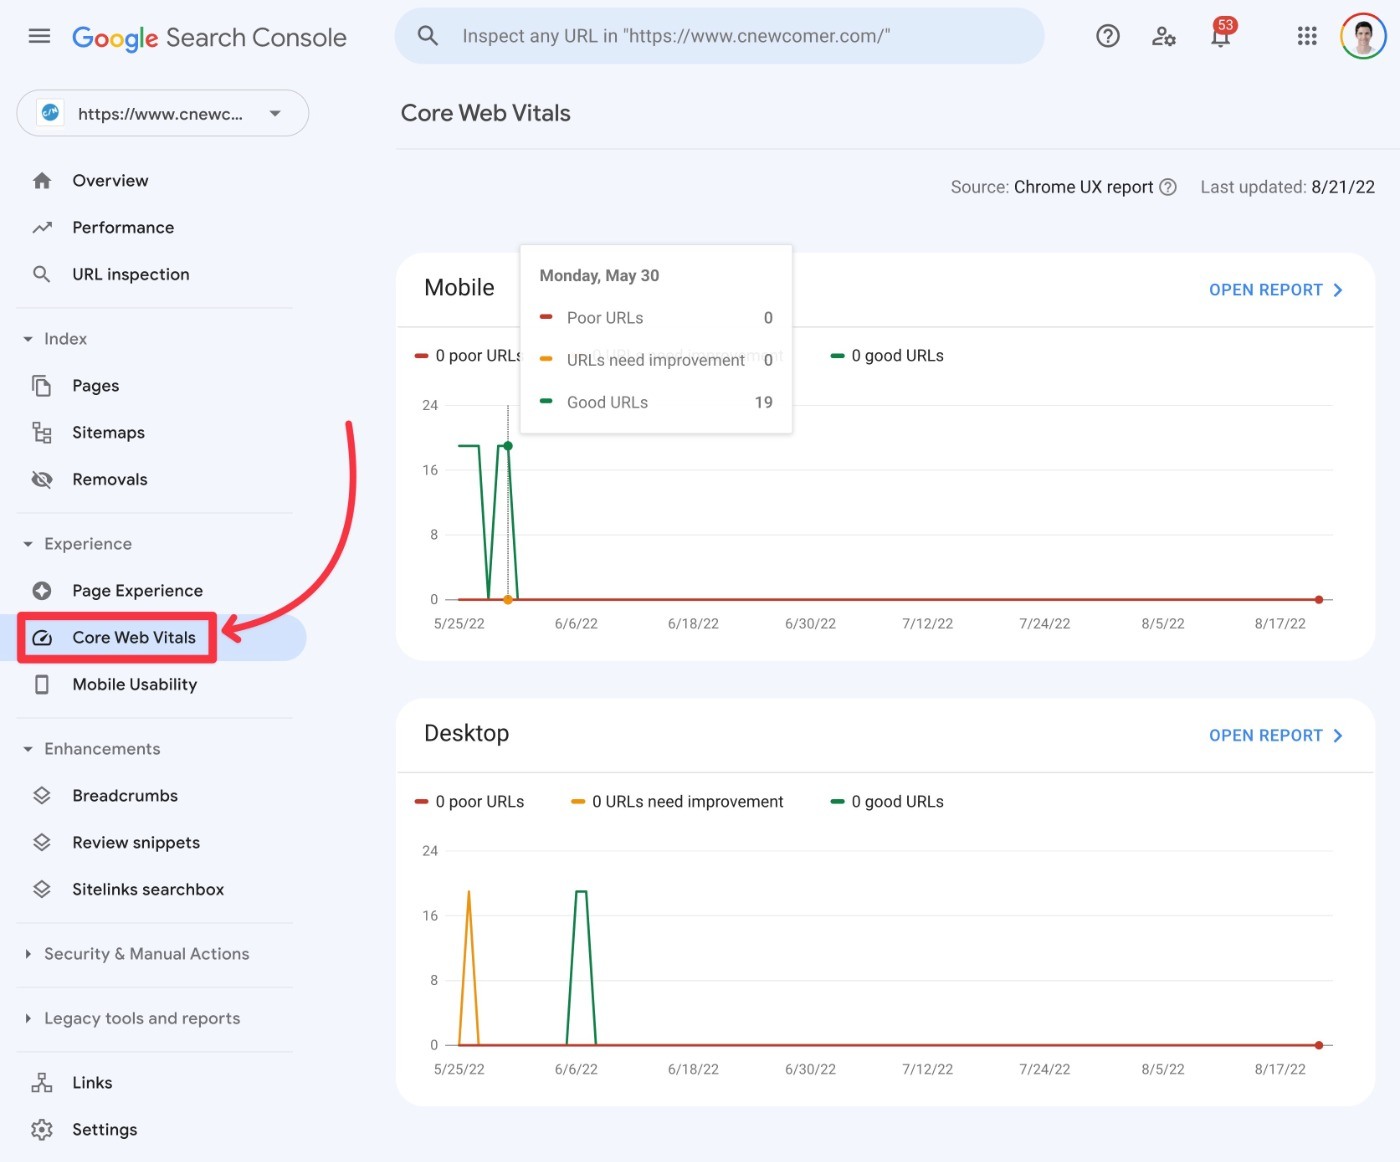
Alternatively, you can also run your site through Google’s PageSpeed Insights tool, or other speed test tools like WebPageTest.
So how can you optimize your Core Web Vitals metrics?
We have a complete guide on how to speed up WordPress, but the two most fundamental things you can do are as follows:
- Use fast WordPress hosting. Choosing a host from our best WordPress hosting list should set you up for success.
- Install a comprehensive performance optimization and caching plugin. If you can afford a premium plugin, I recommend WP Rocket because it makes it super easy to optimize for Core Web Vitals (read our WP Rocket review to learn more). However, you can also find quality free options at WordPress.org if you’re on a budget – you’ll just need to do some extra work to set up everything.
8. Add an About Page and Other E-A-T Signals
E-A-T stands for Expertise, Authoritativeness, and Trustworthiness. Basically, Google wants to know that you have expertise in your site’s niches, especially in YMYL (Your Money or Your Life) niches such as finance, legal, and medicine.
However, even if you’re not in YMYL niches, adding E-A-T signals is a good thing to do.
Here are some tips:
- Create a detailed About page that lists your expertise and background. You can use the WPKube About page for inspiration.
- Publicly list each piece of content’s author, including a short biography in the author box (along with social media profiles if relevant).
- Link to trusted sources.
- Cover multiple viewpoints in your content (e.g. pros and cons in product reviews).
9. Optimize Your Site Structure
This last tip is the most tricky. However, to optimize how Google understands and ranks your site, it’s important to optimize your site’s structure, which is composed of a few primary parts:
- Navigation menus and links
- Categories and tags
- Archive pages
- Etc.
Let’s go through them…
Navigation Menus and Links
Typically, your site will have navigation menus in the header and footer (as well as potentially the sidebar).
Ideally, you’ll want to use these menus/links to point search engines and human visitors to your most important, high-value content.
For example, here at WPKube, you can see that we link to our most valuable tutorials and list posts, such as our guide on how to make a website:
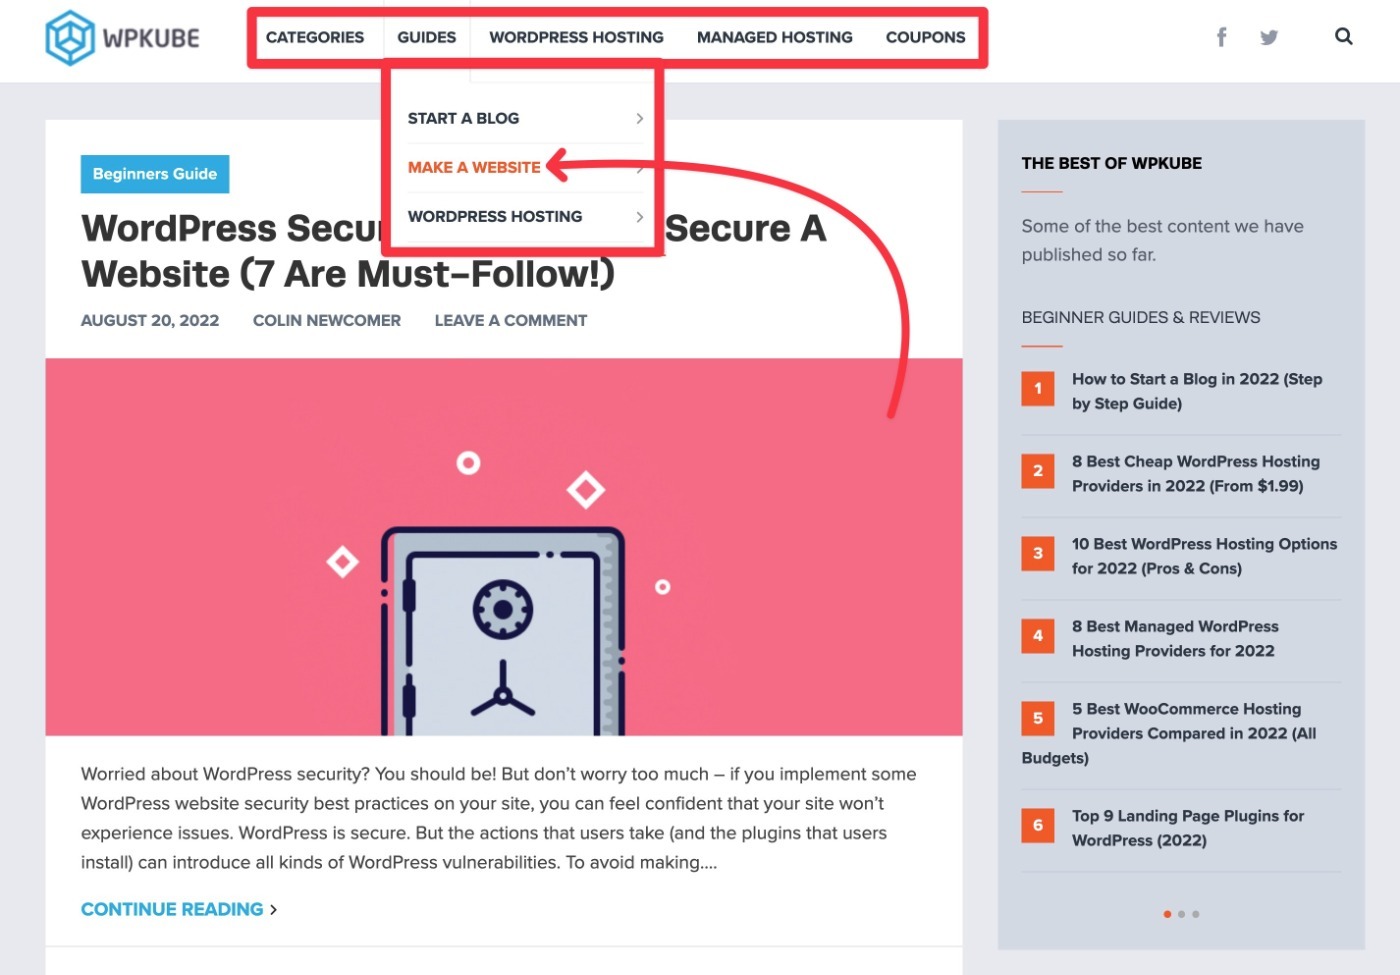
Don’t feel like you need to cram every single link in here. Remember – you just want to promote your most valuable and important content.
Categories and Tags
Categories and tags help you organize your blog posts and other content. As such, they can help both humans and search engines navigate and understand your content.
You must assign each blog post at least one category, but using tags is totally optional.
To learn more about how to use them properly, read our full guide to WordPress categories and tags.
Archive Pages
Archive pages are the pages that list all of the blog posts that meet certain criteria. For example:
- Main blog archive – lists all of your blog posts, ordered by the most recently published date.
- Category archive – lists all of the blog posts in a specific category.
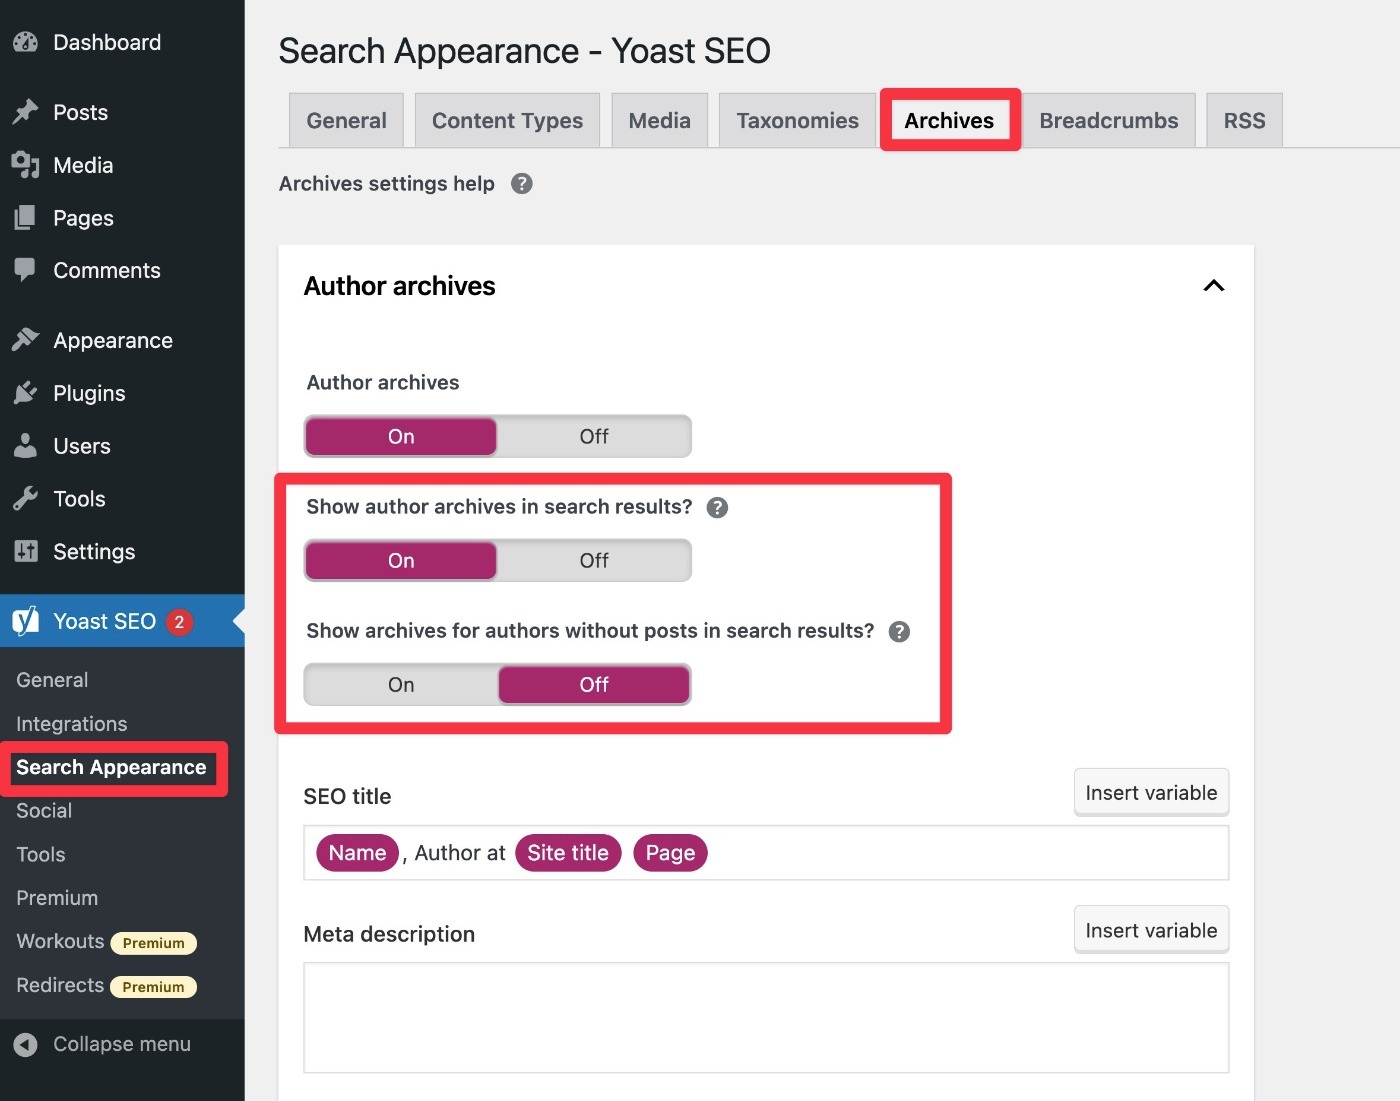
- Author archive – lists all of the blog posts written by a specific author.
Archive pages can be both good and bad for SEO, depending on how you use them.
If you set them up well and add some unique content, you can actually rank your archive pages in Google. However, for most sites, it’s probably better to just noindex your archive pages, as they can also be viewed as duplicate content on many sites.
Unless you have a specific reason for wanting to rank these pages in Google, I recommend using the noindex approach.
In Yoast SEO, you can control the appearance of archive pages by going to Yoast SEO → Search Appearance → Archives:
WordPress SEO Checklist for Individual Pieces of Content
In addition to nailing the sitewide aspects of WordPress SEO, it’s also important to optimize each piece of content that you publish (assuming you want that content to rank in search engines).
Here are some tips to do that…
1. Perform Keyword Research
In order to know which keywords to target in your post, you’ll want to do at least some basic keyword research for every piece of content that you publish.
This helps you know what people are searching for so that you can optimize your content for those keywords.
If you’re using Yoast SEO, this will also help you choose the “Focus Keyword” to put in the Yoast SEO box, which will give you access to some helpful SEO suggestions.
If you’re on a tight budget, you can use free keyword research tools like Ubersuggest or Wordstream.
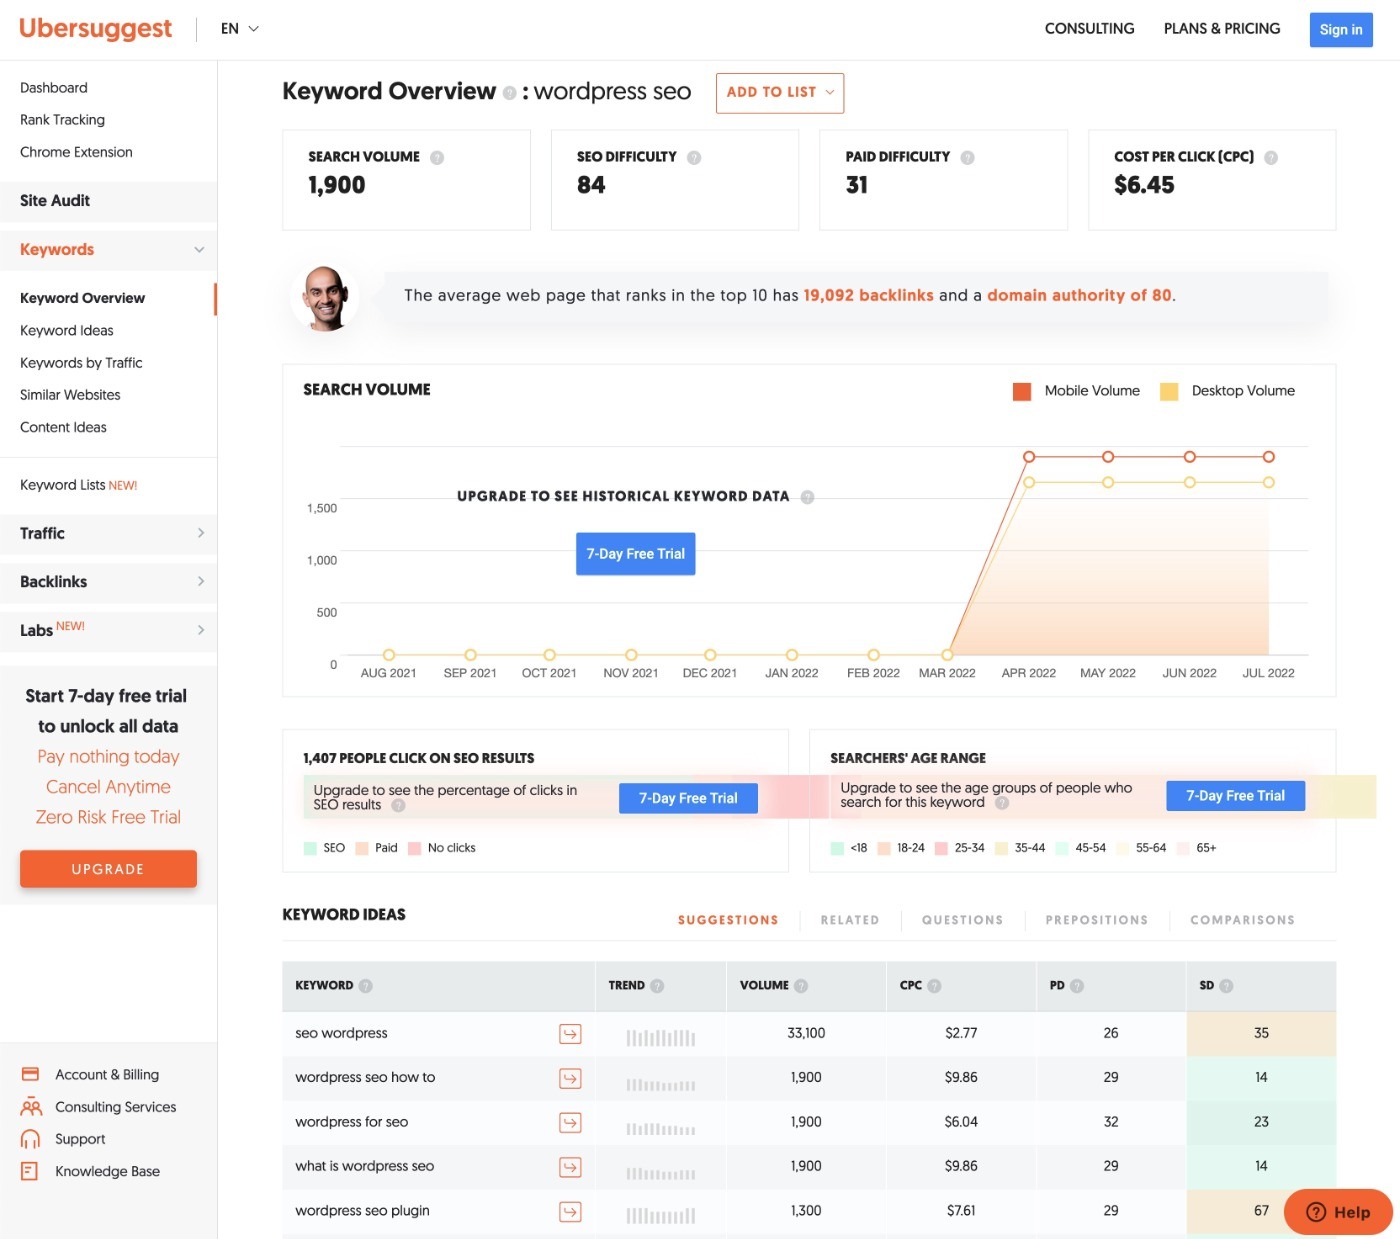
If you’re willing to pay, Ahrefs and SEMrush are two of the best options, though they’re pricey. Our special SEMrush coupon gets you a 30-day free trial, though.
KWFinder is also a great budget alternative that should work fine for most WordPress users. Personally, I use KWFinder.
2. Set the SEO Title and Meta Description
Once you have your focus keyword, you’ll want to add your SEO title and meta description to the Yoast SEO box for the piece of content:
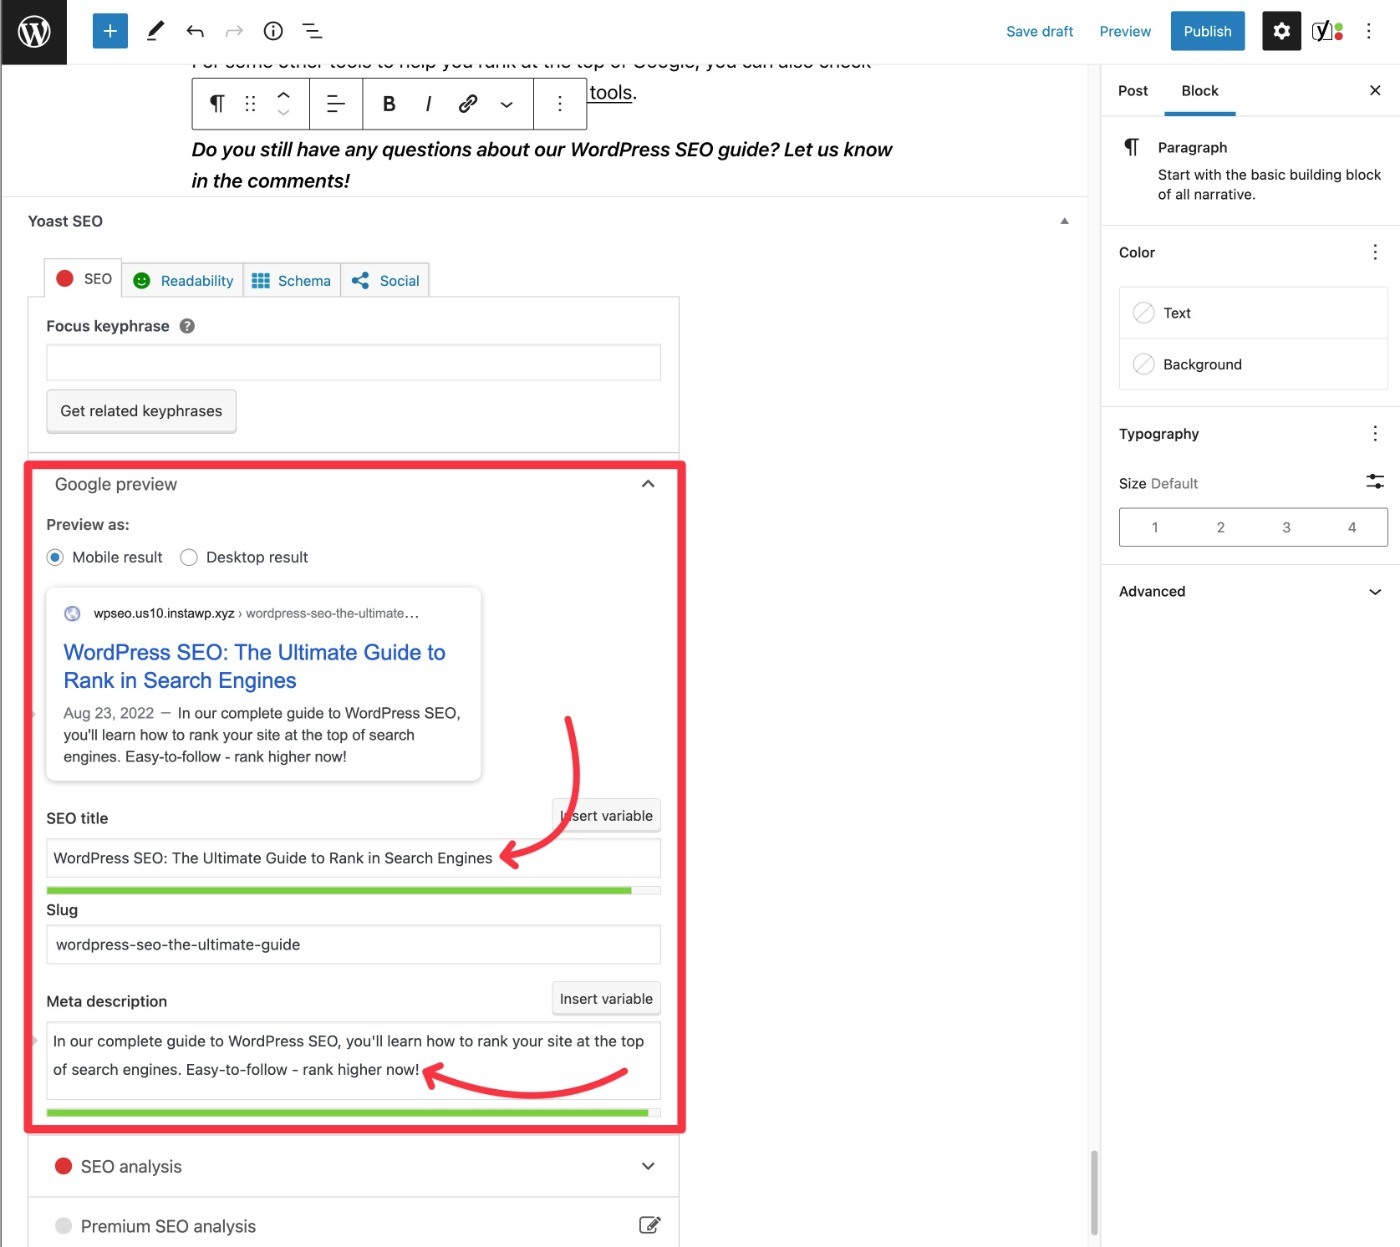
These are the details that will appear on the search results page, so they’re very important for getting people to click on your site (though Google will sometimes generate its own title and description, which can be a bit annoying):

Ideally, you’ll want to naturally include your focus keyword in both the title and description whenever possible.
3. Optimize Your URL Slug
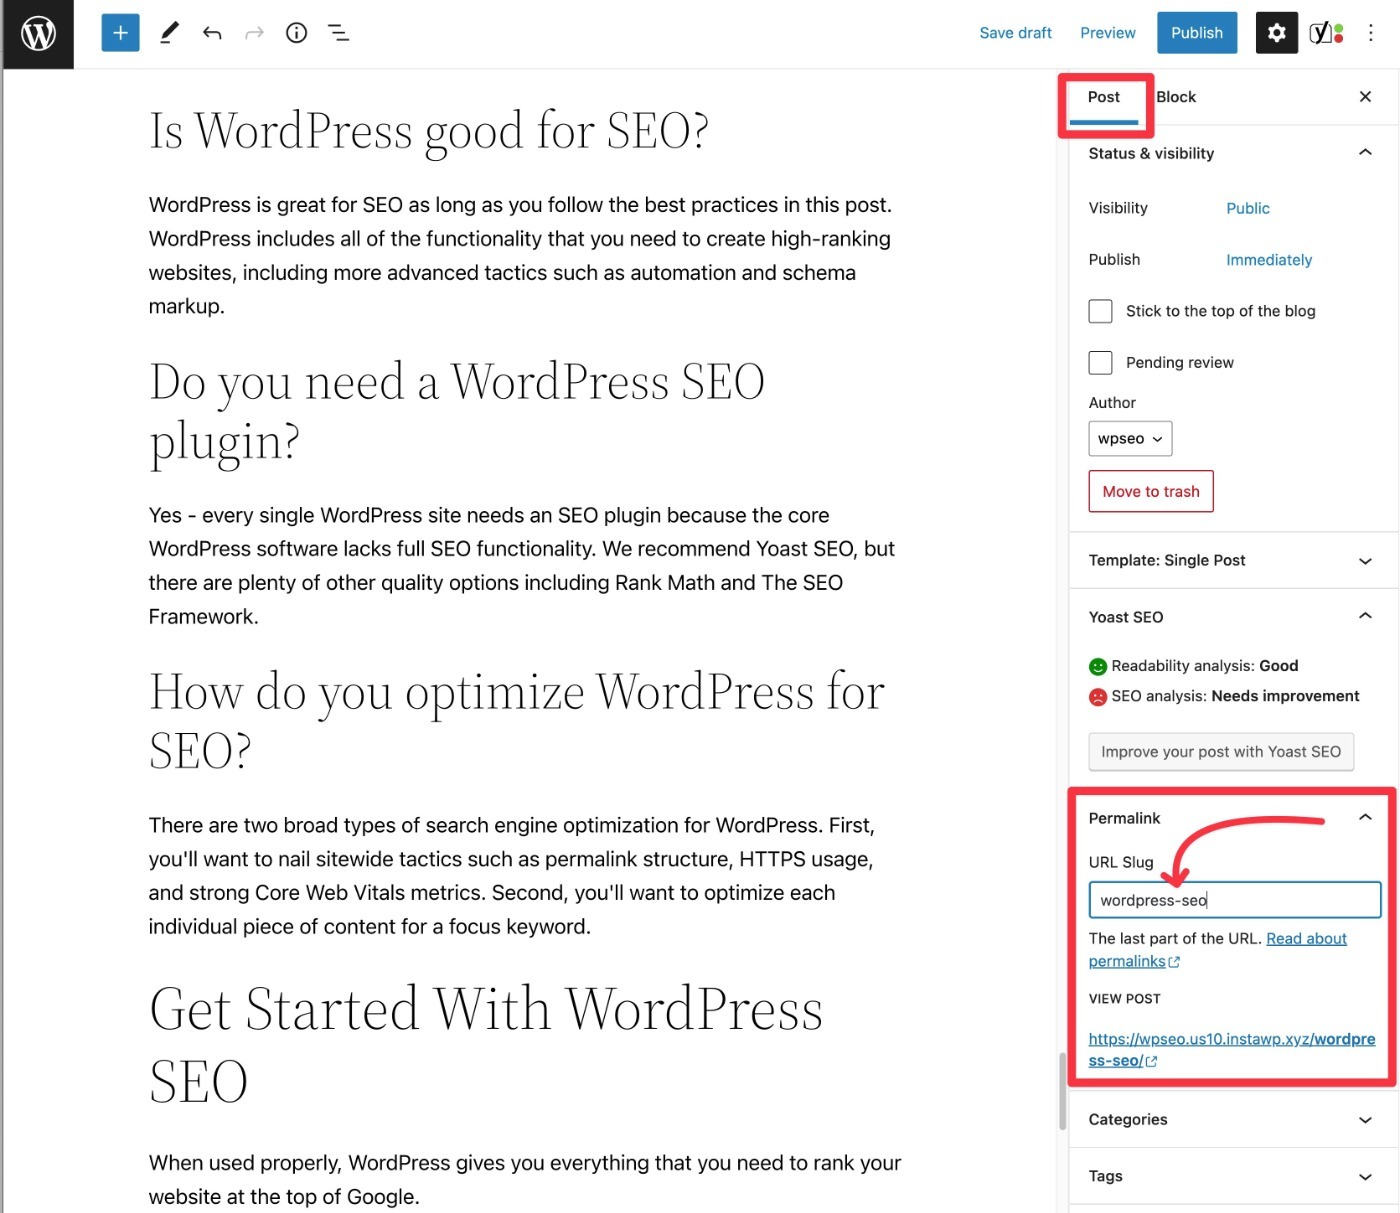
A piece of content’s URL slug is its unique identifier. For example, in this URL – wpkube.com/wordpress-seo-guide – the URL slug is “wordpress-seo-guide”.
As with your SEO title and meta description, you’ll want to include your focus keyword in the URL slug. You can do this by using the Permalink setting under the Post tab in the editor:
4. Set Focus Keyword and Implement Other Suggestions
If you’re using Yoast SEO, the plugin offers some really handy suggestions to help you optimize your content for your chosen focus keyword, which is the primary keyword that you discovered in your keyword research.
These include setting the SEO title and meta description, as well as a number of other tips:
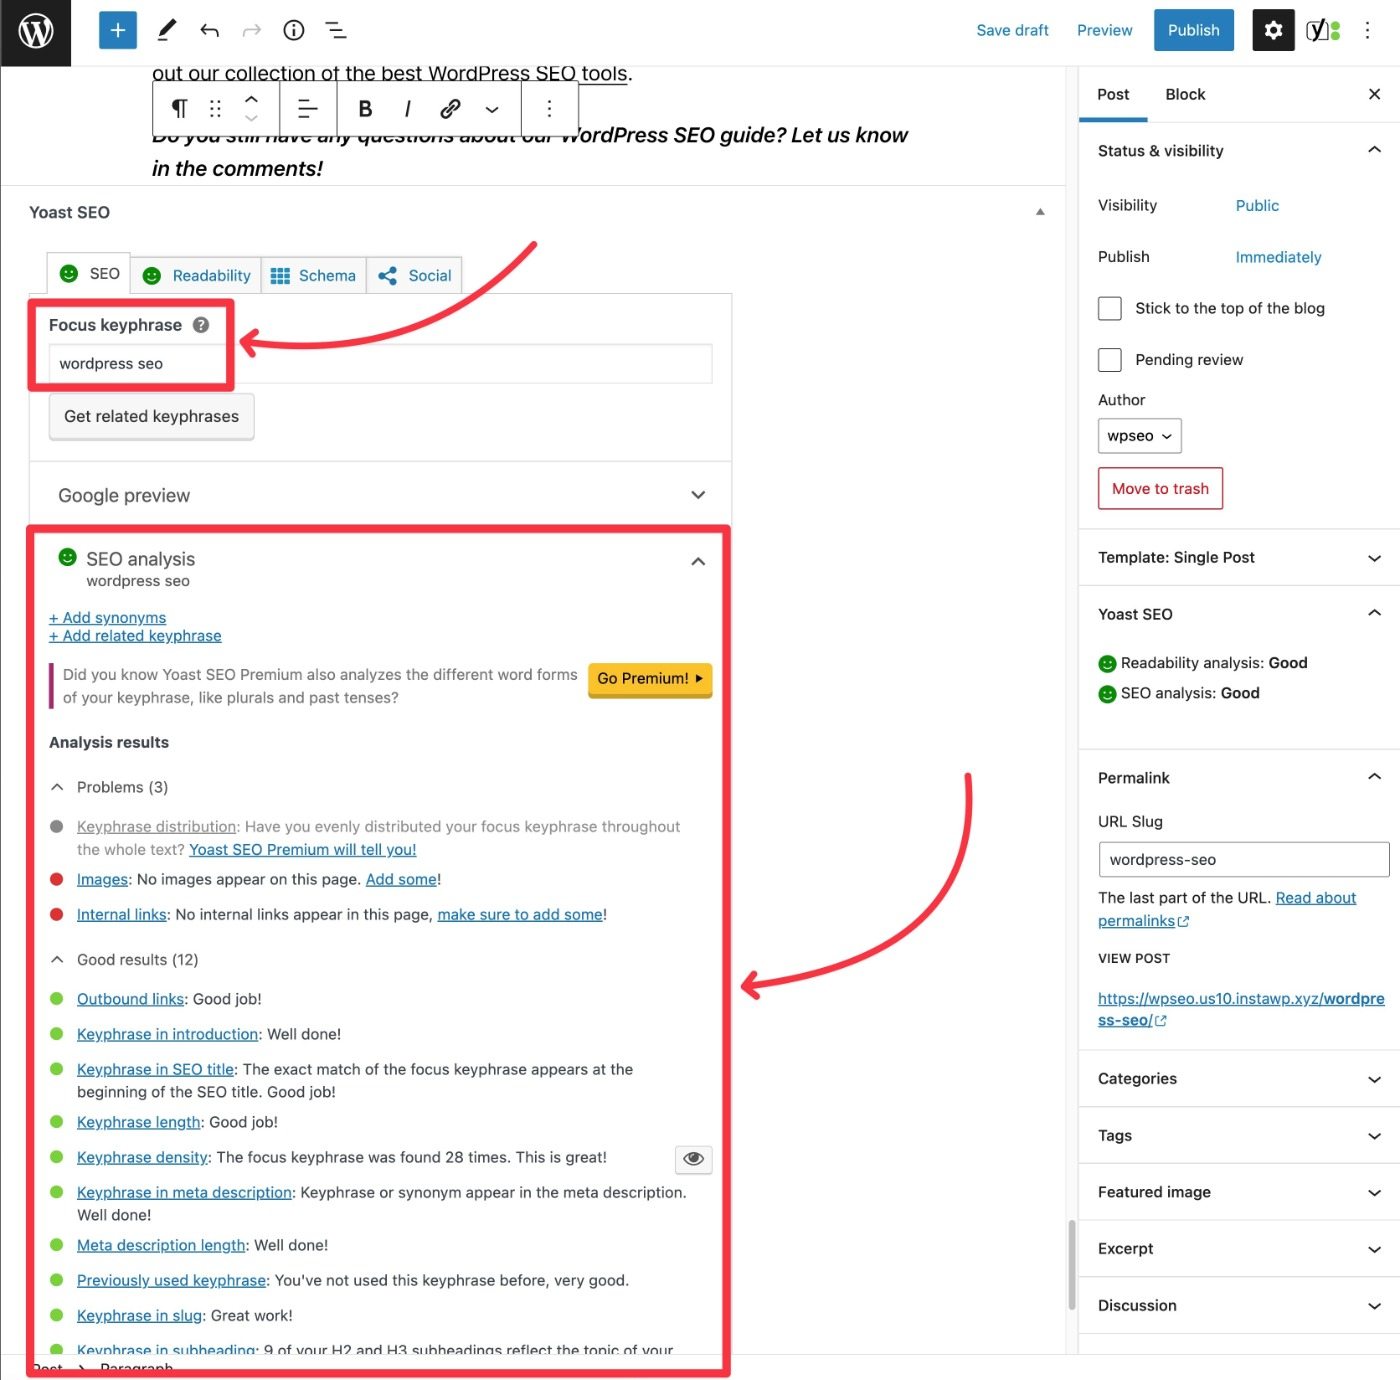
Don’t worry too much about implementing every single suggestion. But you do want to implement as many as you can while keeping the post natural-sounding and engaging for human readers. That is, don’t sacrifice your post’s quality just to score better in the analysis.
5. Add Alt Text to Images
If you’re using images (which you should be), it’s important to add alt text to images.
Alt text is behind-the-scenes code that provides a description of the image. Not only does this add context for search engines, but it also serves another benefit of making your site more accessible to visitors who are using screen readers.
To add alt text to an image, select the image block and then use the alt text box in the sidebar. If you can do it in a natural way, you’ll want to try to work in keywords related to your post:
6. Include Relevant Internal Links Whenever Possible
Internal links are links that point to other content on your site. They’re great for two reasons:
- They spread around your site’s “link juice”. While not as powerful as quality backlinks from external sources, internal links can still help the linked content rank higher.
- They keep visitors on your site longer, which can improve metrics such as bounce rate, time on page, etc.
The simplest way to add internal links is to just do so manually – you can add the internal link just like you’d add any other link.
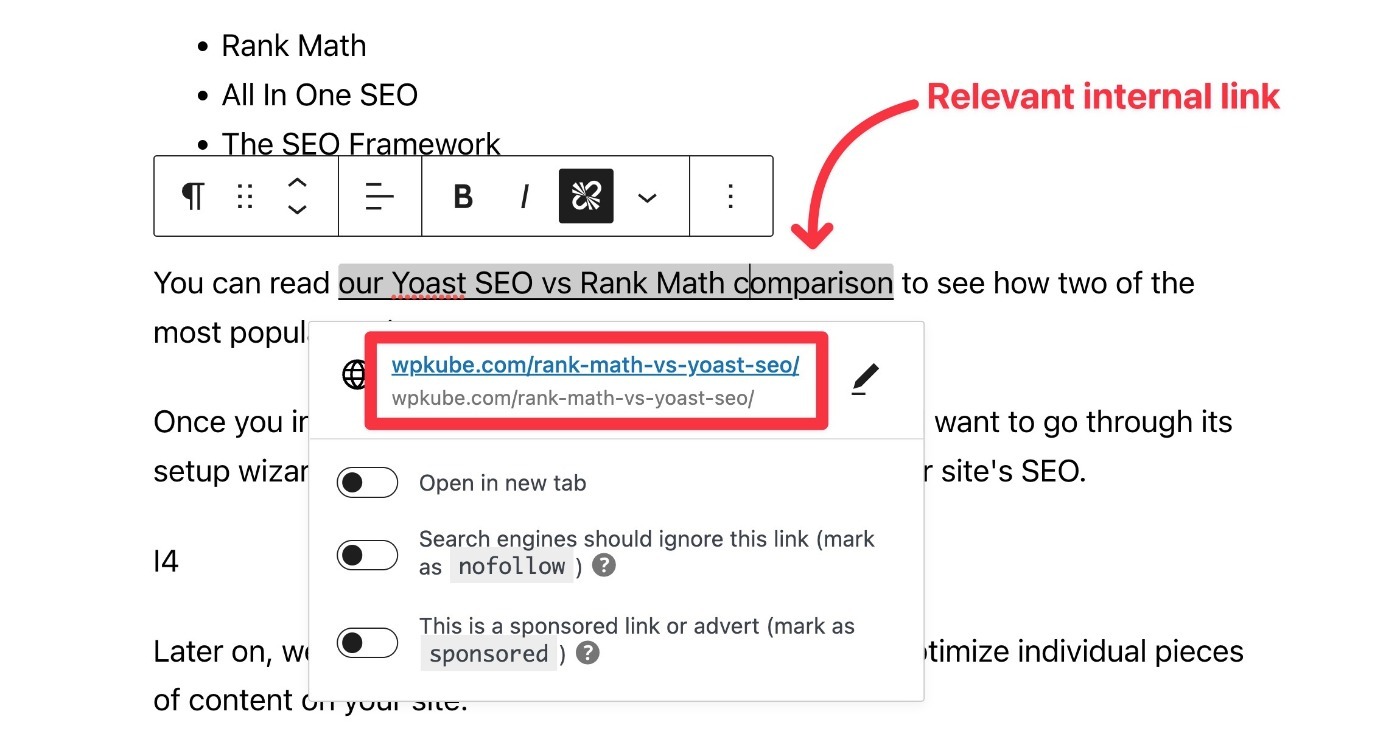
However, if you have a ton of content, it might be tough to remember relevant content to link to. In that case, you can consider a dedicated internal linking plugin such as Link Whisper. Or, the premium version of Yoast SEO also includes internal linking suggestions, as do some other SEO plugins including Rank Math.
7. Add nofollow to Affiliate Links
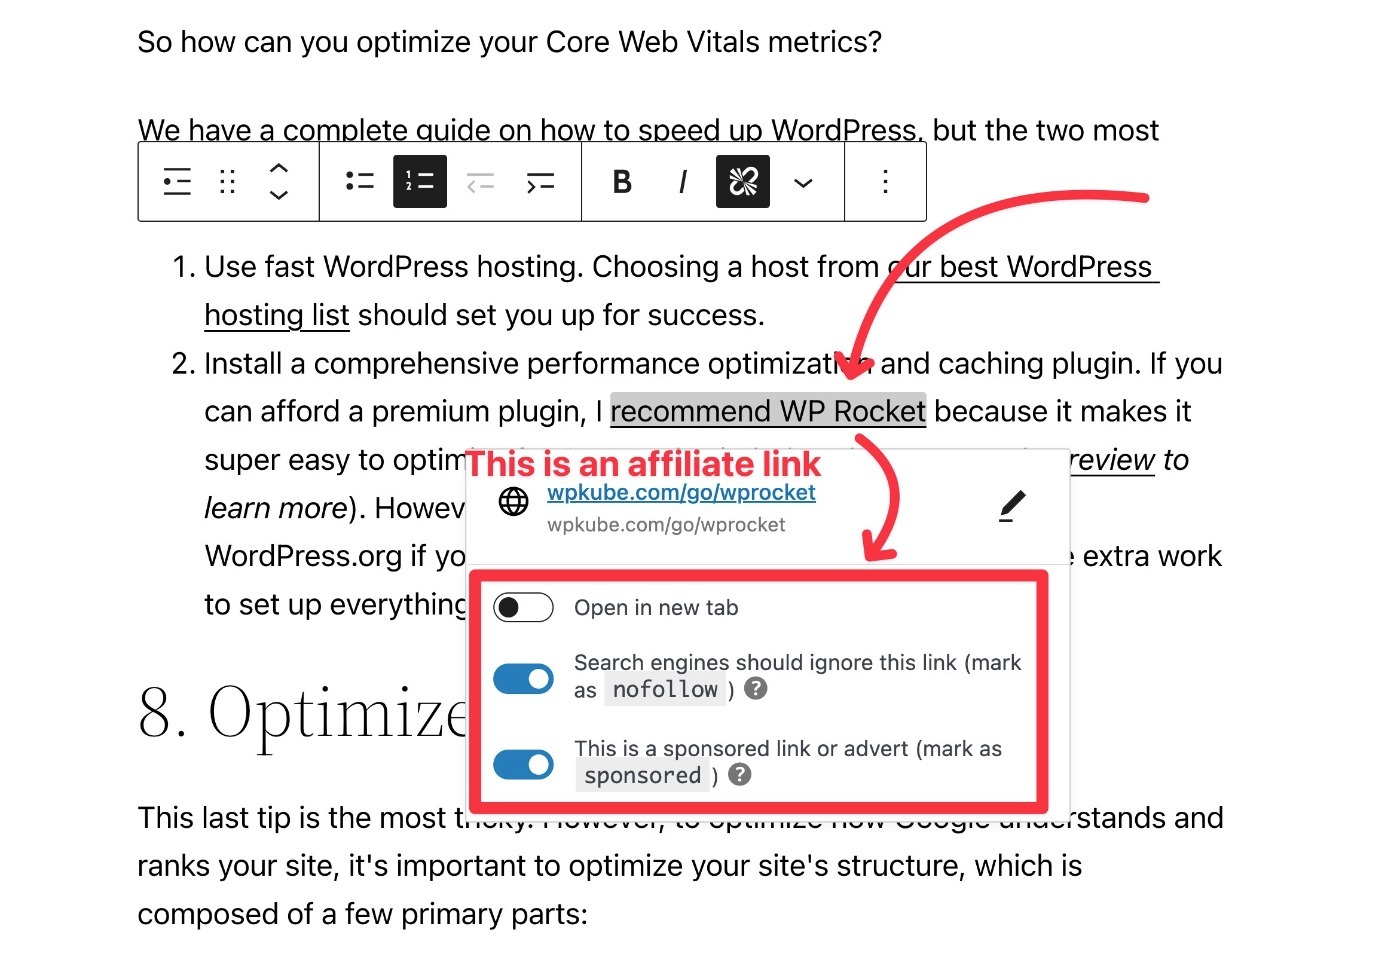
If you’re including affiliate links or other sponsored links in your content, you should add the nofollow tag to them to follow Google’s recommendations.
If you have Yoast SEO installed, you can do this by clicking on the relevant link and using the toggle:
WordPress SEO FAQs
To finish out our WordPress SEO guide, let’s recap a few common questions.
Is WordPress good for SEO?
WordPress is great for SEO as long as you follow the best practices in this post. WordPress includes all of the functionality that you need to create high-ranking websites, including more advanced tactics such as automation and schema markup.
Do you need a WordPress SEO plugin?
Yes – every single WordPress site needs an SEO plugin because the core WordPress software lacks full SEO functionality. We recommend Yoast SEO, but there are plenty of other quality options including Rank Math and The SEO Framework.
How do you optimize WordPress for SEO?
There are two broad types of search engine optimization for WordPress. First, you’ll want to nail sitewide tactics such as permalink structure, HTTPS usage, and strong Core Web Vitals metrics. Second, you’ll want to optimize each individual piece of content for a focus keyword.
What other tools do you need for WordPress SEO?
In addition to a quality WordPress SEO plugin, we also recommend a keyword research tool such as SEMrush, Ahrefs, or KWFinder. If you’re on a budget, you can also use tools like Ubersuggest.
Get Started With WordPress SEO
When used properly, WordPress gives you everything that you need to rank your website at the top of Google.
In this ultimate WordPress SEO tutorial, we tried to cover all of the most important best practices, including sitewide SEO principles as well as a WordPress SEO checklist for individual pieces of content.
Implement these tactics today and I guarantee that your site’s rankings will improve.
Add some backlinks from quality third-party sites and you’ll really shoot up the rankings!
For some other tools to help you rank at the top of Google, you can also check out our collection of the best WordPress SEO tools.
Do you still have any questions about our WordPress SEO guide? Let us know in the comments!
