LearnDash Review 2021: The Best WordPress LMS Plugin?

[ad_1] Considering using LearnDash to create online course content with WordPress? LearnDash is a popular WordPress LMS plugin that works for both serious academic institutions, solo course creators, and everyone in between. It can help you create unlimited courses, add unlimited lessons and topics, quiz your learners, require assignments, etc. It also includes built-in features to charge one-time or recurring access fees, as well as advanced features like content dripping, course prerequisites, and more. Overall, it’s definitely one of the top options when it comes to WordPress LMS plugins. And in our hands-on LearnDash review, we’re going to take a detailed look to help you decide whether this plugin is right for you. Here’s how we’ll break up our LearnDash review: Thoughts on the types of users who can benefit from LearnDash A hands-on look at how LearnDash works Seven pros and two cons of LearnDash FAQs about LearnDash Final thoughts Let’s dig in… Who Is LearnDash For? LearnDash is a pretty flexible plugin that can benefit both academic institutions as well as businesses, solo creators, and more. On the academic front, LearnDash supports SCORM and Tin Can API (xAPI) for heavy-duty implementations. The ProPanel feature is also well-suited to academic institutions, as it offers quick assignment management, emailing features, and more detailed learner information/analytics. However, LearnDash can also be quite effective for more small-scale uses, too. For example, if you’re a solo course creator, LearnDash can help you create and deliver free or paid course content to your members, which makes it a great solution for monetizing your site with online courses. It can also be useful to businesses that want to provide training to employees. You can use LearnDash to set up employee onboarding or certification and track your employees’ progress to make sure they’ve completed all the relevant education materials. All in all, you have a lot of different ways to use LearnDash, which is why it’s one of the top WordPress LMS plugins.  How LearnDash Works In this section, I’ll give you a general overview of what it’s like to create course content with LearnDash. Then, in the next section, I’ll single out some specific pros and cons. Basic Setup When you first activate LearnDash, it launches a “bootcamp” guide to show you all the actions you need to take to set up LearnDash. Each step includes a video and text article, and you can mark them as complete as you go through them: Overall, I think this is really convenient as it helps you make sure you’re not missing anything important. Creating a Course Your first step is to add a course. Each course can include unlimited lessons, topics, quizzes, assignments, etc. When you create a course, you’ll see the native WordPress block editor (for the course listing page content), as well as tabs across the top to configure additional options: Using the Course Builder The course builder is one of the most useful features in LearnDash as it lets you set up the structure of your lessons, topics, quizzes, and more using a simple drag-and-drop interface. Lessons are the main knowledge block, and then you can subdivide lessons into topics. You can use the buttons to add new lessons, topics, and quizzes and then drag-and-drop things to rearrange them as needed: Adding Lessons/Topic Content Once you’ve added the high-level structure of your course using the builder, you can open the editors for individual lessons/topics to add the content for those units. When you add a lesson/topic, you can add the content using the regular WordPress block editor. You’ll also get a useful Associated Content box in the sidebar to let you see how this unit matches up to other topics: In the Settings tab, you can also add a dedicated video that users must watch to complete the lesson, as well as configure other features like: Lesson materials (e.g. a PDF checklist) Assignments Lesson timers Adding a Quiz To add a quiz, you’ll get a dedicated quiz builder that works a lot like the course builder. You can add different questions and use drag-and-drop to change their order: If you go to the Settings tab, you can configure more advanced options like the passing score, retakes, question order randomization, a quiz certificate, quiz timer, and more. Setting Up Course Access Once you’ve added and organized your course content, the next step is to control access to your course, which you can do from the course’s settings. You have five options: Open – anyone can access the course. It’s public on your site. Free – the course is free, but people need to register and enroll for it. Buy Now – people pay a one-time fee for access. Recurring – people pay a recurring fee for access. Closed – you must manually add learners (or use a separate payment/membership plugin). You can also set up other restrictions, such as course prerequisites and access expirations: And that’s a general high-level look at what it’s like to create a course with LearnDash. Of course, I didn’t cover nearly every feature, because there are a lot of small options. But you should have a good idea of how it works. LearnDash Pros and Cons – 7 Pros and 2 Cons Now, let’s dig into some of the specific things that LearnDash does well…and some of its weak points. LearnDash Pros 1. User-Friendly Drag-and-Drop Builder I showed you the course builder in the tutorial, but it’s worth highlighting again because it’s such a useful feature. When you have a lot of lessons, topics, and quizzes, it can be hard to visualize how everything fits together and the progression that your students will follow as they move through the course. Having the course builder interface not only makes it easy to see how everything fits, but it also lets you easily make changes using drag-and-drop. It also just generally speeds up your course building because you can easily open the editors for all the course’s content from one spot.

Continue reading

How to Switch from Wix to WordPress (Step by Step Guide)

[ad_1] It gets said about many aspects of running a website, but your choice of platform is one of the most important decisions you’ll make. However, mistakes happen and needs change. If you’re currently looking to switch from Wix to WordPress, you’ll want to make the process as smooth as possible. While there’s nothing wrong with Wix in some aspects, it’s a closed-source problem to WordPress’ open-source solution. If you want to make the switch, there’s a lot of ‘donkey work’ in getting posts, pages, and media from one platform to another. As such, this post will show you how to switch from Wix to WordPress step-by-step. We’ll cover all of the aspects you need, and mention some future considerations too. Comparing Wix to WordPress On the surface, there’s a lot to like about both Wix and WordPress. For example: They both offer a full-featured solution for creating a website. Building a layout using both platforms is a breeze. The extendable nature of both solutions means you’ll be able to create a site to your exact requirements. Overall – and it might be polarizing to say – Wix does represent a good platform in some use cases and for some site owners. However, there are some drawbacks that warrant attention. Why You’d Want to Switch From Wix to WordPress In a bubble, Wix represents a dependable solution for creating and managing your website. However, you may have come up against some of the following issues: You’d like to run more than one site, without increasing your current budget. The storage for your Wix account has run out. You want to scale your site for more traffic and growth. The requirements you have for an eCommerce site can’t be met with Wix. In all of these cases, a switch from Wix to WordPress makes sense. Note that we’re talking about self-hosted WordPress here, rather than the .com version. Self-hosted WordPress is a full-fledged Content Management System (CMS) that can be tailored to your exact requirements. What’s more, the core software is free, as are thousands of themes and add-ons called ‘plugins’. Of course, you’ll need to pay for some aspects of hosting your WordPress website, but on the whole, you stand to save money by switching. Also (and it’s something we consider the most important aspect), you have total control over how to run and present your website. How to Switch from Wix to WordPress (In 6 Steps) As we noted, making the switch from Wix to WordPress is tougher than other platforms. This is because Wix doesn’t let you export your content with the same flexibility as its competitors. As such, there are a few steps you’ll need to take to get everything ported over: Purchase suitable hosting. Pick a theme for your site. Import your Wix content into WordPress. Design your new layout. Add functionality to help your new site meet your needs. Redirect your old site to the new one. We’ll dedicate more time to some of these steps than others, so let’s get to it! 1. Choose a Suitable Hosting Provider Before you think about making the switch from Wix to WordPress, you’ll need somewhere to host your new site. Wix includes hosting in its monthly price, while self-hosted WordPress doesn’t. Even so, you’ll usually pay around the same price for your own host, and get more control over your performance to boot. If you’re wondering which host to choose, we’ve looked at a number of options previously. However, the field is more packed for WordPress, given how popular the CMS is. As such, you might want to consider managed hosting. This keeps the control and flexibility with you, while letting your host handle under-the-hood tweaks. If you’re still unsure which host to choose, we’d recommend A2 Hosting: They have good support, a wide selection of plans, and suitable options for a range of budgets. We’ve covered them before (+ 52% off coupon) at WPKube, and had a lot of good things to say about the entire service. Installing WordPress You’ll also need to install WordPress in some cases. However, a lot of hosts include a one-click installer such as Softaculous, or pre-install WordPress for you. If you’re fortunate to have WordPress pre-installed, a chunk of the work is already done for you. However, if not, WordPress is a snap to set up. In fact, we’ve covered this in a previous article, so check that out if you need the guidance. 2. Choose the Right Theme For Your New WordPress Site Once WordPress is up and running on your host, there are a few tasks you’ll want to check off. We’ll talk about some of these later, but for now, getting your site looking right is our focus. WordPress uses ‘themes’. Think of them as ‘skins’ for your site, that can also implement additional functionality in some cases. While there are hundreds of themes available for free, they’re not usually the best fit for a business site, for a few reasons: You’ll get better support under normal circumstances with a premium theme. The functionality will be more robust. Free themes often have a reduced set of features in order to convince you to upgrade. Updates will be more frequent, as developers can devote their whole time to fixing bugs and enhancing the theme. You should look to pay around $50–100 for a decent premium theme, although you can find options at all price points. What’s more, there is lots of choice for your industry or niche. When it comes to narrowing down your options, consider how established the developer is, how often a theme has been updated, and other user’s reviews before stumping up the cash. Once you’ve chosen a theme, you’ll need to install it on your site. WPKube has put together the ultimate guide to getting themes up and running on your site, so check that piece out if you need the assistance. 3. Import Your Wix Content Into WordPress Here is where making

Continue reading

WooCommerce Advanced Product Labels Plugin Review/Tutorial (2021)

[ad_1] Have a WooCommerce store and wish to stand out from other merchants selling online? Try adding product labels. Product labels are a great way to showcase important details about your product, display special offers, and highlight ongoing sales in your store. And if you brighten them up with eye-catching colors and interesting graphics, they’ll look pretty dang appealing to anyone who visits your store. Today, we’re going to explore the capabilities of a plugin that makes it simple to add and manage product labels. Its name? Advanced Product Labels. WooCommerce Advanced Product Labels is a powerful WordPress plugin by BeRocket offering a range of attractive templates, label content options, advanced styling, and more. It’s designed to help you improve conversions by making products dynamic, engaging, and noticeable. It’s hard to describe the label effect with just text, so you can check out the plugin in action here and here to see what I mean. These are live examples of what Advanced Product Labels helps you create. The plugin has almost 30,000 installs and has been on the market since 4 years. In our hands-on WooCommerce Advanced Product Labels review, I’ll give you a detailed look at how this plugin works and how you can use it to add labels to your products. WooCommerce Advanced Product Labels Review: The Feature List In a nutshell, BeRocket Advanced Product Labels is a product personalization, and enhancement tool specifically built for WooCommerce and WordPress. It helps you create product labels that stand out on your site with features like: Article Continues Below 50+ ready-to-use templates, including customizable CSS templates, discount timer templates, and image templates Various content types and product conditions Label style options like font color and custom label borders Opacity & Gradient modification and shadow effect The tool also lets you choose the type of label you want to add to your products. For example, you can select the “In title” label to place the label to the right or left side of the product title. As BeRocket Advanced Product Label is a WooCommerce-specific tool, it plays nicely with the core WooCommerce installation. All you have to do is install it on your WordPress WooCommerce site, permit it to access your WooCommerce functionality via the WordPress API, and you’re good to go. Hands-On with BeRocket Advanced Product Labels Now, let’s dive in, and I’ll show you how the different features of WooCommerce Advanced Product Labels work. 1. Creating a New Label To get started, you open up your WordPress dashboard and click BeRocket → Advanced Labels. Your next step is to add a label. To do so, click the Add Label button beside the Advanced Labels heading at the top of your screen. BeRocket will now redirect you to an area where you’ll find tools to create a new custom label from scratch. First, you’ll enter a title for your label. You could write “Sale” or “Bestseller” depending on how you wish to promote your items. Then, you can choose from the 17 conditions available for your product label. At this point, you can decide if you want to mix conditions using “AND” or “OR” operators. When creating a Sale label for my product, I selected On Sale as the first condition and Page ID as the second condition. Then I used the AND operator to form a relation between the two. Next, go to Advanced Label Settings and pick a template you want to use for your label. As you do that, BeRocket will give you options to hide the label on mobile, tablet, and/or desktop. Check the box for the device you don’t want the label to appear on. You also get to select from 8 content types for the label: Article Continues Below Depending on the option you choose, the plugin will modify the text, background image, and image title of the label. Once done, click Save to create your new label. 2. Modifying a Label’s Style Not content with the existing style of your label? No problem – you can tweak it through the Style tab in Advanced Labels Settings. Let me show you how it’s done. First, I’ll create a new label, this time to showcase stock status. Then, I’ll click the Style tab and select a new background color. There’s a lot of options to play with. You can modify the font size, width, height, border radius, border width, and more for your label. Two options that stood out to me are Opacity and Shadow effects. Used correctly, these two effects can draw attention to your best deals. 3. Changing a Label’s Position Another neat option in the Advanced Product Labels tab is Position. This setting allows you to decide between keeping the label in its current position, putting it on the image, or placing it in the product title. Based on the option type of position you choose, BeRocket will let you adjust the label for the positions left, right, and center. You can also adjust the padding and margin of the label and rotate it as a part of an A/B test to see if a uniquely positioned label improves your conversions. 4. Using Tooltip BeRocket Advanced Product Labels also lets you create a tooltip. Also known as a hint or info tip, a tooltip is a graphical UI element that displays a text box containing information about an element when a user hovers over it. You can create a tooltip for any label to inform visitors about its function or convey what a particular abbreviation stands for. BeRocket allows you to enter the content you want to display and upload a custom tooltip image.  Article Continues Below The plugin also lets you decide whether you want the tooltip to appear or close after a delay, whether it should have a dark, light, or translucent style, and more. Further, you can adjust the tooltip for positions top, bottom, left, and right. Place it wherever you think your visitors are most likely to

Continue reading

Refreshing Old Twenty* WordPress Themes With Block Patterns – WordPress Tavern

[ad_1] What began as a project in August 2020 has now become a reality. All past Twenty* default WordPress themes now have their own unique block patterns. In recent weeks, Twenty Ten through Twenty Fifteen received updates. Designer Mel Choyce-Dwan kick-started tickets for all previous 10 default themes before the WordPress 5.5 release, the first version to support patterns. Twenty Twenty, Twenty Nineteen, Twenty Seventeen, and Twenty Sixteen each made the cut for that update. However, the remaining default themes were left to languish, at least for a few months and WordPress updates. Jumping back over a decade to update past themes might seem extreme, but all of the default themes are still some of the most popular from the directory. Granted, they had the benefit of being installed directly in WordPress. Still, the current number of active installations means they are worth a small refresh: Twenty Fifteen: 100,000+ Twenty Fourteen: 100,000+ Twenty Thirteen: 70,000+ Twenty Twelve: 100,000+ Twenty Eleven: 100,000+ Twenty Ten: 100,000+ Despite having the lowest installation total, Twenty Thirteen has some of the best pattern designs. The Informational Section and Decorative Gallery patterns stand out the most, but all fit well with the overall theme design. Informational Section Decorative Gallery Twenty Thirteen is also the only remaining default theme that supports wide and full alignments. Its one-column layout affords it more flexibility, and the old design feels fresh again with its new pattern choices. Perhaps they can revive the theme’s lagging numbers relative to the other defaults. The initial pattern designs for the theme included a suite of layouts for post formats, one of the features Twenty Thirteen leaned on. Something similar to the first gallery design landed, but the others were left out. Patterns designed to match post formats. Post formats never garnered widespread support past their launch, and the core development team all but abandoned them, never building atop the feature. However, all of the format-specific patterns might be welcome for those users still running the theme. They would have been a nostalgic nod to the old WordPress, a throwback to yesteryear. If nothing else, maybe they can serve as inspiration for those of us still clinging to that tiny sliver of hope that post formats will make a roaring comeback. These theme-bundled designs highlight how the upcoming pattern directory is not meant to be the only destination for snagging the best layout sections to drop into the block editor. Often, the best choices will be specific to the theme. Much of the flavor of custom design is lost when building for a general audience. What looks good with Twenty Twenty-One may look terrible in another and vice versa. Maybe that will change as block design tools become more robust and how they are used becomes standardized, but for now, at least, the most artistic patterns are those that designers include with their themes. Aside from Twenty Thirteen, Twenty Ten’s new patterns stood out the most. The theme was the first of the new era of yearly themes, and its classic blog design has weathered the years well — just ignore the 12-pixel sidebar font size. Twenty Ten’s new patterns. The three patterns are at home in the theme. The Introduction pattern, which showcases the Image, Heading, and Paragraph blocks, is simple, but it relies on Twenty Ten’s typography for an elegant article intro. The Quote and Alternating image layouts do not try to do too much, simply highlighting the theme’s design. Landing squarely in my favorite-but-most-disappointing category was Twenty Fourteen. The About pattern’s image and text looked elegant and roomy in the editor, but the front-end view painted a different picture. Because the theme lacks wide-alignment support, the photo was scrunched up. The gallery-supported Summary pattern has a lot of potential as a full-width pattern, but it falls short in the theme’s 474-pixel wide content area. About Pattern Summary Pattern There is really no reason why Twenty Fourteen could not support wide and full alignments. It has free space. At least the timeline-esque List pattern is pretty sweet in both the editor and front-end views. I may borrow that for my own projects. List pattern included with Twenty Fourteen. I was not particularly excited over the other patterns, but I am happy to see a little love thrown toward the 600,000 or so users with these themes still active. I am sure many will find something they can use on their own sites. The themes are aging; the wrinkles and weaknesses of their designs are showing. With the site editor looming ahead, it might be time to consider retiring them. That is assuming no one wants to take the reigns and update them for a modern era. Otherwise, they will continue falling behind, remaining a relic of classic WordPress. Like this: Like Loading… [ad_2] Source link

Continue reading

Google Launches Search Console Insights, a User-Friendly Content Performance Overview – WordPress Tavern

[ad_1] Google Analytics is powerful if you know exactly what kind of metrics you want to investigate, it but can be overwhelming if you just need a simple overview of your traffic and referrals. Search Console Insights is a new tool from the Google Web Creators team that is aimed at making content performance easier to understand at a glance. It combines data from Search Console and Google Analytics for a user-friendly overview of important metrics for content creators. Search Console Insights can help users quickly ascertain which pieces are their best performing content, how new pieces are performing, and how people are discovering the site. Clicking on the little academic cap icon offers more information about understanding the data and tips for improving content engagement and performance. The first section shows a site’s content performance trend for the past 28 days using page views and page view duration. The next card displays a carousel of new content with page views, average page view duration, and badges for content that has high average duration compared to other content on the site. Other cards include the most popular content within the past 28 days, top traffic channels, top Google Search queries, referring links from other websites, and social media. The performance cards are not configurable but they give you a starting point if you want to dig deeper into Google Analytics. It would be helpful if each graph was linked to more data where you could adjust the date range. Search Console Insights doesn’t include all the features unless you are using Google Analytics and associate it with your site’s Search Console property. Users can access the tool’s overview page by visiting the link directly. In the near future, Search Console Insights will be available in the iOS and Android Google apps when you tap your profile picture. The tool is now in beta but Google plans to roll the experience out gradually to all Search Console users in the coming days. Like this: Like Loading… [ad_2] Source link

Continue reading

Out Of The Darkness – HeroPress

[ad_1] When I first chatted with Topher about doing an article for HeroPress, I couldn’t quite think of how I would put the words together to describe my life, and what has gotten me to where I am now. Am I that interesting? This is exactly where imposter syndrome grabs you by the balls thinking you aren’t good enough. After chatting with him for a bit, and asking about how I should go about it, he just told me to be real and tell my story. Well, here I am. This isn’t the the typical biographical, motivational, PG bullshit. This is my life. Hold onto your ass, and enjoy the ride. Independence From Birth From birth, the odds were both stacked against me and in my favor. When you’re the child of a 15 year old mother who grew up in poverty, you don’t have many options in front of you. I’ve told people several times that it’s not about the hand you’re dealt; it’s about how you play it. You bet slowly and carefully with the little you have, and when you see that ace, you take the house. For me, that ace was a computer. Around the age of 5 or so, I remember getting a new-to-us computer and being introduced to Wolfenstein 3D. Yeah, that badass Nazi-slaying game by iD Software where you go in and out of too many doors that look the same, until you eventually get to slay Mecha-Hitler. As you probably know, floppies and DOS were a thing at that time. If you don’t know what I’m talking about, get off my lawn. Being brought up in a family that takes very much of a “if you want it, get it yourself. Nobody is going to hand you what you want” approach, I only was shown how to start it up a few times. After that, I’m on my own. At that time, I learned the two most important values in my life: to learn things on my own, and that if I want something, I have to bust my ass for it. This, of course, led to a life of tinkering. To a passion for finding out how things work. If I was curious about something, I took it apart. A perfect example of this is the time my parents discovered that I was listening to my neighbor’s cordless phone conversations using a busted toy walkie-talkie. I didn’t realize it then, but this was my first experience with truly making something work for a purpose other than what it was intended for. My mother still loves telling that story for a good laugh, but to me, it’s a defining moment. The moment when I never became happy with how things are. The moment my wife sometimes wishes never happened so that we wouldn’t have closets full of miscellaneous defunct tech and hacked solutions to problems that don’t actually exist throughout the house. “Yes, honey. We DO need to be able to access everything in the house with every device imaginable.” “No, we can’t just use the regular cable box to watch TV.” We all know there’s always some issues that come with habits like those previously mentioned. I didn’t have a whole lot of friends, and nothing was ever good enough. I didn’t realize it until much later, but this eventually led to getting into plenty of trouble. Descent Into Darkness School was hell. From elementary school to middle school, we moved quite a bit. Friends came and went, while my computer and constant craving for knowledge was always there. Around this time, I really stopped giving two shits about reality. Teachers were told to go fuck themselves, and I hated my parents. I didn’t get along with the other kids very well, and had terrible grades. Thankfully, my time spent alone led me to a single book that I still own to this day: Creating Web Pages with HTML. While looking at the examples makes me cringe every time, it reminds me of exactly where I came from. I wish I could tell you that I just spent all of my time progressing my skills to be where I am now, but unfortunately, things went grinding to a halt. My hatred for everyone got much worse, and I simply didn’t have the coping skills to deal with it. I just didn’t care about being alive anymore and seriously considered suicide several times. That was about the same time that I discovered that cutting myself made the pain go away. Both physically and mentally, I would hurt myself daily. Now that I look back on it, I suppose that I felt I should be punished for not being good enough, and the pain took away from reality. This got to the point where I had deep gashes and would keep razor blades from box cutters in my wallet to get me through the day. I absolutely craved that feeling. I needed it. I later just shut down completely. I was an absolute fucking mess. I didn’t eat. I didn’t sleep. I only cared about my addiction to watching myself bleed. Even my best friend, Pete, stopped talking to me. This got to a point that I was kicked out to be on my own. As a teenager, with just the clothes on my back and the car that I saved up to buy, I headed out at around 6am to the Wal-Mart parking lot where I had to figure out my next move. Without a cell phone, and most pay phones being phased out in favor of fancy flip phones, I didn’t have any communication with anyone. Not even my girlfriend at the time, Robin was in contact. As I happened to know that she was working at Circuit City that day (where I also worked part time), I headed her way that morning. Her incredible generosity kept me fed, clothed, and a hotel room for a few days, and eventually

Continue reading

Getting To Know the Upcoming WordPress 5.8 Template Editor – WordPress Tavern

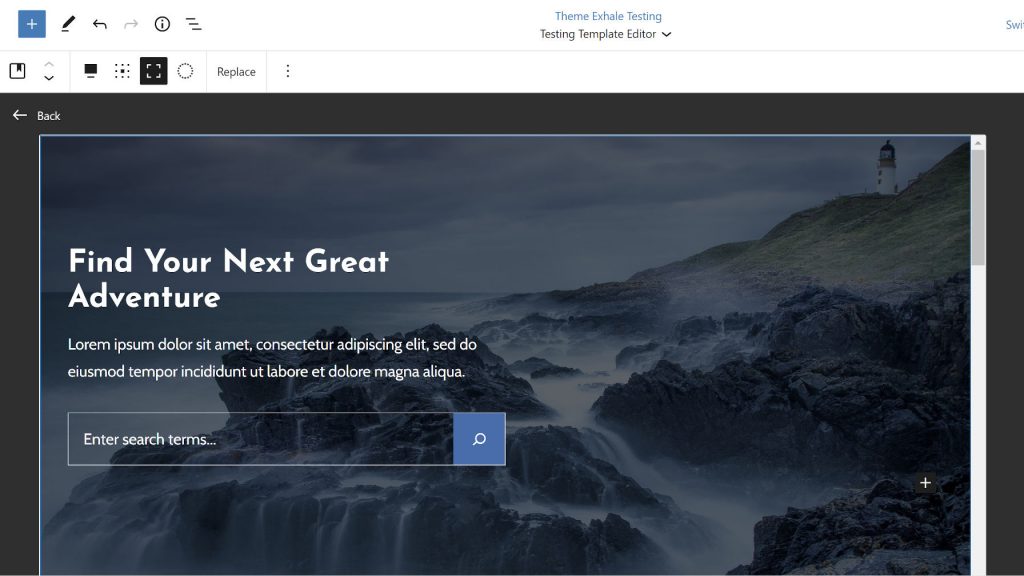
[ad_1] WordPress 5.8 is slated for release on July 20. In just over a month, many users will get their first taste of one of my favorite new features: template-editing mode. The template editor is a new tool that allows end-users to create custom templates without ever leaving the post-editing screen. It exists as a stepping stone toward the eventual site editor, a feature that will hand over complete design control to those who want it. The downside to the new feature in WordPress 5.8 is that users will not have access to their theme’s header, footer, sidebar, or other template parts. It is a blank slate in which they must put on their design caps to create the entire page. With these limitations in place, what is the point of the template editor launching with WordPress 5.8? Landing pages. A blank slate is not always a bad thing. There is a reason all the best themes include page templates named Blank, Empty, Canvas, Open, or something similar. Sometimes users want control over the entirety of the page’s output. And WordPress 5.8 is bringing that capability to every WordPress user. I have been editing templates for months now, but always in the context of a block theme. I have built both a photography portfolio and WordCamp landing page as part of the FSE Outreach Program. Despite some hiccups, it has been a worthwhile journey being involved as the feature has come to fruition. However, most of my testing was on top of the TT1 Blocks theme. It was time to put it to a real-world test with themes that are actually in wide use. Will It Work With My Theme? The question many users will have on their minds will be: will this new template editor work with my theme? The answer is that it depends. Generally, yes, it will work to some degree. However, because older designs were not created with the template editor in mind, not all experiences will be the same. I wanted to really put this theory of working with every theme to the test. So, I loaded up Twenty Fifteen, one of my favorite default themes from the past decade. Perhaps I jumped too far back. Twenty Fifteen has a two-color background meant for sidebar and content. The block editor did not exist back when Twenty Fifteen was built. Its use of a box-shadow technique on the page background meant the entire page had two colored columns running down it. The design team had to use some hacky methods for equal-height sidebar and content backgrounds. Ahhh…the good old days before developers had access to CSS flex-box and grid. It is these sorts of problems that could limit some older themes. In the case of Twenty Fifteen, I could hide the background with a Group or Cover block over the top of it. Users will likely get better results when using something more modern, at least a theme built during the block era. Even something as simple as wide-alignment support will change the WYSIWYG nature of the template editor. If a theme does not support the feature, the front end will not match the editor. I jumped ahead a few years. Twenty Nineteen was the first default WordPress theme to support blocks. It is old but not ancient in internet years. Editor vs. front end of Twenty Nineteen. There are some differences between the editor and front-end views. The Cover block padding is off, the vertical spacing does not match, the search input’s font size is different, and the search button’s border radius is round on the front end. However, it is nearly a three-year-old theme now. It held up better than expected in this simple test. Jumping ahead a couple of years, I activated Twenty Twenty-One, WordPress’s most recent default theme. Editor vs. front end of Twenty Twenty-One. The editor is a pretty close approximation of what you see on the front end. The most noticeable differences are the inconsistent padding for the Cover block and the light gray border for the search input field in the editor view. It was time to put the template editor to the “real” test. I activated the latest version of Eksell, one of the most well-rounded block themes in existence. Editor vs. front end of Eksell. Obviously, the theme outputs a black section on the left. That is intended for the theme’s sidebar/menu flyout. However, because the user has no access to the template part that outputs that element, it may be impossible for some to create custom templates with this theme. I am sure that Anders Norén, the developer, will address this problem. Similar, unknown issues will arise with the many thousands of themes in the wild. It does not mean a theme is necessarily bad. It just means it was not built with the template editor in mind. Users may need to throttle back their hopes a bit until they have thoroughly tested template-editing mode with their active theme. Oh, and that ugly whitespace that shows the content background at the top of the editor? You will see that with literally every theme. I am clueless as to why the development team thought that it would make for a good default. Nearly every web design I have looked at over the years zeroes out the page’s <body> element padding. For those theme authors who are reading, you will need to deal with this. If you have already been building for the block editor, you are likely a pro at handling such quirks. If we look at a custom theme I have been building, you can see no alignment issues between the editor and front end. Editor vs. front end of custom block theme. The difference for my theme is that I am building when the template editor is already a part of the Gutenberg plugin. The others were all created earlier. It is not fair to compare them. However, users should know that older themes

Continue reading

MapLibre Project Gains Momentum with MapLibre GL Native Release – WordPress Tavern

[ad_1] The MapLibre project is picking up speed with the release of MapLibre GL Native, an open source mobile SDK for Android and iOS. As anticipated, MapTiler’s fork of Mapbox’s mobile map SDKs are coming under the MapLibre umbrella. This free library enables developers to write native applications that can display vector maps on mobile devices, with advanced functionality like custom map styles and integrating specific business data. The project was formed by Mapbox’s open source contributor community after the company announced that Mapbox GL JS version 2.0 would be released under a proprietary license. MapLibre GL founders include a diverse group of companies who are contributing to this healthy, community-led fork, including MapTiler, Elastic, StadiaMaps, Microsoft, Ceres Imaging, WhereGroup, Jawg, Stamen Design, and more. MapLibre GL Native is developed and maintained as an independent mobile SDK, led by the MapTiler team in cooperation with Amazon, Facebook, Microsoft, and the MapLibre community. MapTiler forked Mapbox’s last version released under the OSS license in December 2020, and ensured that developers can migrate their apps with just a few lines of code. The release post identifies a few critical changes in the MapLibre SDK: Tracking of end-users (telemetry) has been removed OSS license: community ownership ensures it stays open-source forever Updated distribution model: the library is now distributed via the Maven Central repository for Android and as a Swift package for iOS Optional usage of authorization: access token requirement depended on the map provider and its policy WordPress core doesn’t include a Map block but WordPress.com and Jetpack both use Mapbox GL JS 1.13.0. This is the last open source version before Mapbox updated to its proprietary license. I created a ticket to put it on the Jetpack team’s radar, and it looks like they may consider migrating to MapLibre in a future release. Plugin authors using Mapbox will also be at a crossroads when it comes time to update beyond version 1.13.0. MapLibre is the strongest alternative to Mapbox’s proprietary 2.x update. Migration instructions are available in the MapLibre GL readme file. Like this: Like Loading… [ad_2] Source link

Continue reading

Resources, Week of 13 June 2021

[ad_1] As I’ve shared in the last few articles for this category, I started sharing stuff on Twitter pretty regularly. But I don’t that much more either. So, given that I’ve started keeping a list of things in Apple Notes that I find useful, I thought I might as well return to form and share them here. They will probably have a much longer shelf-life and maybe reach more people between subscribers and tweeting out a link to the post. Week of 13 June 2021 Resources For this week: Writing Programming Programming the Real World. “Consume backend APIs as simpler programmable building blocks for faster development of products, apps and services.” Introduction to Domain-Driven Design. Though I don’t do this as much as I did earlier in my career, I’m a fan of it and had the opportunity to take a week long course with the author of the paradigm. It’s something I think programmers should at least familiarize themselves with as it truly changes the way you think about solving business problems. Utilities Notes macOS 12.0 -where oh where is PHP. Most developers likely knew this was coming, but it’s official with the next release of macOS. Maybe opt to install with with brew after the update. 🙂 Here’s to two weeks in a row of getting material out for us (not that there’s a hard and fast rule but, y’know, it’s nice to But as long as I’m around, I’ll keep this series going. So until next week-ish. 👋🏻 [ad_2] Source link

Continue reading

WordPress 5.8 Beta 2 Ready For Testing

[ad_1] WPLift is supported by its audience. When you purchase through links on our site, we may earn an affiliate commission. WPLift / WordPress News / 2021 / Weekly WordPress News: WordPress 5.8 Beta 2 Ready For Testing Last Updated on June 18th, 2021 Published on June 18th, 2021 Tags: Automattic, WordPress 5.8 [ad_2] Source link

Continue reading
1 2 3 4 5 11