WP Engine Makes Local Pro Free for All Users – WP Tavern

[ad_1] WP Engine announced today that Local Pro, the commercial upgrade for its local WordPress development product, is now free for all users. Beginning with version 6.0, all features that formerly required a paid subscription are now available with a free Local account. These include Live Links Pro, Instant Reload, Link Checker, and MagicSync. “We believe Local Pro features benefit a broader WordPress developer community and we want to deliver the full value of Local to more developers than ever,” WP Engine Senior Vice President Seth Halpern said. “We want to empower the freedom to create on WordPress by making all Local features available for free.” WP Engine’s recently published research estimates the WordPress economy at $596.7B. The company may be in a better position to gain customers for its hosting products if they make Local completely free, as the tool was designed to seamlessly connect with WP Engine and Flywheel’s hosting. It is currently used by more than 300,000 developers. Over the years Local has gained popularity due to how easy it makes setting up WordPress development and testing environments. Version 6.0 also introduces Local’s new Cloud Backups add-on, which will allow users to backup to Google Drive or Dropbox. Cloud backups can be restored from the Tools tab. The 6.0 release post details a few features that have been moved to new locations in the interface: MagicSync is now a global preference, and the default push/pull experience can be toggled in the Preferences menu.  Live Links Pro, now Live Links, will be accessible for all users by connecting your Local account. Link Checker and Instant Reload have been moved to the Local Add-ons Library.  Xdebug Add-ons have moved from the Utilities tab into the Tools tab within Local. Existing Local Pro subscribers will have access to priority support until September 1, 2021. After that time, dedicated ticket support will be discontinued in favor of directing users to the community forums and help docs. WP Engine is offering customers full or prorated refunds, which will be sent out before July 31, 2021. Like this: Like Loading… [ad_2] Source link

Continue reading

Add Editor-Only Notes via the Markdown Comment Block WordPress Plugin – WP Tavern

[ad_1] Rich Tabor, the Senior Product Manager of WordPress Experience at GoDaddy, tweeted that he had an idea for a new block at the end of last week. Shortly after, the Markdown Comment Block plugin appeared on WordPress.org. The plugin is a one-off block. It allows users to enter notes directly into the post editor that will not appear on the front end of the site. Tabor said he came up with the idea when working on an article for building single-block plugins. There are few things I love more than simple plugins with a tight focus, performing a single function. Markdown Comment Block lands in this category. The plugin creates a new block that works nearly the same as a typical Paragraph block: Adding inline comments to a post. Users can change the text color, but they will not have access to the typical Rich Text controls. Those should be unnecessary anyway. As someone who does long-form writing almost exclusively in Markdown, the block’s use of the double percent-sign syntax for comments intrigued me. Technically, the Markdown spec does not support any sort of special characters for them. It handles HTML comments. However, those appear in the source code on the front end when the document is rendered. I have only seen the %% mark to denote comments in the Inspire Writer app for Windows. Tabor said he had seen the same in Ulysses. The feature also exists in the Iceberg editor for WordPress, which Tabor created alongside Jeffrey Carandang. The plugin also introduces the %% keyboard shortcut. Typing it directly in the editor will create a new Markdown Comment block. My primary use case for the plugin would be leaving notes for my later self. However, it could also be handy in users’ publishing flows. The block adds a “Resolve” button to the toolbar. Clicking it deletes the comment. Clicking the “Resolve” button will delete the block. The block itself will not likely offer a robust enough feature set for complex workflows. However, pairing it with a plugin like Post Descriptions could round out the experience for larger teams of writers and copyeditors. The Post Descriptions plugin allows users to add notes on the post level. These notes appear on the post-management screen, letting other team members know when to check an article. However, it may be hard to provide the full context of what issues need to be resolved before publishing. Markdown Comment Block adds an inline comments system, letting team members pass in-text notes. Theme developers should appreciate that the block uses CSS custom properties too, which makes it easy to overwrite its default style rules. In moments, I was able to make it match my theme: Custom color, font, and line-height styles. The –markdown-comment-font-size, –markdown-comment-line-height, and –markdown-comment-color variables are available for theme developers who want to add in support. The one complaint I had about the block is its title: “Comment.” It is easy to confuse it with the six other comment-related blocks already in the WordPress block list. And, there will only be more in upcoming versions. Giving it a title of “Markdown Comment” would better distinguish it from others. Like this: Like Loading… [ad_2] Source link

Continue reading

What is a WordPress Slug? An In-Depth Guide to Setting and Editing a WordPress Slug

[ad_1] It’s surprising how even a small aspect of your site has an impact. The way you set your URLs can make or break your site in some areas. For example, consider the WordPress ‘slug’ you use for each post and page on your website. It may seem unimportant, but the slug of your URL opens the door to better Search Engine Optimization (SEO). It also gives users a human-readable way of getting the context of your site. As such, this post will focus on the topic of WordPress slugs. We’ll also show you how to optimize them, to exract the maximum value. What a WordPress Slug Is In short, a WordPress slug is the portion of your URL that comes after the main domain name. For example, consider our recent Kadence theme review post: It’s a piece of identification for your post or page, and it gets its name due to its size. Though, your home page won’t ever have a slug, as that’s identified by your primary domain name. In some cases, a post or page may have multiple slugs. Consider taxonomies such as category and tag archives, and author pages: The lines get blurred here and there, because some aspects of a URL may or may not be related to the slug. On the whole, you have full control over every slug for your WordPress website. What’s more, you should exercise that control, because slugs have an important role to play. Let’s discuss this next. Why a WordPress Slug Is Important It may seem a minor concern, but a WordPress slug can help you in a few major ways: You’re able to give your post or page an SEO boost (more of which later). It offers a human-readable element that helps visitors decide if they want to click through to a post or page. You can offer a concise version of a longer post title. Again, this impact readability and context. Given the above, it’s a good idea to work on your WordPress slugs at the point of creating a post or page. We’ll have more to say on this throughout the article. For now, let’s focus on the SEO benefits you’ll get from slugs. How a WordPress Slug Can Impact Your Search Engine Optimization (SEO) The main positive to working with WordPress slugs is how they can improve your SEO. Of course, the better your SEO, the greater the traffic you receive. As such, you’ll get a few benefits from optimizing your WordPress slugs: Search engine crawlers will be able to parse your content quicker. This is because a slug is clear and defined. You’ll be able to rank for the right keywords with a higher success rate. Again, the clarity of a slug means it’s as keyword-rich as possible (if you optimize it well). As we noted earlier, a well-optimized slug can help visitors ascertain what your post is about. The traffic and click-throughs that result means better metrics for your site. This will have a knock-on effect to your SEO. In a nutshell, getting your WordPress slug in an optimal condition is going to help you win the SEO battle on multiple fronts. Let’s take some time to discuss the best way to do this before showing you how to edit slugs. How to Optimize a WordPress Slug Setting a slug is not a case of letting WordPress handle the process and sitting back. While WordPress does generate a slug for you once you create a new page, it’s not going to be optimal. The good news is there are a few solid practices to consider, and they’re easy to implement: Keep the slug short. A WordPress slug should be around three to five words in length. Use your focus keyword. It seems obvious, but your slug should contain your post’s focus keyword or phrase. Only use lowercase letters. Much like filenames, keep a slug lowercase, and use hyphens to separate words rather than other punctuation. Add focus where necessary. If you’re using the focus keyword for the post or page, you’ll have natural focus in your slug. Even so, look to remove all superfluous words from your slug, so that the focus of the content is clear. Use ‘function words’ if required. Words such as “a” and “the” aren’t required in your slug, unless they help add clarity and focus. Keep the slug evergreen. In other words, don’t add time-specific elements such as the year to a slug. This helps you update a post later without changing the URL of the post. This may seem a lot, but each elements gets you close to the ultimate optimal WordPress slug. Regardless, this knowledge isn’t useful if you don’t know how to edit slugs. Let’s discuss this next. How to Edit WordPress Slugs Before we get onto specific editing steps, it’s worth seeing how WordPress helps you to generate slugs in the first place. To do this, head to the Settings > Permalinks page within your WordPress dashboard: Setting your permalink structure is one of the first tasks you should tackle when starting a site. This is because getting your URL and slug structures right from the start is better for you and your SEO. There are lots of ‘tags’ available to help you set a suitable structure, but %postname% is your slug for all intents and purposes. In previous versions of WordPress, you would have to make a change before you did anything else on your site. Though, the development team realized that the Post name permalink structure is ideal. As such, it’s now the default setting for your permalinks. When it comes to individual slugs though, there’s a different approach. As we noted, WordPress generates slugs for every post page, taxonomy, and author you create. This isn’t going to be optimal in most cases, so we have work to do. Let’s start with your posts and pages. Editing Slugs for Posts and Pages There are a few places to edit WordPress slugs

Continue reading

BuddyPress 9.0 Scheduled for Short Development Cycle to Ship Block-Based Widgets Ahead of WordPress 5.8 – WP Tavern

[ad_1] BuddyPress 8.0 was just released earlier this month on June 6, but the core development team is gearing up for a short development cycle for 9.0. The release will be specifically targeted at getting BuddyPress core widgets ready for WordPress 5.8’s new block widgets experience. Contributors are aiming to hit the following timeline to ship 9.0 before the next major WordPress release: Beta: July 8. RC: July 12. Final: July 16 BuddyPress entered the world of blocks with the release of version 6.0 in May 2020, allowing users to insert a specific Member or Group into content. Version 7.0, released six months later, introduced blocks for featuring a list of members, a list of groups, and the ability to embed a public activity post. Over the next few weeks, BuddyPress contributors will continue the process of migrating the rest of the BuddyPress component widgets to blocks. These include the following: Blogs Recent Posts Widget: A list of recently published posts from across the network BP Core Login Widget: Shows a Log In form to logged-out visitors, and a Log Out link to those who are logged in BP Core Friends Widget: A dynamic list of recently active, popular, and newest Friends of the displayed member. Widget is only shown when viewing a member profile BP Groups Widget: A dynamic list of recently active, popular, newest, or alphabetical groups BP Core Members Widget: A dynamic list of recently active, popular, and newest members BP Core Recently Active Widget: Profile photos of recently active members BP Core Who’s Online Widget: Profile photos of online users BP Messages Sitewide Notices Widget: Display Sitewide Notices posted by the site administrator BP Nouveau widgets: BP Latest Activities: Display the latest updates of your community having the types of your choice BP Nouveau Navigation Widget: Displays BuddyPress primary nav in the sidebar of the site. (Must be used as the first widget of the sidebar and only once.) In addition to building a block for every BuddyPress widget, contributors are aiming to make it possible to transform existing BP widgets into their corresponding BP block. With the new block widgets screen imminently landing in WordPress, BuddyPress has to make this move forward to keep pace with the progress of the block editor’s march beyond use in the content editor. Otherwise, BuddyPress users would need to disable block widgets with the Classic Widgets plugin in order to maintain access to BuddyPress core widgets. Contributors are also working on creating a new Follow component, a frequently requested feature which would use the now abandoned BuddyPress Follow plugin as inspiration. The feature will work similar to Twitter following or the Facebook follow button that allows users to see public activity posts for those they are following. The Follow component is being built as a plugin first and will ship with 9.0 if it is ready in time. Like this: Like Loading… [ad_2] Source link

Continue reading

Diving Into WordPress 5.8’s New Widgets Screen – WP Tavern

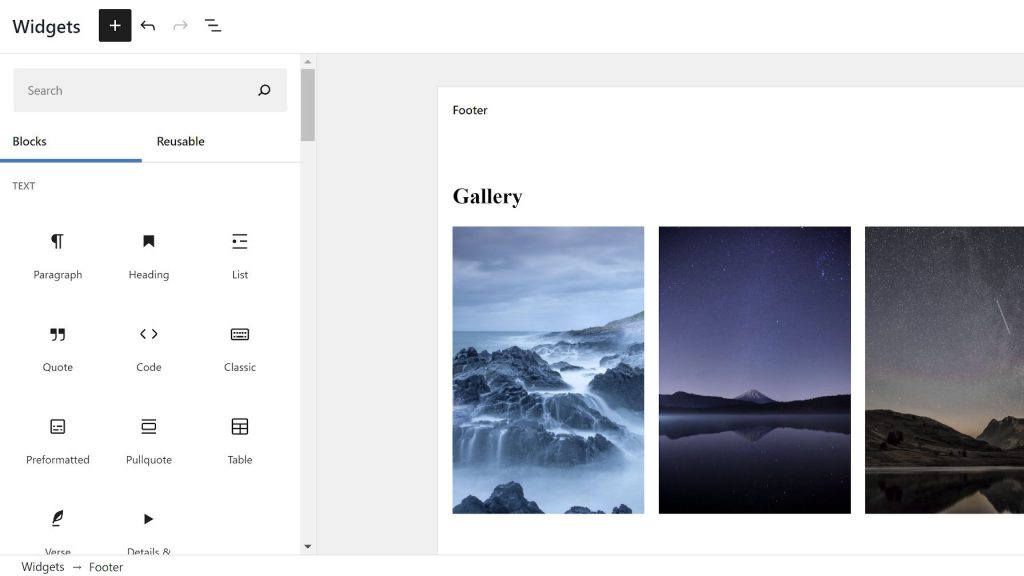
[ad_1] It has been a while since I have touched widgets. Once the site editor landed in the Gutenberg plugin, I almost exclusively dropped the old sidebar paradigm and moved to block templates. Reactivating old themes and jumping into the widgets screen felt like time-traveling into a bygone era. After months of being deeply embedded within block themes, it is hard to imagine moving back to the sidebar widgets system that most WordPress users are still using today. WordPress 5.8 is slated to ship with a small taste of bringing blocks outside of the content editor. However, it can feel like a surface-level refresh of a dying system, one that does not always work. Block-based widgets are part of the transitional phase between classic WordPress and the future, which centers on a complete site editor. Once the bulk of themes are built atop blocks, the need for widgets will wane. The site editor and block themes do not support the old sidebar system. Instead, users will be able to place blocks anywhere. Last October, I asked the question: Are Block-Based Widgets Ready To Land in WordPress 5.6? At the time, the widgets screen was expected to launch with the final release of 2020. However, the development team pulled back on the feature’s inclusion, primarily because the customizer implementation was sub-par. Asking the same question of WordPress 5.8, my answer is mostly the same. It is time to ship the current feature and prepare for a future without widgets. There are so many components that are far more exciting around the corner. The primary user-experience issues will linger around until users have moved on to block themes. I have long been in the camp of starting from a clean slate for block themes, letting widgets die out. However, the path WordPress has chosen is to create this stepping stone for users who may be on traditional themes for a while. It provides an opportunity to use blocks outside of the editor, which may be a leap forward for many. With the vast number of libraries, one-off blocks, and support from plugin authors, users have a wealth of block choices at their fingertips. Right now, if there is no equivalent widget, those users can only ever use those blocks in their content. Within a block-widget system, that limitation does not exist. It also lifts some burdens from developers. Those who want to shed some of their old code and go all-in on blocks can begin considering deprecating or retiring widgets. Transitioning to the new Widgets screen should feel simple to users familiar with the WordPress content editor. Inserting blocks is the same. The difference is that each sidebar has its own container. Widgets screen with a Gallery block in the Footer sidebar. The range of blocks within core WordPress could also let users drop some of their widgets-based plugins. One of the most popular types of widgets over the years has been for handling post lists. There are dozens of such plugins and an untold number of themes that include one. Coupled with WordPress 5.8’s Query Loop block, users can now recreate many of those widgets themselves. Custom post list using the Query Loop block. Much of this depends on the theme’s design support of blocks and whether it will accommodate anything other than traditional widgets. Customizer support for block widgets is lightyears ahead of where it was just a few short months ago. However, it feels awkward at best. There is a deep feeling of not belonging. While it was a remarkable programming feat to make the two features work together, the user experiences are nearly a decade apart. Editing a Heading block in the customizer. Despite the customizer providing a live preview, the Widgets screen in the WordPress admin gives the necessary workspace. Trying to squeeze the block editor into the tiny customize controls panel was never going to be an ideal experience, and it still is not. It gets the job done, but I recommend the traditional widgets screen for fewer headaches. Problems Remain In the eight months since I first dived into the block-based widgets, the system has been overhauled. However, the potential issues I brought up remain. Just dropping blocks into a sidebar can have mixed results. For example, compare a Legacy Widget to Heading and Latest Comments blocks in the footer sidebar of the popular OceanWP theme: Mismatched headings and colors. The issue is that WordPress treats every block as a widget. Traditionally, widgets have had both a title and content. Blocks have no such concept. A Heading followed by something like a Paragraph, Latest Comments, or another block has no special meaning in the block system. They are all treated separately. This issue is in full view when adding blocks to the default Twenty Twenty-One WordPress theme: Block treated as widget in Twenty Twenty-One footer sidebar. Notice the Heading and Latest Comments blocks are columnized because they are seen as separate widgets. To address this, users must add multiple blocks into a Group block if they want them treated as a single “widget.” It is a simple matter, but it could still be a usability hurdle for some. Even with a fix in place, there is no guarantee that blocks will appear as the widgets the theme author intended. I long ago gave up on the hope that there would be better handling for block widgets. The Classic Widgets plugin is available for those who need it, and theme authors can opt-out. These are necessary tools for an experience that can range from downright awesome to utterly broken. Bringing blocks outside of the content editor for traditional theme users is probably necessary for the transition, but the current site editor experience already feels much smoother than block widgets. The long-term focus should be on moving away from the dated concept of widgets and into a WordPress front-end 100% built on blocks. Like this: Like Loading… [ad_2] Source link

Continue reading

Is It the Best WordPress Membership Plugin?

[ad_1] Considering using MemberMouse to create your own WordPress membership website? MemberMouse is a popular option known for its advanced features, but it has some very real pros and cons, so it’s not the right solution for everyone. In our hands-on MemberMouse review, we’ll help you understand MemberMouse’s advantages and limitations so that you can decide if it’s the right plugin for your needs. There’s a lot to cover, so let’s dig in! MemberMouse Review: A Quick Look at The Features To kick off our MemberMouse review, I want to quickly run over the various features that MemberMouse gives you access to. I won’t spend too long here because you can find all this on the MemberMouse website (and I’ll go hands-on with these features in the next section). But I think it’s useful to start here so that you know what MemberMouse does. To manage members, you can create unlimited free or paid membership levels or bundles (add-on levels). You’ll be able to easily manage your members and automatically assign members to certain WordPress roles as needed.  Members can also manage their own memberships from the front-end, including support for prorated upgrades/downgrades. To restrict content, you get all the flexible options you’d expect from a membership plugin. You can: Restrict individual pieces of content (or parts of content) or bulk restrict content (like restricting all the posts in a certain category). Drip and schedule content to make it available at different times. To monetize your site, you can: Sell one-off or recurring memberships that give people varying levels of access. Sell products, such as an eBook. Use coupons and other discounting strategies. Offer payment plans for high-ticket items/memberships. Use one-click upsells (or downsells) to create smart funnels. Other useful features include: Custom notification emails (send to admins or users). SmartTags (shortcodes) to display dynamic content. Auto-lock shared accounts to prevent sharing. Finally, you also get a very detailed reporting and analytics area that helps you track engagement, churn rate, lifetime value, your most effective products/channels/payment gateways, and more. That’s just a brief look at the features – keep reading the full hands-on section of our MemberMouse review to see it in action. Hands-On With MemberMouse Now, let’s go hands-on with MemberMouse and I’ll show you what it’s like to use, as well as my thoughts on the features. For reference, I’m using the MemberMouse Advanced plan on my test site. Basic Setup Once you activate the MemberMouse plugin, you’ll get two new menu areas in your WordPress dashboard: MemberMouse – this is where you manage most settings, including your members. Reporting Suite – with the Advanced plan or up, this is where you can view detailed reports on your membership site. MemberMouse will also automatically create all the core pages that it needs. For example, it will create pages where people can purchase memberships, manage their accounts, reset their passwords, etc. There’s no setup wizard beyond that, which I think would be useful for helping people to get up and running. But you do get a bunch of training videos if you go to the main MemberMouse area: Creating Membership Levels To create a membership level, you go to MemberMouse → Product Settings. MemberMouse calls everything a “product”, whether you’re selling one-off or recurring membership access or an actual product (like an eBook). When you create a new product, you’ll get a popup where you can: Enter the price. Add a free or paid trial period. Set up a recurring subscription on a custom schedule. Require shipping (for physical products). You can also set up commission details if you’re offering an affiliate program (more on that later). Once you create your product, you can go to the Membership Levels tab to link it to a membership level. This opens another popup where you can: Assign members of this level a certain user role. Make it free or paid. If paid, you can associate it with the product that you created. Add expiration details. Customize the welcome email. Assign it to bundles. Choose entire WordPress categories to automatically protect for this level. You’ll get a similar interface when creating a bundle. A bundle acts like an “add-on”. Each member can only have one membership level at a time, but they can add unlimited bundles to their account. You can learn more about bundles here and the bundle creating interface looks a lot like adding a membership level, except that you can assign people who purchase a bundle to one of your existing membership levels: Restricting Content You already saw one option for restricting content in the previous section of our MemberMouse review- you can restrict access to entire categories when you create a membership level (or bundle). For more control, you’ll also get a MemberMouse Options area when editing an individual piece of content that lets you grant access to just that content based on a user’s membership level or bundle. This also lets you set up content dripping by only granting access on a certain day: To easily see your content dripping schedule, you can go to Product Settings → Drip Content Schedule: You can also partially restrict content using a shortcode. This is called a SmartTag – more on them later. Setting Up Payments and Checkouts MemberMouse supports the following payment gateways: Stripe Braintree Authorize.net PayPal ClickBank Coinbase You can set these up from MemberMouse → Payment Settings: If you go to the Checkout Settings area, you can also customize the checkout process, including adding your own custom fields to collect additional information from your customers: Setting Up Emails and Notifications One neat feature in MemberMouse is the ability to set up your own custom emails that are triggered by certain actions. You can do this by going to Developer Tools → Push Notifications and you can send these to yourself (for admin) or to your users). You can see the long list of event triggers in the screenshot below: Creating Coupons MemberMouse includes a built-in coupon

Continue reading

Major Revamp Coming to GitHub Issues – WP Tavern

[ad_1] This week GitHub unveiled new features that will be included in a total revamp of GitHub Issues, including project tables that are similar to spreadsheets, custom fields, a keyboard driven command palette, improved task lists, and issue forms. The new project table view is an alternative to project boards, allowing users to filter, sort, and group issues and pull requests. Project managers can customize the table with custom fields and saved views. GitHub is also making it easier to manage issues that include subtasks. Users can now add lists and the issue will automatically track the status with a progress indicator. Issues forms are now in beta for public repositories. Many open source projects currently use Markdown issue templates and encourage contributors to provide more details by removing the placeholder text and replacing it with their own. Maintainers can now set up YAML configured forms with required fields and instructions to better guide the process. The revamped Issues feature is being updated to provide a bridge between the planning tools and the problems the tools were created to solve. Mario Rodriguez, Head of Product for GitHub Enterprise, explained why they are evolving GitHub Issues in the beta announcement: As teams and projects grow, the way you work evolves. Tools that hard-code a specific methodology are too rigid and complex to flex to whatever the moment demands. Often, we find ourselves creating a spreadsheet or pulling out a notepad, just to have the freedom to think. But then our planning is disconnected from where the work happens and quickly goes stale. The WordPress project hasn’t yet moved away from Trac but most of Gutenberg development happens on GitHub. It’s also the most popular repository hosting site for WordPress theme and plugin authors. Contributors to these projects may soon see some of these features in action for personal accounts and organizations that opt into the beta. The new GitHub Issues is expected to be out of beta later this year. GitHub plans to bundle it for free, along with the new project planning capabilities, with its Free, Pro, Team, and Enterprise plans. Like this: Like Loading… [ad_2] Source link

Continue reading

A Developer-Centric Call for Testing Theme JSON Configuration – WP Tavern

[ad_1] Round #8 of the Full Site Editing (FSE) Outreach Program began yesterday. Instead of the user-centric call for testing features from the UI, program lead Anne McCarthy asks that volunteers dive into code. The new adventure is all about testing theme.json files. The twist is likely to limit the pool of usual volunteers. However, it could open it up to an audience that may have been sitting on the sideline for the previous tests: theme developers. Before jumping headfirst theme JSON files, we should probably all get on the same page. I have been calling theme.json the tipping point between the old WordPress and the new WordPress. When version 5.0 of the core platform launched in late 2018, it was a revolutionary step forward, but not on the surface. A new editor is just a new editor. Some will love it; others will hate it. And, it was more often clunky than not. For the most part, WordPress was still WordPress. The core software was due for an upending. Newer technologies were not only democratizing publishing in their own ways, but they were also bringing that same concept to design. The introduction of blocks was merely foundational. The new editor was an imperfect tool, often feeling like the proverbial round peg being shoved into a square hole. The only way to live out the early vision of the Gutenberg project was to continue bridging the gap between what the user sees in the admin and what gets output on the front end. That is what the theme.json file is all about. It is a translator that allows users, themes, and WordPress to all speak the same language. What does this mean exactly? From a user’s viewpoint, they see all sorts of controls for changing their blocks. Color, font size, alignment, and other options are tools that allow them to customize their content. Customizing a profile card for my cat using block options. There are severe limitations with what is possible in the current system. Theme authors can register a handful of options. Outside of that, the theme and block systems can feel like they are pitted against each other for control. That is where the theme.json file comes in. It allows themes and WordPress to get on the same page, creating a standardized system that improves the user experience. This file that lives a theme’s root folder hands over the power to configure dozens of presets (e.g., color and font options), custom CSS properties, and default styles for blocks and HTML elements. It also gives themers the power to enable or disable specific features. For example, developers can turn off the ability for users to set a custom font size but provide access to their perfect scale of choices that fit into the design’s vertical rhythm. However, it will move beyond the simple configuration of blocks in the content editor. When the global styles system launches alongside the site editor in the future, users will customize many of the presets and overwrite the default block styles. Because everyone is speaking that same language, fewer conflicts arise. As designer Tammie Lister pointed out in her piece for Ephermeral Themes, Theme.json inspires, themes have been stuck. The software, the community, has put too much responsibility on the shoulders of themers over the years. They have had to innovate and build the systems that should have been coming from WordPress. Not only did the core platform need to be turned on its head, but the design system deserved an overhaul. “I am very aware that saying ‘first major theme process to core’ in years is quite a statement,” wrote Lister. “Theme.json to me is that though. I don’t say this ignoring iterations and improvements, WordPress is a project flowing with the energy of those. However, themes were on life support stuck in a land when the rest of front end development was moving on. It wasn’t for some trying to change that, mostly when they did the time wasn’t right and as it didn’t come from core it was always a harder change.” It is time for a new front-end design era. But, first, we must test. Testing Theme JSON Real-world theme.json file. The more I journeyed into this call for testing, the more I realized it did not feel right for me. Over the past couple of months, I have already been in the thick of working from the theme.json file. I know most of the little quirks and see the gaps. The tricks for working with it feel second nature to me. I have performed all of the beginner and intermediate steps dozens upon dozens of times. I have already filed tickets for any issues I have run into. Or, someone else has already beat me to the punch. Those stages of this testing round need fresh eyes. The best feedback will be from theme authors who will be viewing the problems through a different pair of lenses. If you are in this group, there is no time like the present to test and provide feedback. The advanced stage calls for recreating a classic theme using theme.json. It is best to stick with something simple. Otherwise, you could be looking at a weeks-long experiment. McCarthy recommends Twenty Twenty or Storefront. I have already been performing this song and dance too. My test project was an old theme that I gutted and turned into a block theme. There is one overarching issue that I keep coming back to. It is that theme authors must work from a JSON file at all. I understand the “why” behind using JSON. It is a universal format that we can pass around from JavaScript to PHP. Third-party APIs can understand it. However, I am currently sitting on top of 900+ lines of code in my theme.json. I have heard from a couple of other theme authors who have been doing deep work with similar numbers. I expect it to only grow. “Number of lines”

Continue reading

Resources, Week of 20 June 2021

[ad_1] As I’ve shared in the last few articles for this category, I started sharing stuff on Twitter pretty regularly. But I don’t that much more either. So, given that I’ve started keeping a list of things in Apple Notes that I find useful, I thought I might as well return to form and share them here. They will probably have a much longer shelf-life and maybe reach more people between subscribers and tweeting out a link to the post. Week of 20 June 2021 Resources I don’t have as much as I’ve had this week but nonetheless, consistency is key, I guess. Server Security Architecture HTML Until next week. 👋🏻 [ad_2] Source link

Continue reading

WordPress 5.8 Beta 3 Released

[ad_1] Hey, WordPress fans. We are checking in with your latest dose of weekly WordPress news. This week, the WordPress 5.8 Beta 3 is out and ready for testing. 38 bugs have been fixed since the second beta release. Consider setting up a test site to play with the new features. Beyond that, Automattic has launched a new mobile app for Jetpack, available on iOS and Android. We also have some awesome tutorials and roundups for you as usual. Let’s get to all of this week’s WordPress news… WORDPRESS NEWS AND ARTICLES TUTORIALS AND HOW-TOS RESOURCES [ad_2] Source link

Continue reading
1 2 3 11